Wednesday, October 7, 2020

New Quizizz Lesson Feature

Anyone who knows me knows how much I love Quizizz. It's my favorite way to do informal formative assessment. I love using it as part of the Fast and Curious EduProtocol. I use it weekly to build vocabulary. Not too long ago, Quizizz unveiled a new, beta feature that allows you to teach an interactive lesson. The lesson feature is similar to what you can do with Pear Deck. 

You may be thinking, why not just use Pear Deck? I could use Pear Deck, but as a frequent user of Quizizz, my students are comfortable with Quizizz and running interactive lessons through Quizizz allows me to facilitate on a format in which students are familiar. In a distance learning environment, it's a good idea to not overwhelm students with too many platforms and apps. Quizizz can help with that by being a platform for CFU, formative assessment, vocab practice and lesson delivery. 

Below is a series of screenshots that shows you how to get started using the Quizizz lesson feature.

Step 1: Login to your Quizizz account and click Create


Step 2: In the dropdown menu, choose Lesson. (It's currently in Beta so it will be getting new, improved features as time goes on.)


Step 3: Similar to creating a Quiz on Quizizz, enter the Lesson Title, choose your subject and click Next.


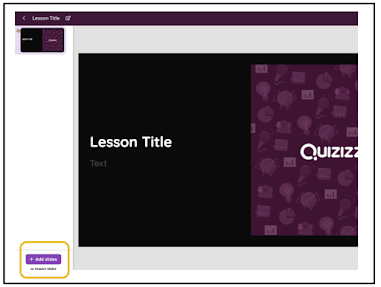
Step 4: After clicking Next, you'll taken to the Quizizz slides builder. Click Add slides in the bottom left corner.


Step 5a: You can choose from a variety of templates and interactive question types.


Step 5b: If you want to create your slides in Google Slides or PowerPoint, you can import them. This is what I prefer to do. You will need to download your slides as a PDF in order to import into Quizizz. Below you see an example with Google Slides. PowerPoint has a similar option.


Step 6: When the PDF of your slides has been uploaded, you will be able to pick and choose which slides you want to use. Pick some or all.


Step 7: Your slides will appear in the Quizizz slides builder. The imported slides are static and cannot be edited as they are images of your pre-made slides from Google Slides or PowerPoint. You can add other slides using the Quizizz templates or inject CFU and reflection questions in between your slides.


Step 8: If you add questions (My favorite part of using Quizizz lesson feature.), you can choose from Multiple Choice, Checkbox, Fill-in-the-blank, Poll or Open-Ended. Whichever type or types you choose to use throughout your lesson, you will get a report at the end with all student responses. 


Below are some screenshots of the different question types you can add in between your slides.

Multiple Choice


Fill-in-the-Blank

Poll


Open-Ended

The following screenshots show the basics of facilitating a lesson using the Quizizz lesson feature.

Step 1: After setting up your slides and questions, open the lesson from My library. Click Start a live lesson. For Asynchronous work, choose Assign homework.


Step 2: Choose your settings and click Present.


Step 3: After clicking Present, this screen below will appear and students will join with the code. Every time you use this lesson, there will be a different code. Remind students to use their real first and last names. The report of student responses at the end can be used for participation points, formative assessment and other grading purposes. Click Start when ready. If a student needs to join late, the code will be pinned at the top of the screen by default.


Step 4: When your first slide appears, you will see a control panel on the bottom left that allows you to navigate through the slides.


Step 5: When you come to a Question slide, there will be a three second countdown and students will be able to answer the question on their end. On your end, you will see student responses appear on the screen as they are submitted. These can be hidden.
 

Step 6: When you get to the end of your lesson, you will see a leaderboard just like when you do with a quiz in Quizizz. To see the results and student responses for each question, click the View reports button.


Step 7: The screenshot below is an example of what the report will look like. It can be downloaded as a spreadsheet for PLC and data analysis purposes by clicking the Download button on the right side. You can see the data by Participants' scores, Question by Question, Overview and Topics (if you added topics to your questions).


If you have any questions and would like a follow up, contact me via Gmail or Hangouts at ajuarez@techcoachjuarez.com. If you would like to unsubscribe from this blog, go to bit.ly/tcjinbox.

My book, The Complete EdTech Coach: An Organic Approach to Digital Learning, co-authored with my wife Katherine Goyette is due out in October/November of 2020. It will be published by Dave Burgess Publishing. Keep an eye out on this blog and on social media. Be sure to follow the hashtag #OrganicEdTech and #CVTechTalk for updates.




No comments:

Post a Comment