Monday, March 28, 2022

Translation in Google Docs Made Easy with Docs Paragraph Translate

Translation of text is one of the most basic ways we can begin to support English learners. When you don't speak another language, this can seem like a daunting task. Though not the most difficult thing in the world, opening Google Translate in another tab and hopping back and forth to copy and paste text is tedious and annoying. But what if you could translate targeted text from right within Google Docs? Would that be so much easier? Spoiler alert, the answer is yes and the Docs Paragraph Translate Add On in Google Docs is here to help.

Start by going to the Add-Ons tab in Google Docs, go to Get add-ons, search for Docs Paragraph Translate and install. Once installed, it'll appear in your Add-ons list as seen below.


After opening it, you can set it to Auto-detect the source language or set it exactly to the language you want. If your source language is English, Auto-detect will work fine. 


Set your target language for which you want to translate to. These settings are automatically saved so you don't have set them each time, unless your want a different language.


On your document, select the text you want to translate. With the Add-on open, click Translate.


Immediately, the translation of the selected text appears in the side panel. From there, click the part of the Doc where you'd like to put the translation.


Below, you can see the translation right beneath the text that was originally selected.


In my 17 years working with English learners, I have seen them be more successful with language development when providing side by side translation of their home language and English. This Add-on has been a life saver for quickly translating directions and other important pieces of text as I curate learning experiences for all learners. How will you use the Docs Paragraph Translate Add-on?

If you have any questions and would like a follow up, contact me via Gmail or Chat at ajuarez@techcoachjuarez.com. My book, The Complete EdTech Coach: An Organic Approach to Digital Learning, co-authored with my wife Katherine Goyette is now available on Amazon. Click here to purchase. It is published by Dave Burgess Publishing. Be sure to follow the hashtag #OrganicEdTech and #CVTechTalk for updates.


Friday, March 25, 2022

Update to Chrome Reading List: Quite a Handy Little Feature

Recently, Google Chrome was updated to include a Reading List button next to your Chrome profile picture, to the right of your extensions. You may have seen this and wondered if you accidentally added an new extension. What this button does is to open your Chrome Reading List as a side panel on the right. Click the button shown below to check it out.

If you are reading a website, and you want to save it for later, but not set it as a bookmark, the Reading List will be your best friend. With the Reading List open, click the button labeled Add current tab. This will save the URL (link) to your Reading List.


In addition, you have another way to see and access your bookmarks. If you'd like to see your bookmarks vertically, rather than horizontally across the top, the Reading List will display them on the right side panel.


This new feature can be useful for students as well. If students are doing research, they can add their search results to the Reading List for easy access. When they are finished, and no longer need the links, they can quickly delete them from the list. 

If you have any questions and would like a follow up, contact me via Gmail or Chat at ajuarez@techcoachjuarez.com. My book, The Complete EdTech Coach: An Organic Approach to Digital Learning, co-authored with my wife Katherine Goyette is now available on Amazon. Click here to purchase. It is published by Dave Burgess Publishing. Be sure to follow the hashtag #OrganicEdTech and #CVTechTalk for updates.


Wednesday, March 9, 2022

Jumpstart the Writing Process with Google Keep and Google Docs


In 17 years as an educator, a frequent pain point I have seen teachers deal with is frustration with students struggling to manage notes and sources when working on a research project. These are essential skills that successful adults possess. Please share these tips with your students to help them better manage their notes, sources and writing process.

In the example shown below, a student is working on a research paper on volcanoes. All of the research is being done online. While the student searches for sources, they are copying the links of the websites they plan use and cite.


To make the sources easy to find and use during the writing process, this student puts each source as its own note in Google Keep. Notice how this student is mindful to properly name each source for easy, future reference.


When the student is ready to start writing in Google Docs, they open the Google Keep button on the right side panel.


Immediately, their Keep Notes are available. The student has bullets and information in addition to the link to source on each note. This makes it easy to copy and paste information into the Doc to help jumpstart the writing process. This is great if they're using direct quotes.


If they click the three dots on any note, the entire contents of the note can be immediately imported to the Doc.


When they are ready to add citations, students can use the built-in Citations tool in the Tools menu within Google Docs.


This allows students to easily cite any source, whether a website, blog, book, magazine, etc. With the links saved in Keep, it is quick and easy to copy and paste those links into the Citation tool for instant citation of a source.


Google Keep and Google Docs work very well together when it comes to enhancing the writing and research process. Keep also integrates similarly with Google Slides. This can be useful when creating presentations. How might you use Keep and Docs with your students?

Share the video below with students to show them how to do all the things mentioned in this blog post.


If you have any questions and would like a follow up, contact me via Gmail or Chat at ajuarez@techcoachjuarez.com. My book, The Complete EdTech Coach: An Organic Approach to Digital Learning, co-authored with my wife Katherine Goyette is now available on Amazon. Click here to purchase. It is published by Dave Burgess Publishing. Be sure to follow the hashtag #OrganicEdTech and #CVTechTalk for updates.


Tuesday, March 8, 2022

Time Management Tools for Students in Google Workspace: Google Calendar (Share with your students)


In 17 years as an educator, one of the biggest pain points I have seen teachers deal with is frustration with students not keeping track of assignments, due dates and time management. These are essential skills that successful adults possess. Please share these tips with your students to help them better manage their time.

Schools often provide students with a paper planner. We all know kids don't use this as much as we would like. A habit I try to instill in students is to write due dates and reminders in the planner, and then add them to Google Calendar. The repetition helps them better remember and it shows them the value of paper and digital time management tools.

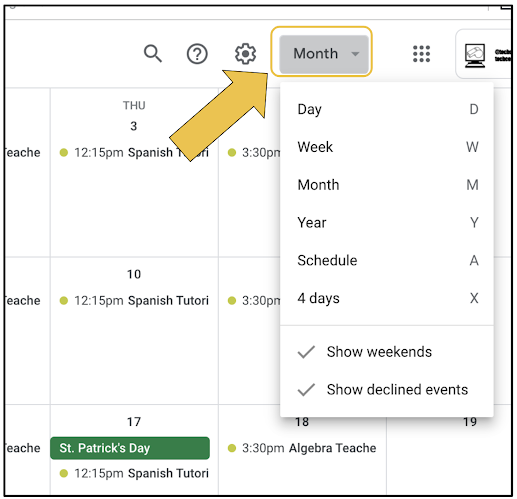
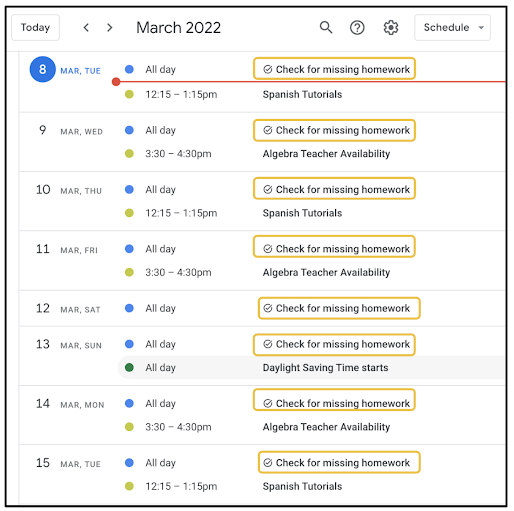
One of my favorite Google Calendar tips, for adults and students, is to use the Schedule View. This allows you to see your day (and a few days after) at a glance. It makes it easier to focus on the immediate future. Teach you students to change the view to schedule by clicking the Calendar View button just to the right of the "waffle". By default, it is set to Month View. This could be a useful habit in a homeroom or advisory class.


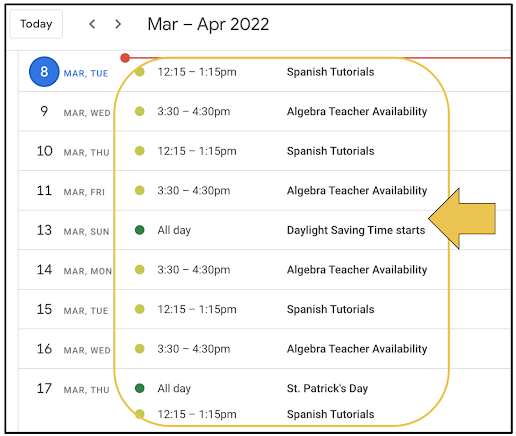
Below is what the Schedule View looks like. It will show you your current day's appointments, tasks, etc. vertically in chronological order.


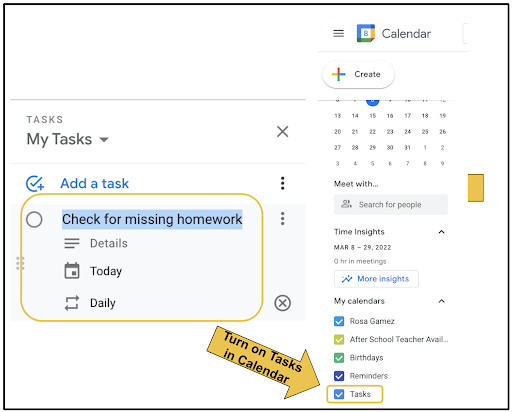
Last week, I wrote a similar blog post about how students can use Google Tasks to keep track of assignments and better manage time. Google Calendar allows you to show your Google Tasks in your calendar. This way you have a one stop shop for tasks and events. Any task you set in Google Tasks can be shown in Google Calendar by clicking the checkbox next to Tasks on the right side of Calendar in the section labeled My calendars. 


Below is what it looks like using the Schedule View with Tasks enabled in Google Calendar. Your Tasks will have a little circle with checkmark icon to the left of them. You can click on them in Google Calendar to view any notes attached to a Task and cross them off without having to switch over to Tasks in the right side toolbar.


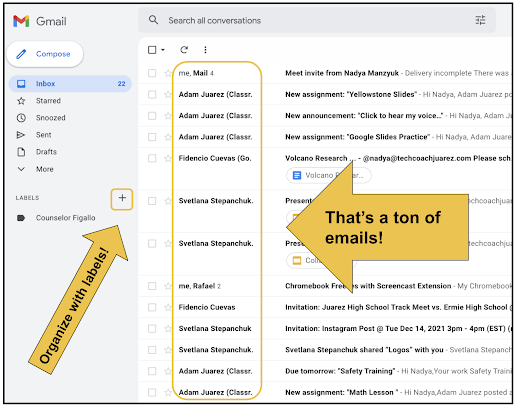
Over the years, I have seen students struggle with managing school work with extra curricular activities. Often times, clubs and sports teams will print a schedule for students. More often than not, this printed schedule gets lost or left in a place where they forget to check. One thing they almost never forget to check is their cellphone. 

Teach your students to create extra curricular activity calendars in Google Calendar. If they sync their Google Calendar to the calendar app on their cellphones, reminders and schedules are just a pop up notification away. 

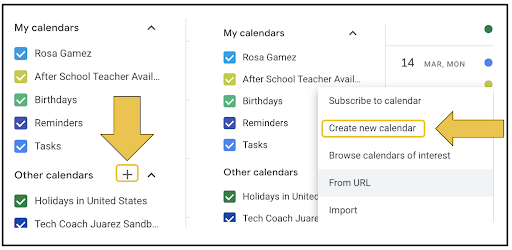
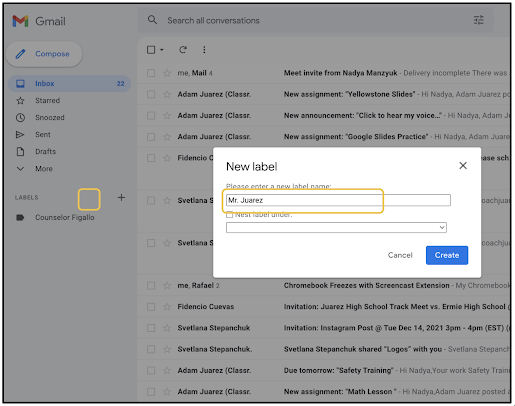
Have them start by clicking the little plus button on the left side of Google Calendar in the section labeled Other calendars. In the menu that appears, have them click Create new calendar. 


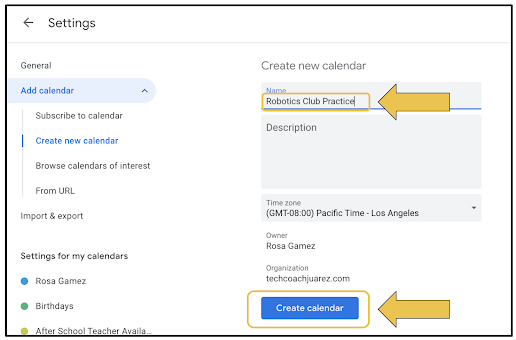
They will be prompted to name their new calendar, then click Create calendar.


When they return to the main Google Calendar screen, their extra curricular calendar will appear in the section on the left labeled My calendars. They will need to check mark it to make it visible. 

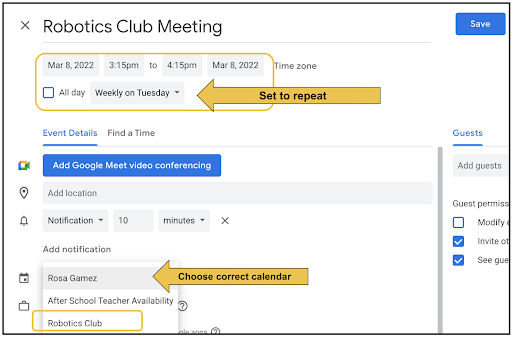
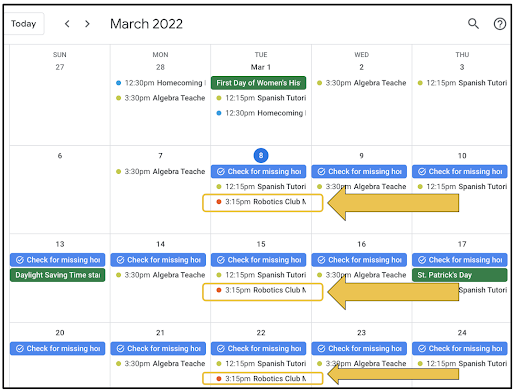
Below is an example of how students can begin creating events on their extra curricular calendars. They start by clicking the big Create button on the top left of Google Calendar. When the event details window pops up, have them click More options to go full screen and see all options. Have them set the date and time of their first event. It is a repeating weekly event, have them set it to repeat. 

Be sure to show them how to set the event to correct calendar. By default, events will appear on the calendar titled as their name. Have them click their name (seen below) and choose the correct calendar in the drop down menu that appears.


Below is what it looks like in Google Calendar using the Month View. You can see this student's "Robotics Club" event repeats every Tuesday. The color of the dot next to those events is different than events that are on other calendars. 


Students can use Google Calendar to schedule pretty much anything in their lives. They can schedule appointments, study dates, set reminders for homework, and much more. An easy way to start is to show them how your Google Classroom has an accompanying calendar that shows assignments and due dates. How might you use Google Calendar with your students? 

Share this video with your students that demonstrates the skills mentioned in this blog post.


If you have any questions and would like a follow up, contact me via Gmail or Chat at ajuarez@techcoachjuarez.com. My book, The Complete EdTech Coach: An Organic Approach to Digital Learning, co-authored with my wife Katherine Goyette is now available on Amazon. Click here to purchase. It is published by Dave Burgess Publishing. Be sure to follow the hashtag #OrganicEdTech and #CVTechTalk for updates.


Thursday, March 3, 2022

An Essential Student Skill: Student Gmail Inbox Maintenance (Share with your students)


Students these days are absolute experts when it comes to staying on top of notifications for their online gaming, social media, text messages, DM's and more. What they need to get better at is applying those same skills to email. As they get older, and transition into college or the workforce, professors, admissions officers and employers will communicate vital information via email, not text or DM. The sooner kids take email as serious as they do other forms of communication, the better they will be prepared for their future.

A common theme I see with students, adults too, is a crowded, cluttered inbox. This type of inbox can lead to missing important messages. Since most students are using Google Classroom, they get emails whenever their teachers post assignments, announcements, etc. Kids need to develop the habit of going through their inbox and deleting unnecessary or old messages and moving into labels the messages they need to save. 

The screenshots shown below are using the most up-to-date version of Gmail, recently released by Google. If your Gmail doesn't look like this yet, it will soon. Start by showing kids how to create labels. Click the plus button to create a new label.


Each school year, I like to have students create a label for each teacher. It's also a good idea to create a label for counselors.


With labels created, you can move multiple, or single, messages by clicking the Move to button at the top. In the dropdown that appears, click the label into which you want to move the message(s). 


Instantly, you'll see those messages disappear from the inbox. Click on the label to view those messages.


For messages you know you don't need, don't hesitate to delete them. One way is to click on the message to open it. From there, click the trash can button at the top.


If you have a ton of emails you know you don't need, you can delete many at a time. Do this by clicking the checkbox next to each message you want to delete. Once you've "checkboxed" them, click the trashcan button at the top.


Share this video with students to show them each of the tips demonstrated in this blog.


Share these screenshots with your students. Set up time during the day or make it an expectation for free time for kids to not just check their email, but to organize and declutter their inbox. What email tricks do you have or have you used with students? 

If you have any questions and would like a follow up, contact me via Gmail or Chat at ajuarez@techcoachjuarez.com.

My book, The Complete EdTech Coach: An Organic Approach to Digital Learning, co-authored with my wife Katherine Goyette is now available on Amazon. Click here to purchase. It is published by Dave Burgess Publishing. Be sure to follow the hashtag #OrganicEdTech and #CVTechTalk for updates.