Showing posts with label Google Classroom. Show all posts

Wednesday, January 31, 2024

5 Reasons to Using Flip with your Students


Flip, formerly known as Flipgrid, is a video discussion platform that allows students to create and share short videos. While it is commonly associated with fostering discussion and communication, it can also be a valuable tool for supporting students' literacy skills. Here are five reasons why teachers might consider using Flipgrid for this purpose:

Engagement and Motivation:

Flip offers a multimedia approach to literacy, allowing students to express themselves through video. This can be particularly appealing to students who may not feel as comfortable expressing themselves in written form. The engaging nature of video responses can increase motivation and interest in literacy activities.

Oral Language Development:

By creating video responses, students have the opportunity to practice and develop their oral language skills. Articulating thoughts verbally can enhance communication skills, vocabulary, and fluency. This oral practice complements traditional written literacy activities and contributes to overall language development.

Differentiated Instruction:

Flip allows for differentiation in literacy instruction. Students can respond to prompts in a way that suits their learning preferences and abilities, whether through writing, speaking, or a combination of both. This flexibility accommodates diverse learning styles and ensures that students can demonstrate their understanding in a manner that works best for them.

Collaborative Learning:

Flip supports collaborative learning by enabling students to view and respond to each other's videos. This fosters a sense of community within the classroom, encourages peer-to-peer learning, and provides opportunities for students to engage in constructive discussions about literacy topics. Collaborative learning environments can enhance comprehension and critical thinking skills.

Feedback and Reflection:

Teachers can provide timely and personalized feedback on students' video responses, addressing both content and language skills. Additionally, the video format allows students to review and reflect on their own communication and literacy skills. This self-reflection can contribute to metacognitive development and improvement in future literacy tasks.

Watch the video below for a step-by-step guide on initiating Flip usage after logging in with your Google account. The tutorial illustrates the process of creating a Group, akin to a Google Classroom, and posting Topics within that Group, resembling assignments in Google Classroom. Additionally, it demonstrates how to enroll students through Google Classroom and seamlessly transfer the topics to Google Classroom as Material posts. I recommend selecting Material as the post type, as this ensures responses are collected directly in your Flip account, eliminating the need to designate it as an assignment within Google Classroom.


Monday, August 14, 2023

New Google Classroom Feature Allows Teachers to Close Submissions After Due Dates


Google Classroom recently launched a new option for teachers to close submissions once the due dates have passed. As per the Google Workspace Updates Blog, this feature was made available on July 27 and is now being gradually rolled out to users. If you haven't noticed the update yet, it will reach you shortly. This feature has been widely requested by teachers, enabling them to better oversee their workflow and ensure timely submission of all student assignments.

With this new feature, teachers can choose to disable submissions for an assignment after a certain date, regardless of whether or not the assignment has a strict due date. This means that teachers can now prevent students from submitting late work.

Of course, this feature is not without its drawbacks. Some teachers may worry that it will prevent students from having enough time to iterate on their work and achieve mastery. However, teachers can, and should, still provide students with opportunities to revise and resubmit their work, even after the due date. Even if the submission is closed for a specific assignment, students may still access their assignment-related documents to continue to edit. 

Take a look below to see how to get started closing submissions after a due date.

Overall, the new Google Classroom feature that allows teachers to close submissions after due dates is a valuable tool that can help teachers manage their workflow and ensure that all students are submitting their work on time.

If you would like to bring me to your school for PD, workshops, a keynote, training or a follow-up on this or previous blogposts, click here to schedule an appointment to chat. My book, The Complete EdTech Coach: An Organic Approach to Digital Learning, co-authored with my wife Katherine Goyette is now available on Amazon. Click here to purchase. It is published by Dave Burgess Publishing. Be sure to follow the hashtag #OrganicEdTech and #CVTechTalk for updates.


Google Classroom Grading Periods: A New Way to Track Student Progress


Google Classroom is a useful tool for teachers to manage assignments, communicate with students, and track their progress. However, tracking student progress over time hasn't been easy. That's where the new Grading Periods feature comes in.

Grading Periods is now available for domains with the Teaching & Learning Upgrade or Education Plus subscription. To begin, teachers can go to the Class Settings page and access the "Grading Periods" section. From there, they can create and configure grading periods.

With Grading Periods, teachers can define and apply grading periods to their Classroom assignments. This enables them to observe student performance trends over time, both as an aggregate by grading period or within a specific grading period.

For instance, a teacher could use grading periods to monitor student progress throughout a semester, quarter, trimester, or even based on benchmark assessments. This provides valuable insights about each student's performance over time and helps identify areas where they may require additional support.

Grading Periods is a powerful new feature that enhances teachers' ability to track student progress effectively. If you're a teacher, I encourage you to give it a try. Check out the accompanying screenshots below to see how to get started.

Begin by clicking the settings gear in the top right corner.


Scroll down to the section titled Grading and click Add grading period.


Name the grading period and specify the date range. You can easily duplicate these periods for other classes and assign them to existing assignments.


After creation, go to the Grades tab. Apply the filter to view student work corresponding to the Grading periods you've included.

If you would like to bring me to your school for PD, workshops, a keynote, training or a follow-up on this or previous blogposts, click here to schedule an appointment to chat.

My book, The Complete EdTech Coach: An Organic Approach to Digital Learning, co-authored with my wife Katherine Goyette is now available on Amazon. Click here to purchase. It is published by Dave Burgess Publishing. Be sure to follow the hashtag #OrganicEdTech and #CVTechTalk for updates.

Sunday, February 26, 2023

ChatGPT and Google Classroom: Power Up Your Ability To Provide Feedback

As an AI language model, ChatGPT can help teachers provide feedback on student writing more easily. In a previous blog post, I discussed ways to use AI tools such as ChatGPT to expedite the feedback process for student writing. Building on this, as an avid user of Google Classroom, I realized that feedback generated by ChatGPT can be stored in the Google Classroom comment bank. This can significantly reduce the amount of time spent grading student assignments.

One of the biggest challenges faced by teachers when grading student writing is providing informative and constructive feedback that is tailored to each student's needs. This process can be tedious and time-consuming, especially for writing assignments that require nuance and subjectivity. ChatGPT can simplify this process by generating criteria-based suggestions that are customized for each student.

For example, if a student is struggling with grammar and punctuation, ChatGPT can generate comments that focus on those specific areas. Similarly, if a student is struggling with the structure of their writing, ChatGPT can provide guidance. When you notice trends and similarities in the feedback that students need for issues such as grammar and punctuation, you can save them in the Google Classroom comment bank. To do this, simply copy and paste into the comment bank. This allows teachers to access and reuse comments across multiple assignments, saving time and ensuring consistency in grading.

Moreover, by storing comments in the comment bank, teachers can easily collaborate with their colleagues. If your department or PLC is using a shared Google Classroom for common or standardized assessments, all co-teachers have access to the comment bank. They can share and reuse effective comments, or create a set of standard comments that can be used across their department or school.

However, using AI-generated feedback has some potential drawbacks. Some teachers may feel that this approach is impersonal and lacks the nuance and context that human feedback can provide. Others may be concerned about the reliability and accuracy of the suggestions generated by ChatGPT.

It's important to view ChatGPT as a tool that can supplement, but not replace, the feedback provided by teachers. By using ChatGPT to generate criteria-based suggestions, teachers can save time and focus on providing more personalized and nuanced feedback to their students.

ChatGPT can be an incredibly useful tool for teachers looking to improve the efficiency and effectiveness of their feedback. By generating criteria-based suggestions that can be stored in the Google Classroom comment bank, ChatGPT can streamline the grading process while providing targeted and personalized feedback to each student. Although using AI-generated feedback has potential drawbacks, it can be an invaluable tool for teachers looking to improve the quality of their feedback while also reducing their workload. Think of ChatGPT as a personal assistant and adapt its suggestions based on your expertise and knowledge of your students.

If you would like to bring me to your school for PD, workshops, a keynote, training or a follow-up on this or previous blogposts, click here to schedule an appointment to chat. My book, The Complete EdTech Coach: An Organic Approach to Digital Learning, co-authored with my wife Katherine Goyette is now available on Amazon. Click here to purchase. It is published by Dave Burgess Publishing. Be sure to follow the hashtag #OrganicEdTech and #CVTechTalk for updates.


Wednesday, January 11, 2023

Boost Efficiency and Power Up Collaboration with Google Classroom Shells


Two things educators all need are more time and collaboration. Google Classroom Shells is a simple idea, hiding in plain sight, to help streamline the lesson design process all the while forming a foundation for effective collaboration in departments and PLC’s.


A Shell is a Google Classroom with no students enrolled. If you are fan of Marvel, it's a little bit like the "mirror dimension" from the first Dr. Strange movie. The "mirror dimension" is a place where sorcerers can practice their spells without affecting the real world. Your Shell allows you to fine tune activities, templates, instructions, accommodations and more without students seeing it. When your assignments, and different versions of them are set in your Shell, simply reuse them in your Classrooms in which students are enrolled. These templates are set so you can add unique details and documents without having to retype instructions, etc. A Google Classroom Shell is your "mirror dimension".


In this session, learn to develop a class shell within Google Classroom to house templates of often-used assignments, activities and Eduprotocols. In addition, learn to use a class shell to facilitate collaboration with departments and PLCs for common assignments and assessments. Each example shared will be rooted in 4 C’s lesson design in order to increase engagement while empowering students to take ownership of their own learning. Attendees will leave the session ready to create different types of Google Classroom Shells: Go-To Activity Templates, Common Activities and Assessments for PLCs, Eduprotocols, Curriculum Aligned, and Fitness for PE Class.


"Go-To Activities" Shell

No matter how long you've been teaching, you likely have an arsenal of go-to activities and assignments that can be reused for multiple topics. During the pandemic and distance learning, if you weren't already using Google Classroom, you were forced to adapt these lessons to Google Classroom.


One thing I found annoying was the process of reusing my go-to activities by reusing posts from different classes. Though not difficult, I was annoyed in how instructions and accommodations varied from class to class. I did not enjoy having to retype or re-edit instructions or re-attach unique versions of documents.


It was this inconvenience that led me to develop my first Google Classroom Shell. This Shell was just for me. One of my go-to assignments was my weekly assessment where I gave students the same 4 options each week to demonstrate learning. The only thing that changed was the weekly essential question. I put the instructions in English and Spanish and used the same rubric regardless of the topic. Each week, all I did was reuse the post from the Shell, type in that week's essential question and click Assign. This was such a huge time saver. Slowly, but surely, I began adding more template activities and assignments to the Shell. My lesson plan time was reduced dramatically
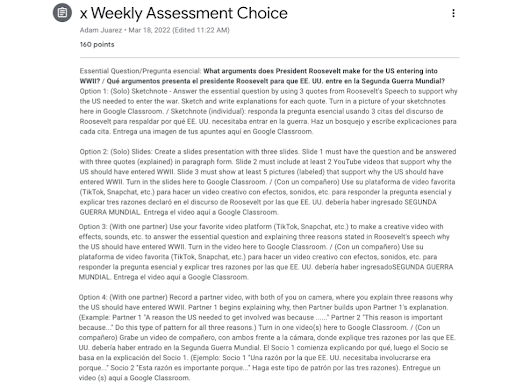


The X before the assignment name was a placeholder for the week number. When I reuse the post, I simply replace the X with the week number. Get started building your "Go-To Activities" Shell by creating posts with your instructions, leaving room for customization. In addition, add template documents that include the format you want to use, but open ended to add custom content for future reuse. When you reuse the post in the future, Classroom will make a copy of the documents for you. No need to attach template documents anymore!


Common Activities and Assessments for PLCs

After establishing with my Go-To Lessons Shell, colleagues thought it was a cool idea and wanted to use some of my templates. What we did instead was create a shared Shell for our PLC where we were all co-teachers. We each created a Topic with our name and added our go-to activities. Doing this, we all had access to each other's activities and template documents. We were able to reuse each other's materials.


In our PLC, we were mandated to periodically proctor common assessments. Using our PLC Shell, we collaborated on assignments for each assessment. We discussed and agreed upon instructions, documents and accommodations. We created a generic version of the assignment in addition to versions for English learners and SPED students. We were able to reuse any version from the Shell. For organizational purposes, we created a Topic titled "Common Assessments".


This process galvanized our PLC and made collaboration very enjoyable. For common assessments, we downloaded our student scores to compare data at future meetings. 


Get started with this process by creating a Classroom and inviting colleagues as co-teachers. From there, create a topic for each member and add your templates and go-to activities.


Eduprotocols

These days, Eduprotocols are all the rage. If you're reading this and you haven't heard of Eduprotocols, open a new browser window and navigate to eduprotocols.com. You will not be disappointed. 


For those of you new to Eduprotocols, in a nutshell, they are a series of lesson frames that can be reused over and over, with the 4C's embedded and applicable to any grade level or subject. As Eduprotocols became a huge part of my teaching, I instinctively built an Eduprotocols Shell. Just like in my "Go-To Activities" Shell, the instructions, accommodations and template documents stay the same each time I reuse. Only the topics or content changes. Below is a screenshot of my Thin Slides template.
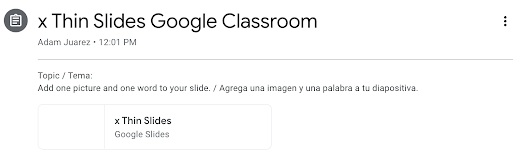


When I reuse this Eduprotocol template, I add the topic and week number in the title. If you're new to Eduprotocols, Thin Slides is what I recommend you use to get started before diving into the rest. It's great for checking for understanding and getting students comfortable presenting in front of their peers. I facilitate by reusing the post then adding a specific topic and giving students 3 minutes to build their slide. On their slide, they will include ONLY one word and one picture about a takeaway, opinion or idea about the assigned topic. They click turn in and I present via Google Classroom on the projector each student's slide. 


When student's slide appears, they have roughly 7 seconds to present, elaborating on their one word and one picture. The one picture and word is there to help them remember what they want to say. In less than 10 minutes, I can have every kid present, everyday. Imagine how comfortable they will be presenting by the end of the year! If interested in joining one of my Eduprotocols Shells as a co-teacher, email me at ajuarez@techcoachjuarez.com.

Curriculum Aligned

If you like the idea of creating a Shell for your department or PLC, then you'll be sure to like the idea of building a curriculum aligned Shell. This type of Shell, best created with a department, takes a specific curriculum and develops assignments and activities that align with each section and chapter of the textbook. 


I originally thought of this type of Shell because I was disillusioned with how textbook companies often have an online version of their book with an accompanying system for which students will login to access curriculum aligned activities. This was just one more thing for students to login to. These systems often where heavy duty, taking up processor power on Chromebooks causing them to operate very slowly. 


Since we were already using Google Classroom, I decided to adapt the curriculum's prebuilt assignments, in addition to my own, to the Google Classroom environment. Classroom works fine on Chromebooks and do not slow them down. Working with colleagues, we went section by section and chapter by chapter creating a treasure trove of activities. If new teachers joined the department, they were given access to this Shell and they had a head start. Even though we were reusing these posts, we still maintained creative control to adapt them as needed. 


Below is a screenshot of a curriculum aligned Shell for a 7th grade World History class that contains Eduprotocols for each section in the textbook.


The naming conventions above were for the grade level, chapter and section. For example, 7.1.1 stands for 7th grade, chapter 1, section 1. No matter the section being covered, this department had activities already built beforehand for teachers to pick, choose and reuse. Get started by creating a new Classroom and inviting co-teachers. Crack open your curriculum, look at the chapter/section structure, create topics for each and start building your curriculum aligned activities. This will take some time if doing for an entire textbook, but the collaboration involved will strengthen your team and save time in the future. 


Fitness for PE Class

For years I struggled to find a way to meaningfully integrate technology into a PE class. Initially, I thought about getting students to use something like a Fitbit to track fitness, but that posed too many logistical problems. I thought about having students use a fitness app on their cellphones, but not every kid has a cellphone. After a conversation with a PE teacher, we decided Google Classroom was the answer. All of our students had access to Google Classroom either on their cellphone or a school issued Chromebook. 


A PE teacher friend and I built a PE Fitness Tracker Shell. This Shell included Google Classroom Questions where students would record mile times, sit and reach scores, height, weight and much more. This allowed the teacher and students to see their fitness and health progress over time. 


Topics were created to organize activities by BMI, cardio and flexibility records. The "x's" were there as placeholders for dates of recording. This helped the teachers and students see progress over time. Below is a screenshot of this Shell.


Google Classroom Shells are very versatile, help facilitate collaboration and save time. For what will you create a Google Classroom Shell? If you would like to bring me to your school for PD, workshops, a keynote, training or a follow-up on this or previous blogposts, click here to schedule an appointment to chat.

My book, The Complete EdTech Coach: An Organic Approach to Digital Learning, co-authored with my wife Katherine Goyette is now available on Amazon. Click here to purchase. It is published by Dave Burgess Publishing. Be sure to follow the hashtag #OrganicEdTech and #CVTechTalk for updates.

Tuesday, August 30, 2022

Google Classroom as a PE Fitness Tracker


Over the years, finding ways to organically integrate edtech into PE classes has been a struggle. There are apps kids can use with their phones, but accessibility is still an issue as we cannot require all students to enable location services and other settings. This past year, I collaborated with my friend and colleague Sara Vega (legendary PE Teacher and Soccer Coach) on a way to use Google Classroom to help track fitness. We came up with the idea of building a "Class Shell" full of template posts that she would reuse each time she wanted students to check in and record some fitness data.

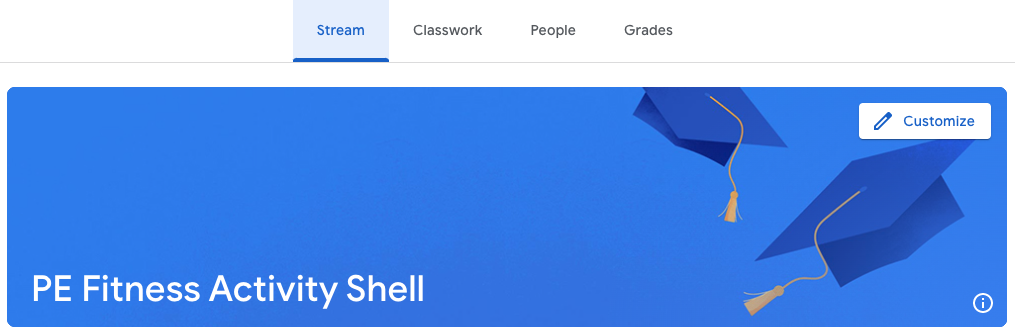
A "Class Shell" does not have students enrolled. It is a Google Classroom with assignment templates. Each teacher only needs to reuse the template posts in their Google Classrooms that contain students. Below are some screenshots of our PE Fitness Activity Shell. We built three categories: BMI, Cardiovascular Fitness, Flexibility and Muscular Strength.


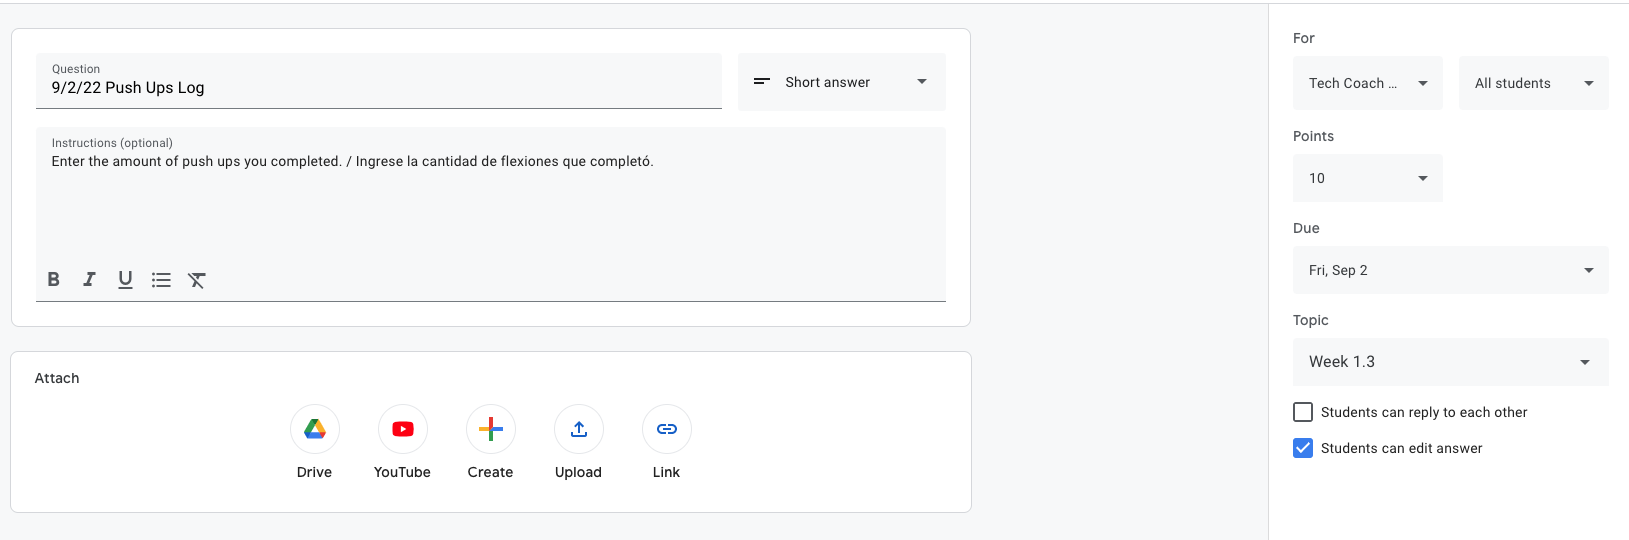
Notice the "X's". Those are place markers for dates. Each post is a Google Classroom Question where students will enter a number of reps or time for the respective fitness activities. 

In this system, after building the templates in the Shell, teachers will open their Google Classrooms that contain students and Reuse post.


Next, choose the template to reuse.


With the reused template post, change out the "X's" for the corresponding date of the post.


Because the instructions are always the same, there is no need to change the instructions. Add your point value, set due date and topic, and click Ask.


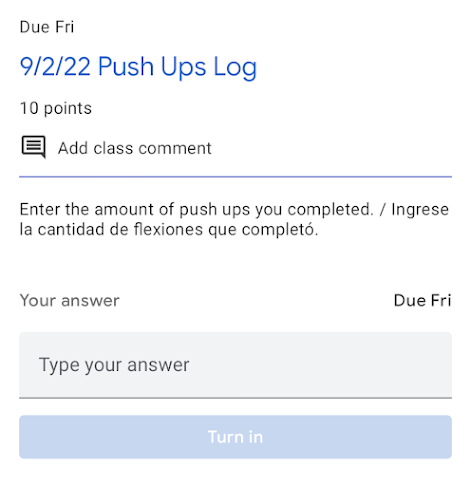
For students, it may be easier for them to log their fitness reps or times using their phones. When in the gym or on the track, a computer, tablet or Chromebook could be problematic, but not impossible. Below is a screenshot of what it looks like on the student side using the Google Classroom mobile app.

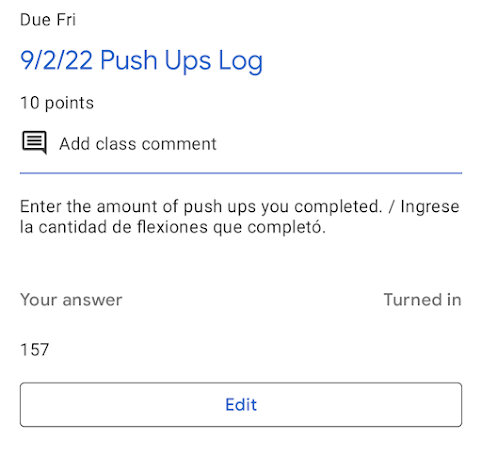
In this example, the student entered an astounding 157 push-ups. 

On the teacher's end, like with any Google Classroom assignment, you can see the students who have turned in and not turned in in real time.


When you open the assignment, you will see at a glance the students who've turned in their reps/times and quickly give them credit or points. 


For students to monitor their progress, they can easily go back into Google Classroom, open previous submissions and see how they've grown from week to week or month to month. This system is obviously not as accurate as a fitness tracker app, but a simple, easy way to help students monitor fitness using a free tool in which they are already familiar. How might you use this hack or with which PE teachers might you share this idea? If you have any feedback or suggestions on how to improve this, please let me know. 

If you have any questions and would like a follow up, contact me via Gmail or Chat at ajuarez@techcoachjuarez.com. My book, The Complete EdTech Coach: An Organic Approach to Digital Learning, co-authored with my wife Katherine Goyette is now available on Amazon. Click here to purchase. It is published by Dave Burgess Publishing. Be sure to follow the hashtag #OrganicEdTech and #CVTechTalk for updates.


Monday, July 11, 2022

Easily Customize Your Google Classroom Banner with Google Drawings

Since the advent of the COVID-19 shift to distance learning, creating a cool looking Google Classroom banner has been all the rage. When creating a custom banner, many people have been aggravated by the height and width requirements for the banner and cropping it to make it fit. Canva has some social media templates for banners that can be used, but in Google Drawings, you can set the area to be the exact size, 800 W x 200 H pixels.

Below is what a default banner looks like when you create a Classroom. To add your own design, click the Customize button in the top right corner. (Hint: This process is something to know for the Google Certified Educator Level 1 Exam).


In the menu that pops up, click Upload photo to add your own custom design. If you click Select photo, you will be able to choose from Google's preset image options and themes.


To create your own design in Google Drawings, first click the File button on the top toolbar. Near the bottom, click Page setup.


In the menu that pops up, it will be defaulted to Standard 4:3. Click that and select Custom.


The default measurement unit is inches. Click Inches and switch it Pixels. The first number on the left is the width. Set it 800. The second number is the height. Switch it to 200. Click Apply.


Immediately you will see the dimensions of the canvas in Google Drawings switch to a wider look. 


Be as creative as you like in setting up your Classroom banner.


When done creating, click File, hover your cursor over Download and click JPEG. This will download the image to your computer for easy upload to Google Classroom.


When you return to Google Classroom, click Customize and then click Upload photo. Your computer's files will pop up. More than likely, your JPEG will be in the Downloads folder. 


When you select the JPEG file, it will be uploaded to the Classroom at the perfect size and ratio.


I want to give a big shout out to my friends at Covina Valley USD in Covina, CA who helped me with the process and ideas for this blogpost. During our Google Certification Bootcamp in June 2022, questions arose about this process and we were able to figure out this hack. 

If you have any questions and would like a follow up, contact me via Gmail or Chat at ajuarez@techcoachjuarez.com.

My book, The Complete EdTech Coach: An Organic Approach to Digital Learning, co-authored with my wife Katherine Goyette is now available on Amazon. Click here to purchase. It is published by Dave Burgess Publishing. Be sure to follow the hashtag #OrganicEdTech and #CVTechTalk for updates.


Wednesday, February 2, 2022

Prep for Google Certified Educator Level 2 Exam: Google Classroom


The Google Certified Educator Level 2 Exam has gone through some changes recently. In the past, it was 20 questions multiple choice and 11 performance tasks. The current iteration is 35 multiple choice questions based off of scenarios. Questions will ask you to choose between 1-5 correct answers. These questions require you to be familiar with the features and functionality of each Google Workspace for Education App. 

For Classroom, you need to be familiar with the following features and functionality.
- Know how to archive a Classroom
- Know the purpose of archiving a Classroom
- Know how to restore a Classroom

Click here to go through some Classroom Practice Scenarios on Quizizz Lessons. These scenarios are NOT the same as the test, but similar. If you understand the skills demonstrated in the videos and can answer my checking for understanding questions, you will be prepared for the Classroom portions of the Level 2 Exam.

If you have any questions and would like a follow up, contact me via Gmail or Chat at ajuarez@techcoachjuarez.com.  

Thursday, December 9, 2021

Prep for Google Certified Educator Level 1 Exam: Google Classroom


The Google Certified Educator Level 1 Exam has gone through some changes recently. In the past, it was 20 questions multiple choice and 11 performance tasks. The current iteration is 35 multiple choice questions based off of scenarios. Questions will ask you to choose between 1-5 correct answers. These questions require you to be familiar with the features and functionality of each Google Workspace for Education App. 

For Google Classroom, you need to be familiar with the following features and functionality.

- Benefits for teachers as tool for collecting, evaluating and returning student work
- Ways Classroom can help teachers move towards paperless
- Benefits for students to stay organized and collaborate
- Customize the look and feel of your Classrooms
- Options for posting an Assignment
- All the ways students can access Google Meet via Classroom

Click here to go through some Google Classroom Practice Scenarios on Quizizz Lessons. These scenarios are NOT the same as the test, but similar. If you understand the skills demonstrated in the videos and can answer my checking for understanding questions, you will be prepared for the Google Classroom portions of the Level 1 Exam.

If you have any questions and would like a follow up, contact me via Gmail or Chat at ajuarez@techcoachjuarez.com. 

My book, The Complete EdTech Coach: An Organic Approach to Digital Learning, co-authored with my wife Katherine Goyette is now available on Amazon. Click here to purchase. It is published by Dave Burgess Publishing. Be sure to follow the hashtag #OrganicEdTech and #CVTechTalk for updates.

Tuesday, October 19, 2021

Simple Tools for Curating Resources


Curation is not just for those who manage museums. Curation is a great strategy for engaging students with content and empowering them to take charge of their learning. Traditionally, teachers have been a sage on the stage where students sit quietly and listen. When you curate resources, students can be empowered to dive into the content at their pace. Students become explorers of content, not just passive consumers. Curation allows you to do this all within in one stop shop.

Instead of having students struggle to keep up with your lecture on To Kill a Mockingbird, try curating excerpts of text, scholarly commentaries, movie video clips and more. Let students have the freedom to explore those resources at their pace and this will likely lead to more engagement and empowerment. Curating resources like this also lends itself towards increased engagement with the 4 C's, communication, creativity, critical thinking and collaboration.

To get started with curation, take a look at some simple tools shared below.

Google Classroom

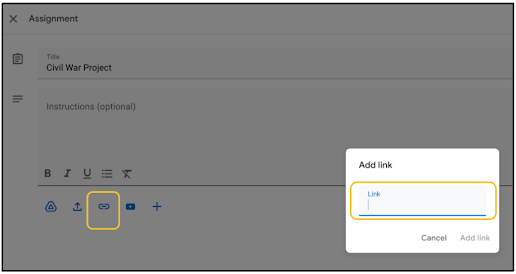
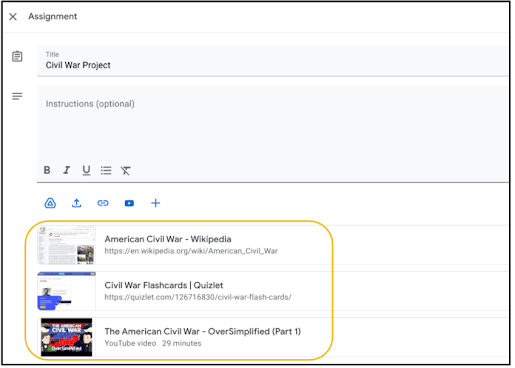
With curation, there is no need to find some fancy tool. If you're reading this blog, it's very likely you are already using Google Classroom. The link button on a Google Classroom assignment, material and or question allows you to quickly and easily curate resources.


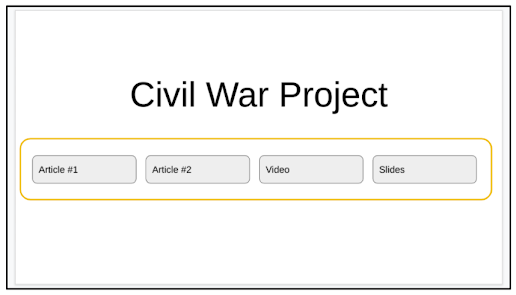
When the student opens the assignment, they will see buttons that lead them to the resources you've created. Be sure to put detailed instructions.


Google Docs

If you haven't heard of Hyperdocs, click here to take a look. You won't be sorry. Hyperdocs are a lesson design strategy using Google Docs and embedded links. The links are curated resources and learning experiences. Students have a whole learning experience set up in a one stop shop. 

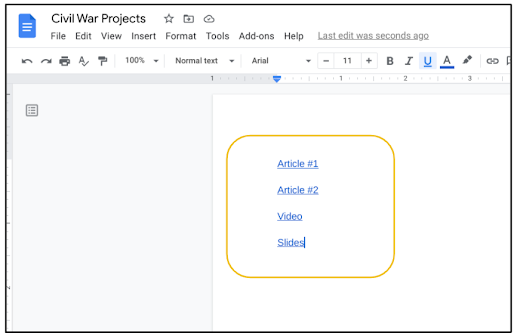
Getting started with curation with Google Docs is as simple as turning text into a hyperlink.


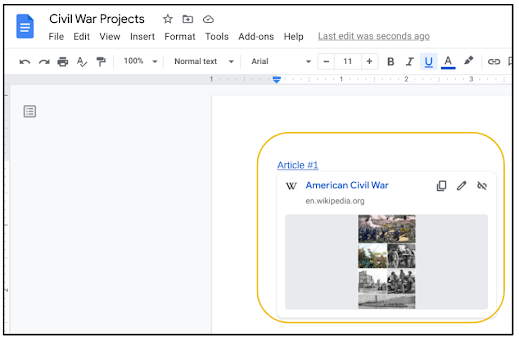
When students put their cursor over a hyperlink, a preview to the link appears.


Google Slides

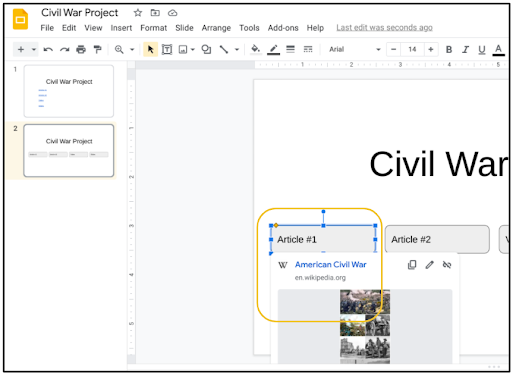
In a very similar manner as Google Docs, you can curate with Google Slides. Any text, shape or image you add to a slide can be hyperlinked.


Like Google Docs, when you hover over an object on the slide that's been hyperlinked, a preview to the resource appears. 


Google Sites

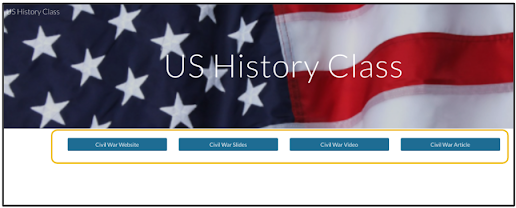
Sites is a visually appealing way to curate student resources. You have more options as far as how the resources are presented. Resources such as Slides, Docs and YouTube videos are visible and viewable within the Site without having to follow a link. Clickable buttons are another option for inserting links. If you are looking for a dynamic user experience, Google Sites is the ticket.


Wakelet

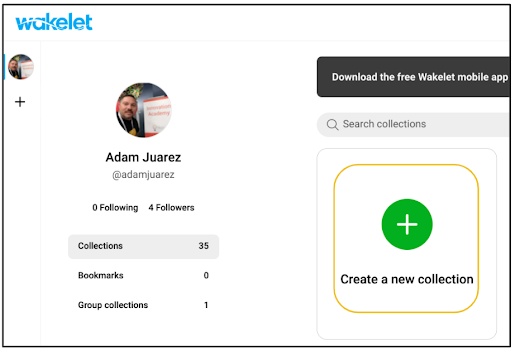
Beyond the realm of Google Workspace, Wakelet has become a popular tool for curating resources. After signing up for Wakelet, you can create Collections. Collections allow you to curate almost any digital file type and they are easily shareable. 


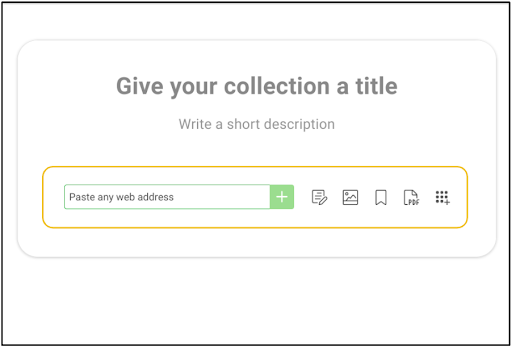
Below you can see the different ways to add digital files to a Wakelet collection. You can paste a URL to a file, search your computers and much more.


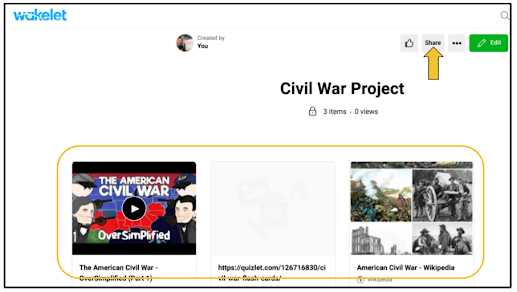
Once a Collection is created, Wakelet allows you to customize the way the resources are presented. The Share button allows to quickly share the Collection on almost any platform. If you are using Google Classroom, the Share button allows you to copy a link that can be pasted into an Assignment or Material. 


If you are interested in learning more about Wakelet, click here to try their newly minted Wakelet Certification Course. It's self paced and will allow you to learn all the ways Wakelet can be used.

Curation is a great way to put control of learning into the hands of students. What will you curate? If you have any questions and would like a follow up, contact me via Gmail or Chat at ajuarez@techcoachjuarez.com. My book, The Complete EdTech Coach: An Organic Approach to Digital Learning, co-authored with my wife Katherine Goyette is now available on Amazon. Click here to purchase. It is published by Dave Burgess Publishing. Be sure to follow the hashtag #OrganicEdTech and #CVTechTalk for updates.