Wednesday, September 30, 2020

Screenshots to PDF: ILovePDF and Google Slides

Distance learning has caused a dramatic increase in screenshots amongst teachers. As more and more digital content and lessons are produced, the art of the screenshot becomes more en vogue than ever. Recently, a number of teachers have been asked me about ways to take screenshots of text and combine them into one PDF file. My two go-to tools for this are ilovepdf.com and Google Slides. Let's take a look, first, at ilovepdf.com.

Step 1: Go to ilovepdf.com and select JPG to PDF. If your screenshot is a PNG file, it will still work. Click the Select JPG images button to search your computer's files for the screenshots you want or click the Google Drive button if you have them saved there. You may select multiple screenshot files.


Step 2: Once your screenshot files have loaded onto ilovepdf.com, choose the orientation and margin. From there, make sure to check the box that says "Merge all images into one PDF file". Click Convert to PDF when ready.


Step 3: When this appears on your screen, click Download PDF to download the file to your computer's hard drive. You may also click the Google Drive button to save it directly into your Google Drive.


If you don't want to use ilovepdf.com, you can accomplish the same goal with Google Slides. With Slides, you have the ability to resize the images and slide dimensions. One thing Slides cannot do is automatically save your PDF to Google Drive. You will have to download to your computer first before uploading to Drive.

Step 1: Open a slides presentation and create a slide for each screenshot you want to merge into a PDF. Click the add image button. Select Upload from Computer.


Step 2: Repeat step 1 on each slide.


Step 3: Once all the slides have the screenshots you want, select all slides. 


Step 4: Go to File, click Download, then select PDF. This will download the entire presentation as PDF file to you computer.


Something to remember when pulling screenshots is the source. Be careful when pulling screenshots from copyright protected websites or books. Digital citizenship is not just for the students, but for teachers as well. 

If you have any questions and would like a follow up, contact me via Gmail or Hangouts at ajuarez@techcoachjuarez.com. If you would like to unsubscribe from this blog, go to bit.ly/tcjinbox.


My book, The Complete EdTech Coach: An Organic Approach to Digital Learning, co-authored with my wife Katherine Goyette is due out in October/November of 2020. It will be published by Dave Burgess Publishing. Keep an eye out on this blog and on social media. Be sure to follow the hashtag #OrganicEdTech and #CVTechTalk for updates.


Tuesday, September 29, 2020

Feedback Workflow with Google Classroom, Gmail and Google Tasks

Whether we are teaching face to face, hybrid or at a distance, feedback is an essential part of the teaching and learning process. In my experience as an edtech coach, I have heard many complaints about Google Classroom notifications blowing up Gmail inboxes. While it is easy to turn those notifications off, doing so limits your ability to provide prompt feedback to students. 

A phrase that is a regular on my computer clipboard is "Please resubmit for a better grade". Most of my assignments, I provide feedback for them to improve upon their initial submission. Students who revise work and improve it, can achieve full credit on their second or third iteration. Each time I provide feedback, I paste that phrase at the end. I want students to begin to understand that learning is a process.

If you are not accepting late work, I encourage you to accept resubmissions based on teacher feedback. You can turn off the late work notifications, but keep the Google Classroom resubmission and comments email notifications. Doing so will prevent you from always having to dig through the Classwork tab of Google Classroom to find resubmissions and student comments. Each email alert from Google Classroom provides you with a direct link right to the student's resubmission or comment. The easier it is to find and review student resubmissions and work iterations, the better. 

Below, you will find a series of screenshots that show you how to check the Google Classroom email alerts for resubmissions, late work and comments in addition to set reminders for yourself to check them at a later date. All student names were blocked out of respect to student privacy.

In Gmail, when you open an email alert from Google Classroom, it will show you who left the comment, resubmitted work or turned it in late. You will be given in a direct link right back to the assignment in Google Classroom. The example below is that of a student comment.


These days, we are extremely busy. When you are too busy to check student comments or resubmissions right way, use the "Add to tasks" button on the top toolbar of Gmail. If you have multiple things to review, check mark the email notifications you want to check later, on the right side of the message, then click the "Add to tasks" button. This will add each email to Google Tasks as its own task.

When you add one or more resubmission or comments email alerts to Google Tasks, they will appear on a right side panel within Gmail. If you click the Edit button on each task, you are able to set a time reminder for yourself that will also appear on your Google Calendar. When you are ready to review the comment or resubmission, you can click the button on the Task that is a direct link to that email. There is no need to fish through Gmail looking for it.


When you are alerted to check the task, click the email link on the task and you'll be transported back to that email where you will see another link that takes you back to that submission in Google Classroom. After you've addressed the resubmission or comments, click the circle button on the left side of each task to "cross it off". There is something oddly satisfying about crossing off your Tasks. 

Like anything in education, the ideas presented in this blog post are not a magic bullet. They're simply a few ideas that I have seen teachers use and use myself daily. They help me stay on top of the never ending list of things I have to do. 

If you have any questions and would like a follow up, contact me via Gmail or Hangouts at ajuarez@techcoachjuarez.com. If you would like to unsubscribe from this blog, go to bit.ly/tcjinbox.

My book, The Complete EdTech Coach: An Organic Approach to Digital Learning, co-authored with my wife Katherine Goyette is due out in October/November of 2020. It will be published by Dave Burgess Publishing. Keep an eye out on this blog and on social media. Be sure to follow the hashtag #OrganicEdTech and #CVTechTalk for updates.


Monday, September 28, 2020

Classroom Cribs: Distance Learning Edition


Classroom Cribs is a play on words inspired by the MTV show Cribs. On MTVs Cribs, celebrities invited cameras into their homes to show off their lavish lifestyles and home designs. A few years ago, my good friend, colleague and mentor Ed Campos introduced me to Classroom Cribs. This "spinoff" was designed to show off innovative learning spaces designed by teachers. 

In our work together on the board of our local CUE affiliate, CVCUE, Ed, other board members and I did a distance learning version of Classroom Cribs showing off the home office setups many of our members and friends had developed. We posted a Flipgrid link on CVCUE social media for people to record a "Cribs-style" video exhibiting their home office space.

Inspired by this, I would like to show off some of the workstations and distance learning setups done by the amazing teachers I serve at Orosi High School and El Monte Middle School in Cutler-Orosi Joint Unified School District. Each teacher featured volunteered to let me photograph their setup. Some spent their own money on equipment while others pieced things together by what they found around campus and home. Your distance learning Classroom Crib does not have to be super high tech and fancy. The idea is to create a work environment that best suits your tastes and workflow. 

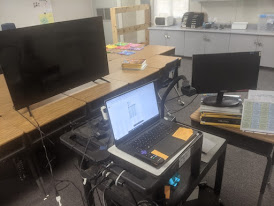
Mr. Jalil, Sports Medicine Teacher, Orosi High School: Mr. Jalil has a pretty cool setup. He has a 65 inch TV connected to a Mini PC with Android. He uses a bluetooth keyboard and mouse as well a projector as extended screen. 


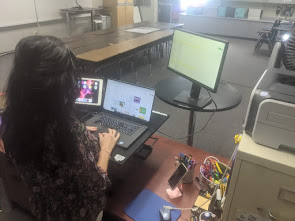
Mr. Nieblas, Math and CS Teacher, Orosi High School: Mr. Nieblas volunteered to pose by his setup. He spent less than $200 to add a large Samsung monitor. He uses three screens, one of which he found left behind by the previous teacher in his room. In addition, he rocks a Snowball microphone that you can get for less than $50 online and at Best Buy.


Mr. Gaspar, Band Teacher, Orosi High School: As you could imagine, teaching music from a distance provides some unique challenges. Mr. Gaspar brought in an extra Vizio TV so he's able to view his students while on Zoom. He purchased an inexpensive external webcam/microphone which he mounts on a microphone stand. The webcam is pointed at his whiteboard allowing him to conduct a lesson much like he did before COVID. 


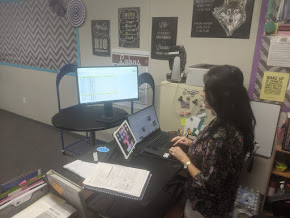
Ms. Goosev, Instructional Coach, El Monte Middle School: Ms. Goosev brought in her personal laptop and iPad in addition to district-provided laptop. Her extra monitor was from a PC on campus. The only extra money she shelled out was for some inexpensive laptop and monitor stands for each device. A cool feature of her setup is "ring light" that she picked up for around $20. This helps students see her much easier when on Zoom.


Ms. Barton, 6th Grade ELA/ELD/History, El Monte Middle School: Ms. Barton called me last week saying she just got a 50 inch Roku enabled TV for less than $300 and wanted assistance setting it up. We found an extra monitor on campus and now she has three monitors. She view her kids on the 50 inch screen, presents on her laptop and has Zoom controls/chat on the spare monitor. In addition, she has her doc cam connected for guided practice. 


Mrs. Barker, 6th Grade ELA/ELD/History, El Monte Middle School: Mrs. Barker has a simple, minimalist setup. In addition to her district issued laptop, she found monitor from a desktop PC on campus and connected it via HDMI cable. She uses an inexpensive iPad stand to prop up her iPad next to her laptop. The most expensive item is here standing desk platform. It can lay flat on the desk or be raised to a standing height. You can find those on Amazon for less than $200. Years ago, she found a circular pub table on Amazon for less than $80 and she uses it now a platform for her extra monitor.


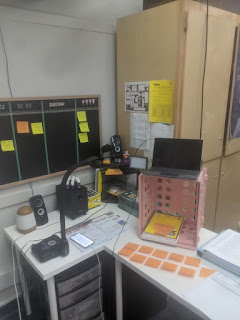
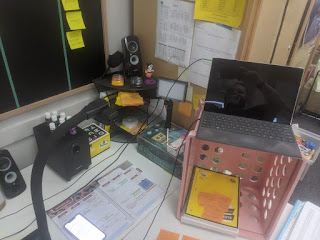
Mrs. Giannandrea, ELA Instructional Coach, Orosi High School: Mrs. Giannandrea has a very simple, organic setup. Her setup was pieced together with things found around her classroom and campus. She found a plastic crate to use as a laptop stand. As a guru of focused note taking, she makes great use of Zoom's doc cam integration to demonstrate effective note taking strategies. Her setup is a great testimony to the fact you don't have to spend a bunch of money to have an effective distance learning setup.


Mr. Ermie, Digital Literacy and Business Math, Orosi High School: Like Mrs. Giannandrea, Mr. Ermie did not go out and spend any extra money on on his setup. His classroom is a computer lab so he pulled a monitor from one of the desktops for a second screen. He uses a personal laptop as a third screen. Instead of forking out any money on a laptop stand, he uses a cardboard box instead, and to great effect. Next to his computers, he has a small whiteboard on an easel to teach lessons and write notes for himself.


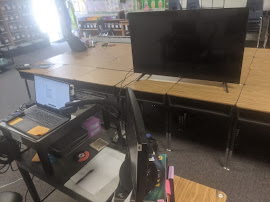
Mr. Kelley, World History Teacher, Orosi High School: Mr. Kelley found an old, extra TV in his house that wasn't being used. He breathed some new life into this old TV by using an HDMI cord to extend his laptop screen when on Zoom calls with students. 


Mrs. Parra, Spanish Teacher, Orosi High School: When teaching Spanish, Mrs. Parra uses a student Chromebook as a second screen during Zoom calls. She uses a small blanket to cover the stack of books that serves as a laptop stand. 


Mrs. Ang, Advanced Math and Calculus, Orosi High School: Mrs. Ang had an old desktop computer in her classroom and is using its old monitor as second screen. In addition, she reached out to her colleague, Mr. Nieblas, who loaned her a spare monitor he had lying around his classroom. She also has the doc cam plugged into her laptop so conduct guided practice in her math classes.


Mr. Ely, AP Literature Teacher, Orosi High School: Mr. Ely calls this his "battle station". He brought a spare monitor from home and normally shares that screen with students when on Zoom calls. He uses the laptop to monitor that chat, participants and other Zoom controls. He opted for a wireless mouse to minimize the chance of getting tangled while he works. On the right, he uses his personal Chromebook to take attendance and answer emails keeping his laptop exclusively for Zoom during class. He uses wire paper tray houses a variety of papers he needs at a glance during class.


When setting up your work station, you don't need to spend money. Chances are, you may have what you need lying around your classroom or the classrooms of colleagues. If your school has a computer lab that is currently unused, reach out to administration about borrowing the monitors from desktop computers as a second or third screen. 

Remember, a stack of textbooks or plastic crate can serve as a viable laptop or monitor stand. If you are not able to cobble together supplies from your school site and are willing to invest some money, you don't need to spend much. External microphones, metal laptop/monitor stands, HDMI cords, adaptors, ring lights, etc. all can be purchased for less than $50. Monitors can be found at Walmart for less than $80. In a nutshell, you don't need to break the bank. 

Design your "battle station" in a manner that best works for you. There is no need to compete with colleagues on work station design. Whatever setup works for you, is the best one.

What does your work station look like? I'd love to see it. Shoot me a picture of your work station via email.

If you have any questions and would like a follow up, contact me via Gmail or Hangouts at ajuarez@techcoachjuarez.com. If you would like to unsubscribe from this blog, go to bit.ly/tcjinbox.

My book, The Complete EdTech Coach: An Organic Approach to Digital Learning, co-authored with my wife Katherine Goyette is due out in October/November of 2020. It will be published by Dave Burgess Publishing. Keep an eye out on this blog and on social media. Be sure to follow the hashtag #OrganicEdTech and #CVTechTalk for updates.


Thursday, September 24, 2020

One of My Favorite Tools: Clipboard History Pro Chrome Extension


One of my favorite teacher productivity tools is the Clipboard History Pro Chrome Extension. Don't let the name fool you. You don't need the paid pro account to get great mileage out of this tool. The free version works just fine. 

This Google Chrome Extension provides easy, convenient access to your computer's clipboard. Distance learning, more than ever before, has educators producing digital content and curriculum. Doing so requires much use of the copy and paste function built in to all computers. Throughout the day, we copy and paste many things from text to images to URLs. Often times it is necessary to paste something again in a different location. Annoyingly, this can require you to go back and find the original item you copied, then re-copy. 

Clipboard History Pro puts all the things you copy at a glance from your browser. All you need to do is click the extension, and in the dropdown menu that appears, see anything you've copied recently. In the menu, click any item to re-copy. Take a look at the screenshots below to learn how to use Clipboard History Pro.

Step 1: Go to the Chrome Web Store and search for and install the Clipboard History Pro extension.


Step 2: Once installed, click the Extension on your Chrome browser. In the drop down menu that appears, you will see all the items that are on your clipboard.

Step 3: From left to right, you can click the circle next to each item to select an item. You can select multiple items at once. Next to each item, it tells you how long ago the item was copied onto the clipboard. Towards the right of the item's row, you can Star an item to add it to favorites, Edit to see more details and X it to delete it.

Step 4: If you click the Edit button, the drop down menu will show more details and options for a single item on your clipboard.

A way in which I use this extension daily is when I post announcements in Google Classroom Stream that are reminders for upcoming due assignments containing quick links to the assignments. The animated GIF below shows how. 


If you have any questions and would like a follow up, contact me via Gmail or Hangouts at ajuarez@techcoachjuarez.com. If you would like to unsubscribe from this blog, go to bit.ly/tcjinbox.

My book, The Complete EdTech Coach: An Organic Approach to Digital Learning, co-authored with my wife Katherine Goyette is due out in October/November of 2020. It will be published by Dave Burgess Publishing. Keep an eye out on this blog and on social media. Be sure to follow the hashtag #OrganicEdTech and #CVTechTalk for updates.


Make a Force Copy of a Digital File in GSuite


As educators, we create resources all the time. When we collaborate with colleagues, we share these resources, but issues arise with editing and viewing permissions as well having to make copies of digital files. If you are using GSuite, there is a simple trick for creating a "Force Copy" link. A "Force Copy" link forces anyone who clicks on it to make a copy of your file without having open a View Only version and make the copy on their own. It removes a few steps from that process. With many colleagues, removing those extra steps can be very helpful. 

This isn't a brand new idea, and you could Google it and find many articles on how to do this, but take a look at the steps and screenshots below to learn how to make a "Force Copy" of a file in GSuite.

Step 1: Open your file and click Share. Set permissions for Anyone with the link is a Viewer.


Step 2: After setting the permissions, look at the Omnibox (address bar)

Step 3: In the Omnibox (address bar), find where is says edit near the end of the address. Delete the word edit and replace it with copy.


Step 4: After changing edit to copy, push Return (on a Mac) or Enter (on a PC or Chromebook) and you'll be taken to this page. Copy the new URL, the entire address, and send it anyone you like or post it somewhere for people to make a "Force Copy" of your file. When they click Make a copy, their copy will automatically be saved in My Drive of their Google Drive. This trick can be done with Slides, Docs, Sheets, Forms, Jamboard, and Drawings.


If you have any questions and would like a follow up, contact me via Gmail or Hangouts at ajuarez@techcoachjuarez.com. If you would like to unsubscribe from this blog, go to bit.ly/tcjinbox.

My book, The Complete EdTech Coach: An Organic Approach to Digital Learning, co-authored with my wife Katherine Goyette is due out in October/November of 2020. It will be published by Dave Burgess Publishing. Keep an eye out on this blog and on
social media. Be sure to follow the hashtag #OrganicEdTech and #CVTechTalk for updates.


Iron Chef with a Dash of Flipgrid for Distance Learning

One of my favorite Eduprotocols is Iron Chef. It's a great way to jigsaw, get students analyzing text, build slides and get all students to present all in one activity. When students present Iron Chef, students become active listeners as they hear the same topics repeated by their peers throughout. This gives them the opportunity to add to their notes as new tidbits and ideas may be added each time a topic gets repeated. 

In distance learning, Iron Chef can be difficult to facilitate. After many iterations of distance learning Iron Chef, I think I may have found a convenient method for teachers. 

The first step is to create a topic on Flipgrid for students to "present" their slides. Students now can screencast on Flipgrid using the option to screen record. Click here to read my past blog post on screencasting with Flipgrid. The second step is to create a Google Slides template you want students to use for building their Iron Chef slide. 

Once you've created the Flipgrid topic and Slides template, go to Classwork in Google Classroom and set up an assignment. Add the link to Flipgrid and the Slides template. For permissions on the Slides template, set it to Make a copy for each student. Be sure each student knows what their assigned reading is.

The screenshot below show how teachers set up the activity. If the image on this post is too small, click here for a larger view.


When students open the assignment, they will open the Slides first and build their slides. Give them 10-15 minutes, in a synchronous lesson, to do their assigned reading and build their Slides. When the 10-15 minutes is up, have them go to the Flipgrid link and screen record their Slides presentation.

Normally, students would present live to the whole class. That can be done, but a hurdle that often comes up is issues with students' microphones on Zoom or Google Meet.  Another issue is time constraints. If the students present their slides on Flipgrid, the teacher can present all the video presentations whole class synchronously (time permitting) or it can bleed over into asynchronous work where students watch their peers' presentations on their own time and take notes.

When students open the Flipgrid link, they will click the options button.


After clicking the options button, they will click Record screen.


When the Capture your screen window appears, they will click Start screen recording. There will be a short countdown before the recording begins. They will click over to the tab where there slides are and record their presentation. When finished, they click back to the Flipgrid tab and click Stop recording. From there, they follow the same steps as they normally would for reviewing and finishing a Flipgrid video.

If you have any questions and would like a follow up, contact me via Gmail or Hangouts at ajuarez@techcoachjuarez.com. If you would like to unsubscribe from this blog, go to bit.ly/tcjinbox.

My book, The Complete EdTech Coach: An Organic Approach to Digital Learning, co-authored with my wife Katherine Goyette is due out in October/November of 2020. It will be published by Dave Burgess Publishing. Keep an eye out on this blog and on social media. Be sure to follow the hashtag #OrganicEdTech and #CVTechTalk for updates.