Thursday, November 19, 2020

Participation Points for Synchronous Lessons in Distance Learning


By this point in distance learning, we all have a pretty good idea of which students will participate in a synchronous lesson and who won't. Before COVID, there were always those few students who were just flies on the wall. They were physically present, but did not contribute or participate. The same is true in distance learning. They're logged into the Zoom or Google Meet, but they do not engage. 

I really wish there was a magic wand or magic bullet to get 100 percent of students participating all the time, but let's be honest, no such thing exists. Dealing with this reality, I have found participation points as an idea that has helped get more students involved in synchronous lessons. 

One way the powers that be are holding schools accountable is through the gradebook. Teachers have been instructed to submit, weekly, copies of assignments and grades. This is meant for auditors to see how students are engaging in distance learning. By no means am I a fan of this, but it is reality.

Daily assignments are not something all teachers do. Finding something to grade daily can be a tedious thing. Below are some of the ways I use participation points as a method of "daily grades" for the auditors and to keep students engaged during a synchronous lesson


Checking for understanding is just good pedagogy whether in distance learning or not. Back in the day, I remember teachers using popsicle sticks to randomly choose students to demonstrate understanding. I remember closing my eyes hoping I wouldn't get picked. When I didn't hear my name, I tuned out. Technology has made it so we don't need popsicle sticks anymore. Apps such as Quizizz, Pear Deck, Nearpod and more allow teachers to have every student answer checking for understanding questions. These tools offer informal, authentic formative assessment. 

These apps all provide reports of student answers and responses when a lesson has ended. Those reports can be used for those daily grades auditors are looking for and as participation points. Students who participate can get a little boost to their grade. For many students these days, a little boost in confidence might be just what they need to push through these troubling times.


Exit tickets are simple, daily participation points activity. Exit tickets can be facilitated easily in Google Classroom via the Question function. A way I use the Question function weekly is to have students reflect and write a real life to content connection before leaving Zoom. Google Classroom scores can be imported to our grade system (Illuminate) so entering those grades for the auditors is simply a few clicks of the mouse. Below is a screenshot of a Google Classroom Question activity that I use weekly as an Exit Ticket. 


If you're looking for some other quick ways to have students earn participation points, check out two of my favorite Eduprotocols, Thin Slides and Iron Chef. Both can be done easily within an hour long synchronous lesson. Click here to see my blog post on Thin Slides in distance learning.  Click here to see my blog post on Iron Chef in distance learning. 


The chat in Zoom is another simple way to track participation points. If you are using Zoom, you can set it to automatically download a record of the chat when the Zoom call is finished. Student responses in the chat could be used for participation points purposes. 


If students are working independently during a synchronous lesson, another way to give participation points is to give them a "minimum progress" goal. For example, in Google Classroom, you could have students working on a Google Slides activity where you made a copy for each student. Students could mark the text or complete tasks on each slide. Booksnaps is a good example of this. You can set them a target of completing a certain number of slides during class time as a way for them to earn participation points. While students work independently, you can look in on their progress and provide feedback as well.

The COVID crisis and distance learning has changed the way we teach dramatically. Accountability and auditors are a reality whether we like it or not. Participation points are not a new idea, but they can be leveraged to help better engage students while giving the powers that be what they are looking for. How do you use participation points in your synchronous lessons? If you have some ideas, I'd love to hear them.

If you have any questions and would like a follow up, contact me via Gmail or Hangouts at ajuarez@techcoachjuarez.com. 

My book, The Complete EdTech Coach: An Organic Approach to Digital Learning, co-authored with my wife Katherine Goyette is now available on Amazon. Click here to purchase. It is published by Dave Burgess Publishing. Be sure to follow the hashtag #OrganicEdTech and #CVTechTalk for updates.


Wednesday, November 18, 2020

Hashtags: Reflection, Review, Real-life to Content Connections, and Metacognition

Hashtags became popular in the early days of Twitter. Early Twitter users used hashtags to categorize Tweets, making them easier to search and find. Since then, they have become a major part of pop culture and the lives of students. For instructional purposes, I have been using the concept of the hashtag as a method of fostering real life to content connections, reflection, feedback and metacognition. 

Getting students started with "hashtagged learning" is easier said than done. Like any new idea or strategy, it will take kids a few repetitions before they grasp the concept. When I introduce the concept, I repeatedly remind students to reflect on learning with this question, "What does this remind me of?" 

Every student has a unique life experience that can be leveraged to help students learn.   
I want students to develop the habit of seeing themselves in what they learn. I want them to make real life to content connections. This can be done in all grade levels and subjects. Hashtag reflections can be used as an exit ticket, asynchronous reflection on notes, a part of Thin Slides, and more. 

Here are some sample hashtags from a lesson I taught years ago on the Korean War. 

#DivorcedParents - The Korean War reminds me of divorced parents arguing. In this case, it was a fight between capitalism and communism. In a divorce, the kids get caught in the middle, but in this case, it was the Korean people stuck in the middle.


#LineOfScrimmage - The Korean War reminds of a football game. In football, controlling the line of scrimmage and pushing your opponent back is important for winning. At first, the North pushed the South back to the ocean. Then the US helped the South push the North back to China, but then the Chinese helped North push them back to the 38th Parallel.

#PushItPushItRealGood - As I was learning about the Korean War, I kept hearing the Salt-N-Pepa song "Push It" in my head. The line between North and South Korea kept getting pushed around until it finally settled on the 38th Parallel.

#Hairline - In the Korean War, the line between North and South kept getting pushed back by each side. This reminds of people who go bald and their hairline gets pushed back further as they get older.

#ChaChaSlide - The Korean War reminds me of the song "Cha Cha Slide" because the song tells people what to do and makes them keep moving the entire time. The line between the North and the South during the war kept moving just like people do during the song.

#AlienVsPredator - The Korean War reminds me of the Alien Vs Predator movies because humans get stuck in the middle of battles between Aliens and the Predators. The Korean people are the ones stuck in the middle of a battle between capitalism and communism.

The screenshots below show examples of how to have students use hashtags as a method of reflection in Google Classroom. This method can be done with both synchronous and asynchronous lessons.

Set up a Question in Google Classroom. Instruct students to reflect on notes taken on a recent lesson. Have students ask themselves "What does this remind me of?". Encourage them to think of life experience with friends and family or things they've seen in movies, TV and pop culture. Be sure to remind students to write a 1-2 sentence rationale for each hashtag. They can write any hashtag as long as they can rationalize the connection to what they learned.


Below are some sample hashtags students wrote about what they learned from a lesson on Thomas Paine and Common Sense. This was one of the first times they engaged in a hashtag reflection. My favorite is the hashtag #AOC in which the student saw a parallel between Thomas Paine and current congresswomen Alexandria Ocasio-Cortez.


For synchronous lessons, hashtags can be adapted to be part of the Thin Slides Eduprotocol. In Google Classroom, create an assignment with a Google Slides presentation attached. The presentation only needs to be one blank slide. Be sure to make a copy for each student. Students are given 3-5 minutes to add one picture and one word ONLY to their slide. Their picture and word must be about something they've learned. 

When the slide building time is up, the teacher will present each kid's slide. Do this in Classroom as if you are going to grade the slides. From there, you can click quickly through each student's slides. When their slide shows on the screen, they unmute and have 7-10 seconds to explain the topic. The picture and word are there to remind and help them remember what to say. To adapt Thin Slides for hashtags, replace the one word with a hashtag. When a student presents, they will verbally explain how their hashtag connects to the topic or concept. 


Hashtags can also be used as a method of metacognition. Students can engage in spiral review by having students review hashtags from previous lessons and reflect on what the author of the hashtag was thinking. This can lead into class debates and or academic discussions. 

If you have any questions and would like a follow up, contact me via Gmail or Hangouts at ajuarez@techcoachjuarez.com. 

My book, The Complete EdTech Coach: An Organic Approach to Digital Learning, co-authored with my wife Katherine Goyette is now available on Amazon. Click here to purchase. It is published by Dave Burgess Publishing. Be sure to follow the hashtag #OrganicEdTech and #CVTechTalk for updates.


Tuesday, November 17, 2020

Use Google Forms and Sheets to Track Intervention Students and More


A common pain point among educators is having to transpose grades, data, etc. from paper or a program to another program. One thing we have started doing is electronically submitting records of student intervention. We have the autonomy to track and record student intervention interactions with our own preferred methods. For the most part, I have seen teachers write down their intervention on a paper chart. When we were turning in hard copies, this method is fine, but now we're submitting electronically. 

One solution would be to scan intervention forms, but that can be tedious and time consuming. Using Google Forms in concert with CONCATENATE in Google Sheets or Microsoft Excel, you can track intervention data, and much more, digitally and efficiently. I am by no means an expert with spreadsheets. My skill level is rather rudimentary, but this trick has made my workflow much better and saved me hours of tedious work.

In the GIF below, you see a sample of a form similar to what I use to track intervention with students. Setting the form is not difficult. The tedious, difficult part is getting all the student names into the form.

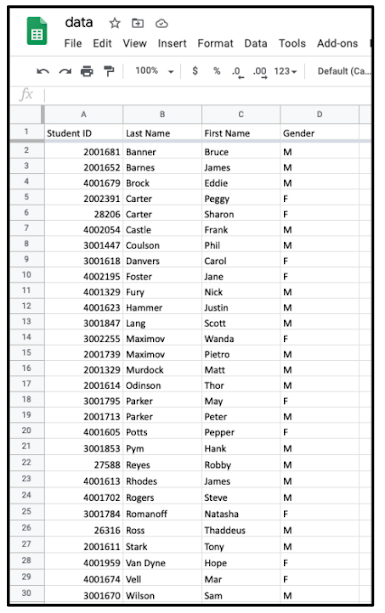
Using your school's student data system (We currently use Illuminate), you can download spreadsheets with your class rosters. Below is a sample of what these spreadsheets can look like. Using CONCATENATE in Google Sheets or Microsoft Excel, you can combine student last names, first names, and a comma in between, into a list that is EASILY copied and pasted into a Google Form.


According to edu.gcfglobal.org, the CONCATENATE function allows you to combine text from different cells into one cell. In our example, we can use it to combine the text in one column and another column  to create a combined name in a new column. 

Get started using CONCATENATE to combine last name and first name with a comma and space in between. In the screenshot below, I used an empty cell in the first row of data. Start by typing the "equal" sign. From there, enter the first cell you want to combine. In this case, it was "B2" for the last name Banner. After typing B2, with no spaces, type an ampersand. 

To add a comma after the last name (Banner), put a quotation mark, comma and another quotation mark. Remember, no spaces. To add a space after the comma, type an ampersand, quotation mark, hit the spacebar and put another quotation mark. To add the first name (Bruce), type an ampersand and the cell for Bruce (C2). Push the enter button when done. Typing the cells is not case sensitive. The formula used to combine the cells creating Banner, Bruce was =B2&","&" "&C2.


The beauty of this is that you only have to type the formula once. Once the last and first name is combined, click in that cell and you'll see a blue box around it. In the bottom left corner of the cell, you will see a blue square. Click and drag the square down to "fill down" and apply the formula to all of the rows below. This will combine last and first names for all students in the spreadsheet.


The GIF below shows CONCATENATE in action.


Select and copy all of the combined last and first names. 


With all of the students' names copied, create a Google Form. Set up a question for student names. Paste the names as the options for either Multiple Choice or Checkboxes. If you teach multiple classes, you will want to create a question for each class. Paste the student list into "Option 1" and it will add all student names to the question.


With my student rosters easily put into Google Form, without typing one by one, there are many ways to use them. I use them for tracking intervention, phone calls to absent students, rubrics and more. Click here to view a sample of Form I use when teaching multiple classes. How might you use a Form like this?

If you have any questions and would like a follow up, contact me via Gmail or Hangouts at ajuarez@techcoachjuarez.com. 

My book, The Complete EdTech Coach: An Organic Approach to Digital Learning, co-authored with my wife Katherine Goyette is now available on Amazon. Click here to purchase. It is published by Dave Burgess Publishing. Be sure to follow the hashtag #OrganicEdTech and #CVTechTalk for updates.


Friday, November 13, 2020

Google Classroom "Upcoming & To Review/To Do": What is it??

Perhaps you haven't paid it any attention, but there is a relatively new feature visible in the Google Classroom Stream. Off to the left, you will see a small section that says "Upcoming." At a glance, it shows you what assignments are due soon. It appears the same from both teacher and student perspective, but it will operate differently in each. 

I use this feature weekly when I attempt to keep up with student work. This saves me time of having to look through and open each assignment in Classwork. In addition, I can categorize assignments as "reviewed" and only see ones that still need my attention. On the student side, they are able to see their assignments as Assigned, Missing or Done. This simple tool can be very valuable for both teachers and students when managing time and workflow.

Below is a series of screenshots that shows you how to get started using Google Classroom's "Upcoming & To Review" features.

Teacher

When you open a Google Classroom, on the Stream tab, you will see small box titled Upcoming. In this box, there will be displayed some assignments that are due soon. If you click on any of the assignments in the box, it will take directly to the assignment to evaluate student work. If you click "View all", you'll be taken to the "To Review" page for that particular Google Classroom.


On the To review page, you will see your assignments with how many have turned it in, still assigned and graded. At the top, it shows which class you are viewing. If you click that button, you can switch to other classes.


Next to each assignment, on the right, click the three dots and you can mark an assignment as reviewed. This is a great tool for organizing assignments, on the teacher end. When you mark an assignment as reviewed, It will "disappear" from To review and placed in the Reviewed tab at the top. This is a great tool for categorizing assignments for which you are no longer accepting late work. This will not show up on the student end though. That feature is yet to come from Google. 


Student

On the student side of Google Classroom, when they click Upcoming, they will see three categories: Assigned, Missing, Done. Assigned are assignments in which they have not completed, but the due date has not yet passed. Missing are assignments in which have not completed and the due date has already passed. Done refers to assignments in which they have already submitted. This is a great tool for students to monitor their work.


If you have any questions and would like a follow up, contact me via Gmail or Hangouts at ajuarez@techcoachjuarez.com. 

My book, The Complete EdTech Coach: An Organic Approach to Digital Learning, co-authored with my wife Katherine Goyette is now available on Amazon. Click here to purchase. It is published by Dave Burgess Publishing. Be sure to follow the hashtag #OrganicEdTech and #CVTechTalk for updates.


Thursday, November 12, 2020

Monitor Asynchronous Work with Sheets Notification Rules


Since the dawn of distance learning, the term Asynchronous has become a huge part of the EDU lexicon. I think I say this word at least a dozen times daily and type it more than double that. Keeping students engaged in asynchronous work can be a struggle. Some students have thrived, others struggled while many have been rather hit and miss. 

A common asynchronous learning activity is to embed lesson videos with questions on Google Forms. Teachers insert a recorded lesson video to the Form, students watch the video in the Form then answer a variety of checking for understanding questions. 

Keeping track of when students submit work are valuable data points not only for tracking asynchronous work, but also for gaining insight on when students are completing work. This type of information can be useful when trying to better understand student study habits and routines. In addition, this data can be useful when setting up intervention groups. Using notification rules in the Google Sheet generated by a Google Form, you can access this data. You can receive an email immediately after a student submits a Form or get a daily digest of Form submissions.

Below is a series of screenshots showing you how to get started using notification rules with Google Forms and Google Sheets.

Step 1: After creating a Form, click Responses.


Step 2: Click the Spreadsheet button. A small window will then appear.


Step 3: In the small window, click Create a new spreadsheet and click Create.


Step 4: In a new tab, the Sheet will open. Click Tools and select Notification rules.


Step 5: A small window will appear called Set notification rules. Select the option to be notified when "A user submits a form." For "Notify me with" you can choose to be emailed a daily digest or to be emailed right away, as soon as a student submits the form.


This is a sample of what the email looks like when you have set notification rules. If you click the circled "Click here" it will open the Sheet so you can see the most recent submissions of the form.


Notification rules can be used to keep up with a variety of information. It can be useful when using a Form for a sign-up sheet, fundraiser, feedback form, suggestion form and more. For what might you use notification rules? If you have some ideas, please share. 

If you have any questions and would like a follow up, contact me via Gmail or Hangouts at ajuarez@techcoachjuarez.com. 

My book, The Complete EdTech Coach: An Organic Approach to Digital Learning, co-authored with my wife Katherine Goyette is now available on Amazon. Click here to purchase. It is published by Dave Burgess Publishing. Be sure to follow the hashtag #OrganicEdTech and #CVTechTalk for updates.


Use Google Classroom to Create Class Period Email Groups


In my experience with distance learning, I have come to realize that students vary on their preferred method of communication. Google Classroom is my main platform. In addition to assignments posted, I use the Stream daily to send messages and reminders. Since we started distance learning last spring, I have noticed many students ignore the alerts from Google Classroom Stream announcements. Many of these students tend to respond better to emails. 

To best meet the needs of students, I have been sending reminders and announcements on both the Google Classroom Stream and email. Is it a little bit of extra work for me? Yes, but it's not too much work and it's what students need. Any way we can streamline this process and shave off some clicks, seconds and minutes is valuable.

One way to streamline this process is to create a label in Gmail for all students in a particular class. With a label like this set, when in Gmail, start typing the label name and quickly enter all students' names. This will save you time of having to manually enter names or go to the Google Classroom People tab to select students and email from the Actions button. Setting up labels for your classes also saves time when sending messages to multiple classes.

Below is a series of screenshots for getting started creating a label for each class without having to manually enter each student's name one by one.

Step 1: Go to People tab in one of your Google Classrooms. Check the box below Students to select all students.


Step 2: Click the Actions button. In the dropdown menu, select Email.                                  


Step 3: A new tab will open in Chrome. This tab will be a message to be composed in Gmail. All student names will be placed automatically into the BCC (Blind Carbon Copy row). This means each student will receive the message without seeing who else is also receiving the same message. This will help you manage replies as there will be no reply all's.

Click BCC.


Step 4: After clicking BCC, a small window will pop up. All student names will appear checked. Click Manage labels.


Step 5: In the dropdown that appears, go to the bottom and click Create label. If you have already created a label beforehand, click the label for where you want to place these students. 


Step 6: If you are creating the label for the first time, give the label a name and click Save.


If you want to check your label and see who is in it, go to contacts.google.com. On the left side, you will see a list of labels. Click on the label and it will display all the names saved to that label. 


Step 7: Now that you have created the label, the next time you want to email the whole class, don't go to Classroom. Start composing your email in Gmail. In the recipient row, start typing the name of the label. The label will show as a suggestion. Click the label.


Step 8: After clicking on the label, all the names will appear. To message multiple classes, you can type other class labels and those names will be added to the message. My advice is to use BCC to manage replies from students.


The labels you create are private to your account only. In Google districts, email groups are set up for all users to use to send messages to teachers, admin, departments, etc. Nobody will be able to type your label and email your students. 

If you have any questions and would like a follow up, contact me via Gmail or Hangouts at ajuarez@techcoachjuarez.com. 

My book, The Complete EdTech Coach: An Organic Approach to Digital Learning, co-authored with my wife Katherine Goyette is now available on Amazon. Click here to purchase. It is published by Dave Burgess Publishing. Be sure to follow the hashtag #OrganicEdTech and #CVTechTalk for updates.


Tuesday, November 10, 2020

Mark Text with Booksnaps

Booksnaps are absolutely one my favorite activities to help students interact with text. Booksnaps was invented years ago by my friend Tara Martin. Originally, Booksnaps were done with Snapchat, but as time went on, teachers have adapted it so it can be done with Google Slides, PowerPoint and Seesaw. In a nutshell, Booksnaps empowers students to read curated text, identify evidence or theme, and justify their conclusions. 

Hanging with Tara at Tech Rodeo 2020

The beauty of Booksnaps is how they can be adapted to any grade level and or subject. When I do Booksnaps, I always start with a title slide that shows the students the topic. This can be used for both synchronous and asynchronous work.  

Booksnaps are set up by adding an image of text to a slide and adding a task for students to accomplish based on their reading of the text. Below are some screenshots of some Booksnaps I have used this semester in my 11th grade US History class. 


On this version of Booksnaps, I instructed students to identify "argument". They had to underline evidence of the argument. 


On this slide, students were instructed to underline/circle evidence and add an emoji in the empty box that represents the feelings of those they are reading about. 


Below is how I set up a "generic" Booksnaps slide. The large area is where I paste an image of text. To the side is where I enter instructions, tasks and more. Part of the tasks can be to paste in images and emojis that support what students identify when they read. 


Here is a sample of the setup of a Booksnaps slide. An image of text was pasted in and, on the right, two tasks were entered in for students to complete using that text. On this example, students are tasked with underlining evidence in red. They also will paste a picture that represents the feeling of those they are reading about.


For underlining or circling, I teach students to use the Line tool. Next to the line tool, there is a little arrow that provides a dropdown menu. From the menu, I have students select the Scribble tool. This allows them to underline and circle. Their circles and lines may be a bit crooked at first, but over time, they get better with the tool using a mouse or trackpad.


After drawing a circle or line, they use the Line weight tool to make the line thicker. This will make it easier for teachers to see when evaluating student work.


The Line color tool allows you to change the color of any line or circle you draw. Underlining and circling different aspects, themes, types of evidence, etc. in different colors is a great strategy for students to demonstrate understanding. 


Here is a sample of a completed Booksnap. Evidence was underlined and an emoji the represented a feeling was pasted. 


Booksnaps are extremely versatile. If you are familiar with Hyperdocs, you can apply many of the design elements from there to Booksnaps. They have been one of my go-to activities for years when teaching any subject. If you are looking a new way to get kids engaged in reading and analyzing text, give Booksnaps a shot. How might you use Booksnaps? If you have some cool ideas, please share with me. 

If you have any questions and would like a follow up, contact me via Gmail or Hangouts at ajuarez@techcoachjuarez.com. If you would like to unsubscribe from this blog, go to bit.ly/tcjinbox.

My book, The Complete EdTech Coach: An Organic Approach to Digital Learning, co-authored with my wife Katherine Goyette is now available on Amazon. Click here to purchase. It is published by Dave Burgess Publishing. Be sure to follow the hashtag #OrganicEdTech and #CVTechTalk for updates.