Showing posts with label Google Forms. Show all posts

Friday, February 4, 2022

Prep for Google Certified Educator Level 2 Exam: Google Forms


The Google Certified Educator Level 2 Exam has gone through some changes recently. In the past, it was 20 questions multiple choice and 11 performance tasks. The current iteration is 35 multiple choice questions based off of scenarios. Questions will ask you to choose between 1-5 correct answers. These questions require you to be familiar with the features and functionality of each Google Workspace for Education App. 

For Forms, you need to be familiar with the following features and functionality.
- How to use Forms to gather various forms of feedback and data
- How to use Forms to build a Create Your Own Adventure Story
- How to use Forms to build surveys
- How to use Forms to create self-paced lessons with videos and questions for differentiated instruction

Click here to go through some Forms Practice Scenarios on Quizizz Lessons. These scenarios are NOT the same as the test, but similar. If you understand the skills demonstrated in the videos and can answer my checking for understanding questions, you will be prepared for the Forms portions of the Level 2 Exam.

If you have any questions and would like a follow up, contact me via Gmail or Chat at ajuarez@techcoachjuarez.com.  

Friday, December 10, 2021

Prep for Google Certified Educator Level 1 Exam: Google Forms


The Google Certified Educator Level 1 Exam has gone through some changes recently. In the past, it was 20 questions multiple choice and 11 performance tasks. The current iteration is 35 multiple choice questions based off of scenarios. Questions will ask you to choose between 1-5 correct answers. These questions require you to be familiar with the features and functionality of each Google Workspace for Education App. 

For Google Forms, you need to be familiar with the following features and functionality.

- How to use Forms to check for understanding
- How to use Forms to create quizzes and assessments
- How to use Forms to collect feedback
- Be familiar with all of the different question types

Click here to go through some Google Forms Practice Scenarios on Quizizz Lessons. These scenarios are NOT the same as the test, but similar. If you understand the skills demonstrated in the videos and can answer my checking for understanding questions, you will be prepared for the Google Forms portions of the Level 1 Exam.

If you have any questions and would like a follow up, contact me via Gmail or Chat at ajuarez@techcoachjuarez.com. 

My book, The Complete EdTech Coach: An Organic Approach to Digital Learning, co-authored with my wife Katherine Goyette is now available on Amazon. Click here to purchase. It is published by Dave Burgess Publishing. Be sure to follow the hashtag #OrganicEdTech and #CVTechTalk for updates.

Wednesday, November 17, 2021

Keep Track of Google Forms with Notification Rules


The popularity of Google Forms has exploded over the years. It's so versatile. You can create surveys to collect a wide range of data and information. You can create self paced lessons, Create Your Own Adventure Stories, assessments and more. 

Keeping track of who fills out a form and when they complete it can be a tedious task. This requires you to go searching through your Drive to find the Google Sheet that stores the Form's data. Hiding in plain sight, built into Google Sheets, is a Notification rules function. This allows you to be emailed when someone fills out your Form. 

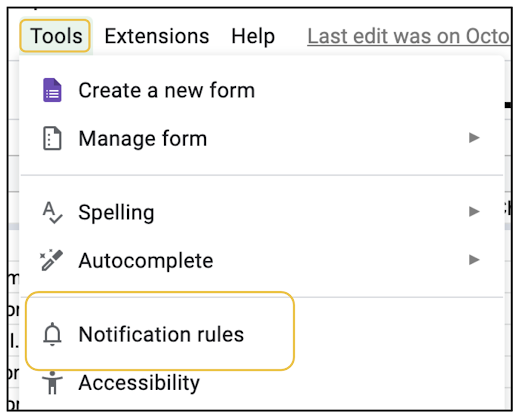
Get started by opening the Sheet that accompanies your Google Form. Click Tools on the top menu and select Notification rules.


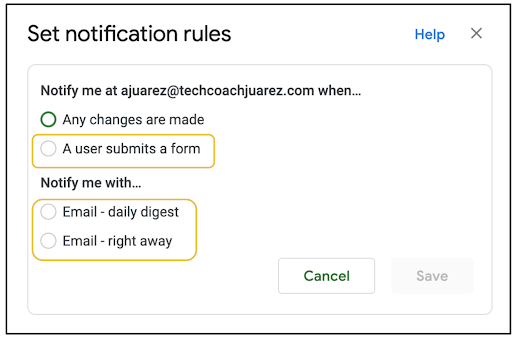
In the menu that appears, you have some options for setting your rules. The first option is when you'll receive the notification email. If you are tracking student responses, I recommend selecting the choice titled "A user submits a form". This will email you within minutes of a someone submitting the Form. The other option is how you'll receive the notification. You can choose from a daily digest, which is one email showing all the submissions that day. You can also choose right away which means every submission will generate an email.


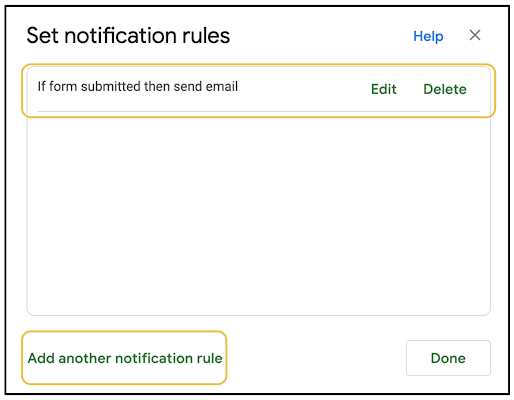
You can set multiple rules by clicking Add another notification rule.


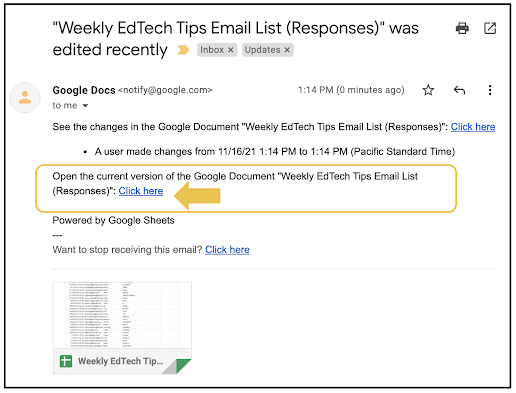
The email you receive will look like what you see below. Embedded is link that takes you directly to the responses Sheet.


There are many applications for notification rules. I've used it to track blog subscribers and unsubscribes. As a classroom teacher, I've used it to get notifications when intervention students complete lessons outside of class. The notification reminds me to check their work and update their grades. Working with parents, you can get notifications to track which parents have yet to respond to a survey. Administrators can do something similar to track which staff members have yet to respond to input surveys. The possibilities are endless. How might you use Notification rules?

If you have any questions and would like a follow up, contact me via Gmail or Chat at ajuarez@techcoachjuarez.com. My book, The Complete EdTech Coach: An Organic Approach to Digital Learning, co-authored with my wife Katherine Goyette is now available on Amazon. Click here to purchase. It is published by Dave Burgess Publishing. Be sure to follow the hashtag #OrganicEdTech and #CVTechTalk for updates.


Wednesday, September 8, 2021

Get Started with "Choose Your Own Adventure" Stories Using Google Forms


Just the other day, I wrote a blog post on how to get started with "Choose Your Own Adventure" Stories using Google Slides. It's a great way to give multiple perspectives when students read as well as inject a little bit of voice and choice. If you're a fan of Google Forms, you can create these types of experiences with Forms too. One advantage Forms has over Slides is ability to track accountability. When students complete or submit, there is a record of them reading and which path they chose. You could have kids read all versions and do a comparison of the characters' journeys. The possibilities abound.

Take a look at the screenshots below to get started with the bare bones basics of creating "Choose Your Own Adventure" Stories with Google Forms.

The example below gives three options for students to choose. Jack and Jill went up the hill, but there are three forks in the road. They can fetch a pail of water, get a better view of the city or plant an oak tree. For this example, I typed the opening of the story as a multiple choice question and each option was a choice.


After putting the three options, I added a section for each option. Click the Add Section button (bottom right of the screenshot) to add sections for each option.


Below you can see the sections for each of the options kids can choose.


Next, I added a title and description to each section. Click the button you see circled (on the right of the screenshot) to add a title and description. In the title and description is where I typed a version of the story. Repeat this process for each section. For this example, I set each section or story version to dovetail at the same conclusion. At the bottom of the screenshot, you have a dropdown menu where you direct readers where to go next in the story after reading their chosen section. In this case, I directed them (in all three options) to go the end.


Below you can see the options of where to direct readers after reading a section.


Now we need to circle back to the original fork in the road and set it so each choice directs the reader to its respective version of the story. In the bottom right corner of the question, click the three dots.


In the menu that appears, select Go to section based answer.


You will see a "Continue to next section" button appear next to each option. 


Click each "Continue to next section" button to determine which section the reader will go to based on their choice. Repeat this for each choice.


Below is what it looks like once you've set the destination for each choice.


The example shown above is a very basic way to get started. The story was not overly complicated. The more versions and or forks in the road you put will require more planning and sections. My advice is to start simple and slowly branch out to create more in-depth stories. The GIF below shows all three versions of the story shown in the screenshots.


How will you use "Choose Your Own Adventure" Stories? If you have any questions and would like a follow up, contact me via Gmail or Chat at ajuarez@techcoachjuarez.com.  My book, The Complete EdTech Coach: An Organic Approach to Digital Learning, co-authored with my wife Katherine Goyette is now available on Amazon. Click here to purchase. It is published by Dave Burgess Publishing. Be sure to follow the hashtag #OrganicEdTech and #CVTechTalk for updates.


Tuesday, November 17, 2020

Use Google Forms and Sheets to Track Intervention Students and More


A common pain point among educators is having to transpose grades, data, etc. from paper or a program to another program. One thing we have started doing is electronically submitting records of student intervention. We have the autonomy to track and record student intervention interactions with our own preferred methods. For the most part, I have seen teachers write down their intervention on a paper chart. When we were turning in hard copies, this method is fine, but now we're submitting electronically. 

One solution would be to scan intervention forms, but that can be tedious and time consuming. Using Google Forms in concert with CONCATENATE in Google Sheets or Microsoft Excel, you can track intervention data, and much more, digitally and efficiently. I am by no means an expert with spreadsheets. My skill level is rather rudimentary, but this trick has made my workflow much better and saved me hours of tedious work.

In the GIF below, you see a sample of a form similar to what I use to track intervention with students. Setting the form is not difficult. The tedious, difficult part is getting all the student names into the form.

Using your school's student data system (We currently use Illuminate), you can download spreadsheets with your class rosters. Below is a sample of what these spreadsheets can look like. Using CONCATENATE in Google Sheets or Microsoft Excel, you can combine student last names, first names, and a comma in between, into a list that is EASILY copied and pasted into a Google Form.


According to edu.gcfglobal.org, the CONCATENATE function allows you to combine text from different cells into one cell. In our example, we can use it to combine the text in one column and another column  to create a combined name in a new column. 

Get started using CONCATENATE to combine last name and first name with a comma and space in between. In the screenshot below, I used an empty cell in the first row of data. Start by typing the "equal" sign. From there, enter the first cell you want to combine. In this case, it was "B2" for the last name Banner. After typing B2, with no spaces, type an ampersand. 

To add a comma after the last name (Banner), put a quotation mark, comma and another quotation mark. Remember, no spaces. To add a space after the comma, type an ampersand, quotation mark, hit the spacebar and put another quotation mark. To add the first name (Bruce), type an ampersand and the cell for Bruce (C2). Push the enter button when done. Typing the cells is not case sensitive. The formula used to combine the cells creating Banner, Bruce was =B2&","&" "&C2.


The beauty of this is that you only have to type the formula once. Once the last and first name is combined, click in that cell and you'll see a blue box around it. In the bottom left corner of the cell, you will see a blue square. Click and drag the square down to "fill down" and apply the formula to all of the rows below. This will combine last and first names for all students in the spreadsheet.


The GIF below shows CONCATENATE in action.


Select and copy all of the combined last and first names. 


With all of the students' names copied, create a Google Form. Set up a question for student names. Paste the names as the options for either Multiple Choice or Checkboxes. If you teach multiple classes, you will want to create a question for each class. Paste the student list into "Option 1" and it will add all student names to the question.


With my student rosters easily put into Google Form, without typing one by one, there are many ways to use them. I use them for tracking intervention, phone calls to absent students, rubrics and more. Click here to view a sample of Form I use when teaching multiple classes. How might you use a Form like this?

If you have any questions and would like a follow up, contact me via Gmail or Hangouts at ajuarez@techcoachjuarez.com. 

My book, The Complete EdTech Coach: An Organic Approach to Digital Learning, co-authored with my wife Katherine Goyette is now available on Amazon. Click here to purchase. It is published by Dave Burgess Publishing. Be sure to follow the hashtag #OrganicEdTech and #CVTechTalk for updates.


Thursday, November 12, 2020

Monitor Asynchronous Work with Sheets Notification Rules


Since the dawn of distance learning, the term Asynchronous has become a huge part of the EDU lexicon. I think I say this word at least a dozen times daily and type it more than double that. Keeping students engaged in asynchronous work can be a struggle. Some students have thrived, others struggled while many have been rather hit and miss. 

A common asynchronous learning activity is to embed lesson videos with questions on Google Forms. Teachers insert a recorded lesson video to the Form, students watch the video in the Form then answer a variety of checking for understanding questions. 

Keeping track of when students submit work are valuable data points not only for tracking asynchronous work, but also for gaining insight on when students are completing work. This type of information can be useful when trying to better understand student study habits and routines. In addition, this data can be useful when setting up intervention groups. Using notification rules in the Google Sheet generated by a Google Form, you can access this data. You can receive an email immediately after a student submits a Form or get a daily digest of Form submissions.

Below is a series of screenshots showing you how to get started using notification rules with Google Forms and Google Sheets.

Step 1: After creating a Form, click Responses.


Step 2: Click the Spreadsheet button. A small window will then appear.


Step 3: In the small window, click Create a new spreadsheet and click Create.


Step 4: In a new tab, the Sheet will open. Click Tools and select Notification rules.


Step 5: A small window will appear called Set notification rules. Select the option to be notified when "A user submits a form." For "Notify me with" you can choose to be emailed a daily digest or to be emailed right away, as soon as a student submits the form.


This is a sample of what the email looks like when you have set notification rules. If you click the circled "Click here" it will open the Sheet so you can see the most recent submissions of the form.


Notification rules can be used to keep up with a variety of information. It can be useful when using a Form for a sign-up sheet, fundraiser, feedback form, suggestion form and more. For what might you use notification rules? If you have some ideas, please share. 

If you have any questions and would like a follow up, contact me via Gmail or Hangouts at ajuarez@techcoachjuarez.com. 

My book, The Complete EdTech Coach: An Organic Approach to Digital Learning, co-authored with my wife Katherine Goyette is now available on Amazon. Click here to purchase. It is published by Dave Burgess Publishing. Be sure to follow the hashtag #OrganicEdTech and #CVTechTalk for updates.


Thursday, September 24, 2020

Make a Force Copy of a Digital File in GSuite


As educators, we create resources all the time. When we collaborate with colleagues, we share these resources, but issues arise with editing and viewing permissions as well having to make copies of digital files. If you are using GSuite, there is a simple trick for creating a "Force Copy" link. A "Force Copy" link forces anyone who clicks on it to make a copy of your file without having open a View Only version and make the copy on their own. It removes a few steps from that process. With many colleagues, removing those extra steps can be very helpful. 

This isn't a brand new idea, and you could Google it and find many articles on how to do this, but take a look at the steps and screenshots below to learn how to make a "Force Copy" of a file in GSuite.

Step 1: Open your file and click Share. Set permissions for Anyone with the link is a Viewer.


Step 2: After setting the permissions, look at the Omnibox (address bar)

Step 3: In the Omnibox (address bar), find where is says edit near the end of the address. Delete the word edit and replace it with copy.


Step 4: After changing edit to copy, push Return (on a Mac) or Enter (on a PC or Chromebook) and you'll be taken to this page. Copy the new URL, the entire address, and send it anyone you like or post it somewhere for people to make a "Force Copy" of your file. When they click Make a copy, their copy will automatically be saved in My Drive of their Google Drive. This trick can be done with Slides, Docs, Sheets, Forms, Jamboard, and Drawings.


If you have any questions and would like a follow up, contact me via Gmail or Hangouts at ajuarez@techcoachjuarez.com. If you would like to unsubscribe from this blog, go to bit.ly/tcjinbox.

My book, The Complete EdTech Coach: An Organic Approach to Digital Learning, co-authored with my wife Katherine Goyette is due out in October/November of 2020. It will be published by Dave Burgess Publishing. Keep an eye out on this blog and on
social media. Be sure to follow the hashtag #OrganicEdTech and #CVTechTalk for updates.


Tuesday, September 22, 2020

A Couple of Ideas for EdTech Coaches to Track Coaching Interactions

As an edtech coach, it is vital to track your teacher and student interactions. Administrators love data and want data to support their investment in your edtech coach position. In our upcoming book, The Complete EdTech Coach: An Organic Approach to Digital Learning, my co-author and wife, Katherine Goyette and I, discuss ways to measure your effectiveness and impact as an edtech coach. We recommend using the 4 C's for this. We like to say, "if you plan with the 4 C's in mind, the tech will take care of itself". The wisdom is that if administrators observe students engaged in the 4 C's, you've effectively integrated technology.

Edtech coaches wear many hats. Where the 4 C's measure the effectiveness of edtech coaching and integration, hard data for your everyday coaching interactions are also important. Take a look below at the Google Form I use to track all of my coaching duties from meeting with teachers, walking classrooms, providing feedback and training students, quasi-IT duties and more.

The first "question" is where I choose the school site of the teacher or student I am supporting. Depending on the choice, it will take me to a list of teachers for that school site. 

After selecting the school site, I select the name of the teacher or select "Student". If "Student" is selected, when I get to the summary at the end of the form, I add the student's name there.

After selecting the teacher name or "Student", the form takes me to a Checkbox question of a variety of "services" provided. 


When finished "checkboxing" services provided, the form takes me to a question to select the date and add a summary of the interaction. Here is where I provide the details of the coaching interaction.


There are a myriad of ways edtech coaches can track their interactions and measure effectiveness. One option I encourage you to take a look at comes from fellow Google Certified Innovator Suzana Somers. She has created a great tool called connecthub.io. It is a platform designed to help instructional coaches save time and better visualize the impact of their coaching. Click here to check it out. Whether you create a Google Form or use a tool like connecthub.io, find or create a tool that works for you. If you're a classroom teacher or administrator, I encourage you to reflect on the ideas presented in this post and think of ways to adapt them toward your role.

If you have any questions and would like a follow up, contact me via Gmail or Hangouts at ajuarez@techcoachjuarez.com. If you would like to unsubscribe from this blog, go to bit.ly/tcjinbox. Our book, The Complete EdTech Coach: An Organic Approach to Digital Learning is due out in October/November of 2020, published by Dave Burgess Publishing. Keep an eye out on this blog and on social media. Be sure to follow the hashtag #OrganicEdTech, #DBCIncBooks and #CVTechTalk for updates.