Showing posts with label Google Docs. Show all posts

Tuesday, May 2, 2023

The New Menu Search Bar in Google Docs


Google Docs has been a go-to platform for document creation, editing, and collaboration for millions of users across the globe. And now, with the new update that has added a Menu search bar in the toolbar across the top, it has become even easier to find features and functions without having to remember where everything is located.

This new update has been designed to save time and enhance productivity. With so many features and functions available in Google Docs, it can sometimes be overwhelming to find a particular tool, especially for new users. This is where the Menu search bar comes in handy. Now, instead of scrolling through various menus and sub-menus, users can simply type in what they're looking for in the search bar, and the platform will automatically display the relevant option.

For instance, let's say you want to add a hyperlink to your document, but you don't remember where the Header" option is located. With the Menu search bar, you can just type in "Header," and the option will appear in the search results. This feature makes it faster and easier to access the various tools and features within the platform, ultimately boosting productivity.

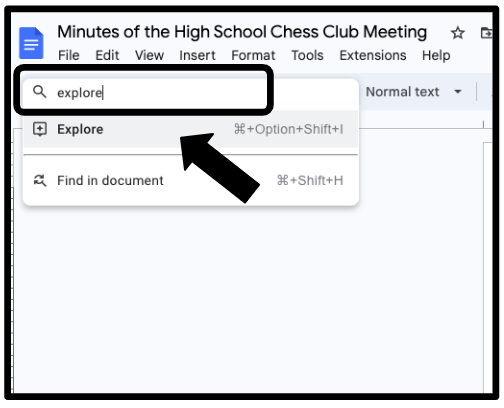
Another benefit of this update is that it can help users discover new features they may not have known existed. For example, if you're not aware of the new location of the "Explore" feature in Google Docs, you can simply search for it in the Menu search bar and learn more about how it can help you create better documents.
In conclusion, the addition of the Menu search bar in the Google Docs toolbar is a welcome update for users of all levels. It simplifies the process of finding tools and features, saves time, and enhances productivity. Whether you're a new or experienced user, this update is definitely worth exploring!

If you would like to bring me to your school for PD, workshops, a keynote, training or a follow-up on this or previous blogposts, click here to schedule an appointment to chat.

My book, The Complete EdTech Coach: An Organic Approach to Digital Learning, co-authored with my wife Katherine Goyette is now available on Amazon. Click here to purchase. It is published by Dave Burgess Publishing. Be sure to follow the hashtag #OrganicEdTech and #CVTechTalk for updates.

Wednesday, August 24, 2022

Help Curb Plagiarism by Disabling Copy in Google Docs


An often heard pain point is how students have become too good at copying and pasting. This leads to blatant plagiarism. As educators, we are looking to get students to analyze and synthesize content in order to generate thoughts, opinions, claims and cite textual evidence. Too often, students will try to cut corners by copying and pasting content and claiming it as their own. 

Google Docs, hiding in plain sight, has a feature that allows you to disable copying on a document you own. For example, if you have an article you want students to read, synthesize and analyze, you could copy and paste the text onto a Google Doc. Be sure to cite the source and or give credit to the author. Once on a Google Doc, click the Share button in the top right corner.


In the pop up that appears, click the Settings gear icon.


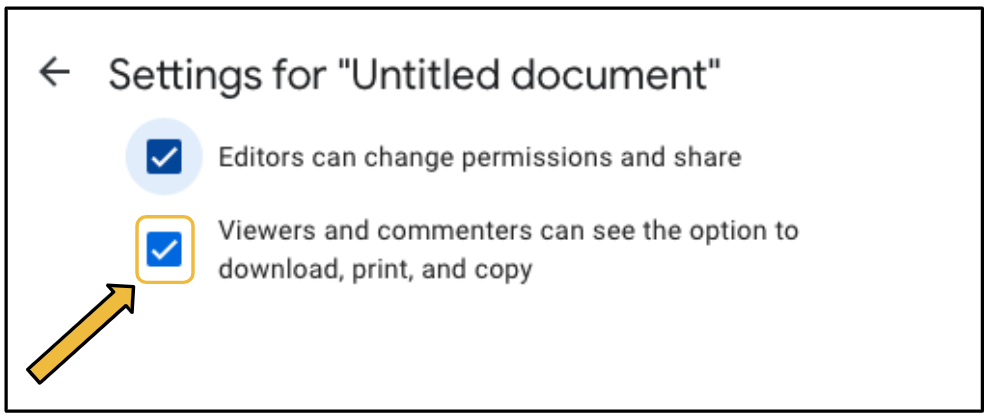
From there, uncheck the box titled "Viewers and commenters can see the option to download, print and copy". Then click the back arrow.


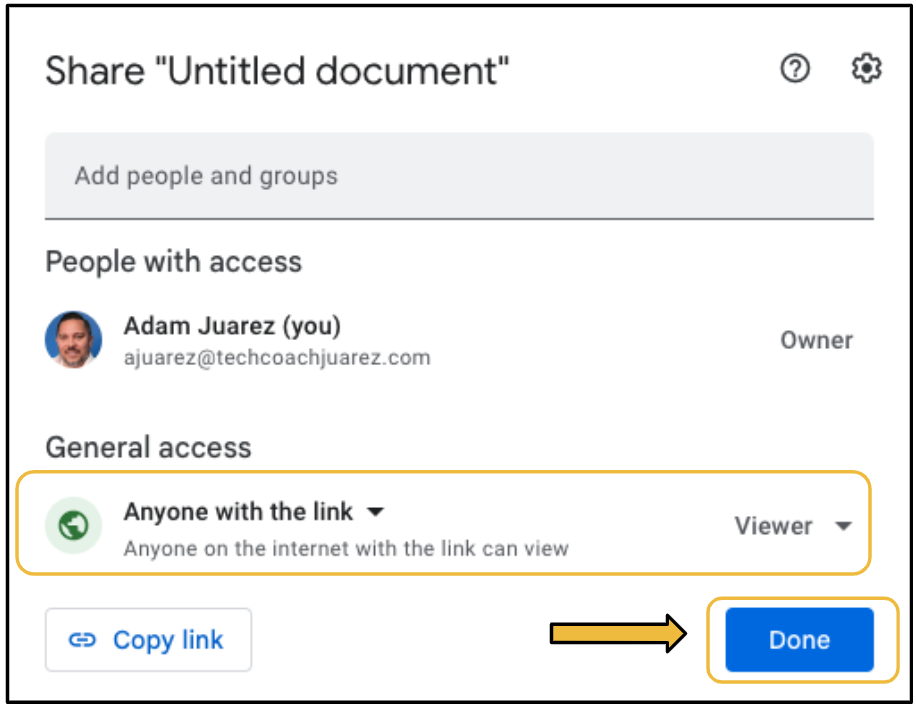
Be sure to set your permissions so students can view the document and click Done.


Below is a screenshot of what it looks like on the student end of this type of document after copying permissions have been disabled. A student could try to highlight text, but they will not be able to copy it from the Edit tab or by right clicking. Keyboard commands for copying are also disabled.


Disabling the ability to copy in Google Docs makes your documents truly View Only. How might you use this feature? If you have any questions and would like a follow up, contact me via Gmail or Chat at ajuarez@techcoachjuarez.com.

My book, The Complete EdTech Coach: An Organic Approach to Digital Learning, co-authored with my wife Katherine Goyette is now available on Amazon. Click here to purchase. It is published by Dave Burgess Publishing. Be sure to follow the hashtag #OrganicEdTech and #CVTechTalk for updates.


Tuesday, July 12, 2022

Power Up Your Hyperdocs with YouTube Preview

The Hyperdoc Handbook by Lisa Highfill, Sarah Landis and Kelly Hilton took the EDU world by storm, and for good reason. Since this book was published, educators have been designing empowering lessons with Google Docs and more. A popular Hyperdoc feature is to include links to YouTube videos. Until recently, these links existed in the Doc as a hyperlink. These hyperlinks opened the video in a new tab for students to watch. 

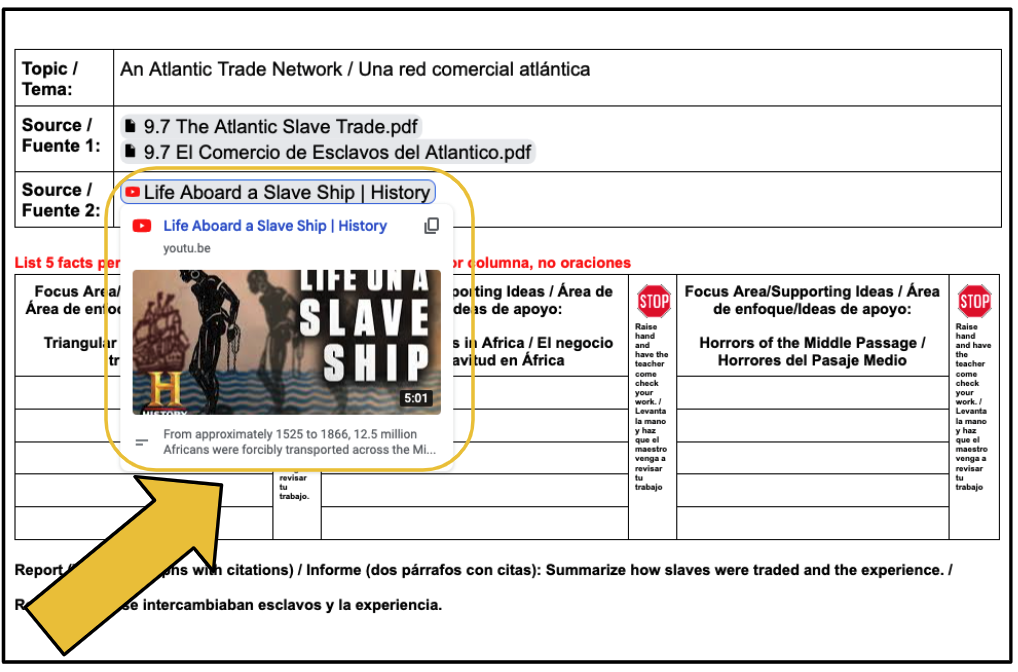
An issue I've seen with students is that when they tab hop, they can often be tempted to veer off task. When working through an activity such as a Hyperdoc, keeping students focused on the task is imperative. Recently, Google Docs has been updated to give you the option to add a YouTube link in the form of a "pretty little Smart Chip-like button." See below.


When a student hovers over the "YouTube Chip", a small preview will appear below. This preview gives them more information, at a glance, about the video.


If student hovers over the actual image of the video in the preview, they will see a button appear that says Open preview. 


When they Open preview, in the bottom right corner of the tab, the video will open up and play. This allows them to type on the Doc, take notes and more while watching the video. They can do this from the convenience of the same tab. No tab hopping necessary.


The screenshots shown above are from a Mini Report Eduprotocol. It was this past school year where I saw students using this feature completely on their own. I learned of this cool trick from students. What cool things will your students teach you this upcoming school year?

If you have any questions and would like a follow up, contact me via Gmail or Chat at ajuarez@techcoachjuarez.com.

My book, The Complete EdTech Coach: An Organic Approach to Digital Learning, co-authored with my wife Katherine Goyette is now available on Amazon. Click here to purchase. It is published by Dave Burgess Publishing. Be sure to follow the hashtag #OrganicEdTech and #CVTechTalk for updates.


Friday, May 27, 2022

An Easy Way to Get Started Using Dropdown Menus in Google Docs


Recently, Google Docs added a new Dropdown menu feature. It can be easily accessed by typing the "@" symbol. The first time you try it, it will be at the top of the menu that appears. After the first time, it will be located at the bottom. Scroll down to access the feature. It can also be found via the Insert menu on the top toolbar. 


When you select Dropdown, you will be prompted to create a new dropdown or use a previous one. You will be given the options to use their preset options as well. 


When creating your own Dropdown, by default, you can create 4 options, but you have the ability to color code them and add or subtract options. 


Below is an example of what this feature can look like. In the example, I have written a narrative with Dropdown menus inserted at strategic points. This can be a comprehension exercise for students to show knowledge of the characters in a story. The Dropdown will show one of the options, but if the student thinks the option is incorrect, they can click it to change the name to the correct answer. 


Below you can see the three sample Dropdowns and the available options.


This is just one simple way to begin using the new Google Docs Dropdown feature. How might you use this feature in your role? If you have any questions and would like a follow up, contact me via Gmail or Chat at ajuarez@techcoachjuarez.com.

My book, The Complete EdTech Coach: An Organic Approach to Digital Learning, co-authored with my wife Katherine Goyette is now available on Amazon. Click here to purchase. It is published by Dave Burgess Publishing. Be sure to follow the hashtag #OrganicEdTech and #CVTechTalk for updates.


Monday, March 28, 2022

Translation in Google Docs Made Easy with Docs Paragraph Translate

Translation of text is one of the most basic ways we can begin to support English learners. When you don't speak another language, this can seem like a daunting task. Though not the most difficult thing in the world, opening Google Translate in another tab and hopping back and forth to copy and paste text is tedious and annoying. But what if you could translate targeted text from right within Google Docs? Would that be so much easier? Spoiler alert, the answer is yes and the Docs Paragraph Translate Add On in Google Docs is here to help.

Start by going to the Add-Ons tab in Google Docs, go to Get add-ons, search for Docs Paragraph Translate and install. Once installed, it'll appear in your Add-ons list as seen below.


After opening it, you can set it to Auto-detect the source language or set it exactly to the language you want. If your source language is English, Auto-detect will work fine. 


Set your target language for which you want to translate to. These settings are automatically saved so you don't have set them each time, unless your want a different language.


On your document, select the text you want to translate. With the Add-on open, click Translate.


Immediately, the translation of the selected text appears in the side panel. From there, click the part of the Doc where you'd like to put the translation.


Below, you can see the translation right beneath the text that was originally selected.


In my 17 years working with English learners, I have seen them be more successful with language development when providing side by side translation of their home language and English. This Add-on has been a life saver for quickly translating directions and other important pieces of text as I curate learning experiences for all learners. How will you use the Docs Paragraph Translate Add-on?

If you have any questions and would like a follow up, contact me via Gmail or Chat at ajuarez@techcoachjuarez.com. My book, The Complete EdTech Coach: An Organic Approach to Digital Learning, co-authored with my wife Katherine Goyette is now available on Amazon. Click here to purchase. It is published by Dave Burgess Publishing. Be sure to follow the hashtag #OrganicEdTech and #CVTechTalk for updates.


Wednesday, March 9, 2022

Jumpstart the Writing Process with Google Keep and Google Docs


In 17 years as an educator, a frequent pain point I have seen teachers deal with is frustration with students struggling to manage notes and sources when working on a research project. These are essential skills that successful adults possess. Please share these tips with your students to help them better manage their notes, sources and writing process.

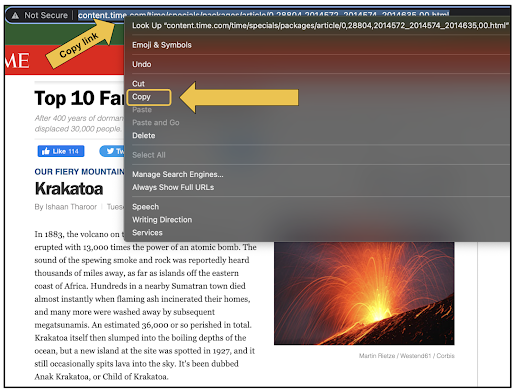
In the example shown below, a student is working on a research paper on volcanoes. All of the research is being done online. While the student searches for sources, they are copying the links of the websites they plan use and cite.


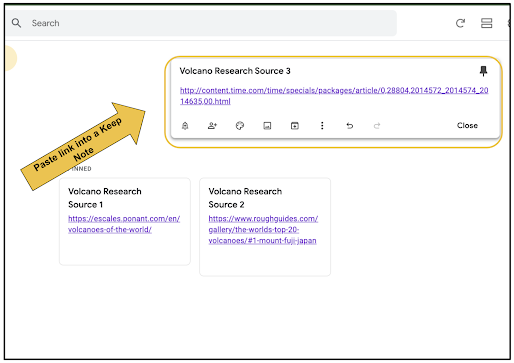
To make the sources easy to find and use during the writing process, this student puts each source as its own note in Google Keep. Notice how this student is mindful to properly name each source for easy, future reference.


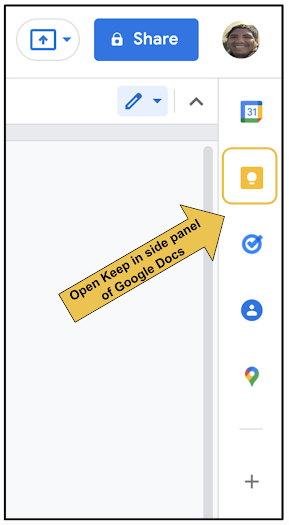
When the student is ready to start writing in Google Docs, they open the Google Keep button on the right side panel.


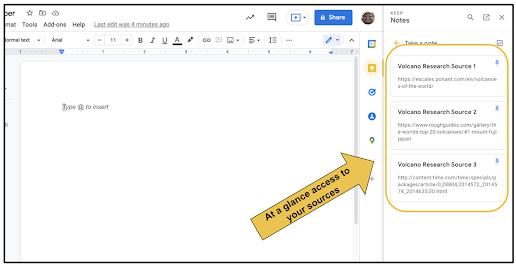
Immediately, their Keep Notes are available. The student has bullets and information in addition to the link to source on each note. This makes it easy to copy and paste information into the Doc to help jumpstart the writing process. This is great if they're using direct quotes.


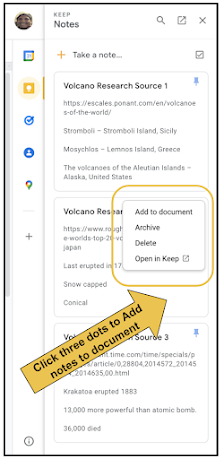
If they click the three dots on any note, the entire contents of the note can be immediately imported to the Doc.


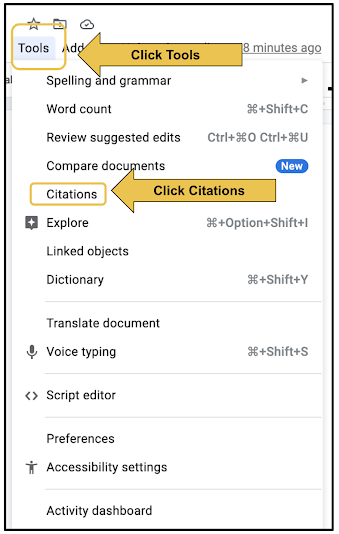
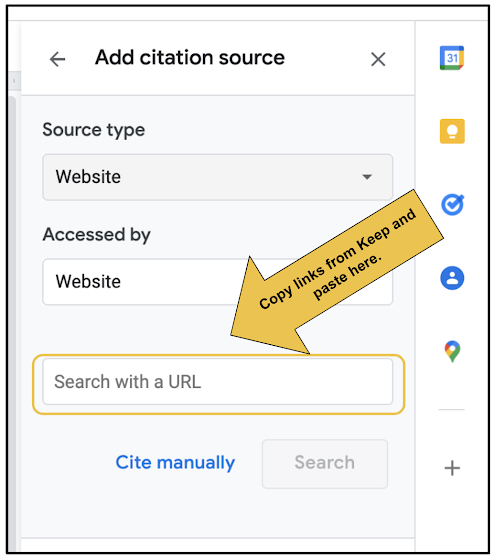
When they are ready to add citations, students can use the built-in Citations tool in the Tools menu within Google Docs.


This allows students to easily cite any source, whether a website, blog, book, magazine, etc. With the links saved in Keep, it is quick and easy to copy and paste those links into the Citation tool for instant citation of a source.


Google Keep and Google Docs work very well together when it comes to enhancing the writing and research process. Keep also integrates similarly with Google Slides. This can be useful when creating presentations. How might you use Keep and Docs with your students?

Share the video below with students to show them how to do all the things mentioned in this blog post.


If you have any questions and would like a follow up, contact me via Gmail or Chat at ajuarez@techcoachjuarez.com. My book, The Complete EdTech Coach: An Organic Approach to Digital Learning, co-authored with my wife Katherine Goyette is now available on Amazon. Click here to purchase. It is published by Dave Burgess Publishing. Be sure to follow the hashtag #OrganicEdTech and #CVTechTalk for updates.


Tuesday, February 22, 2022

Pageless Google Docs Now Available


Recently, Google Docs received an update that allows you to make your documents pageless and add a summary to the sidebar. Making your document pageless removes page breaks and makes the document feel like one giant scrolling page. 

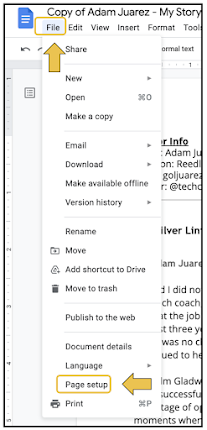
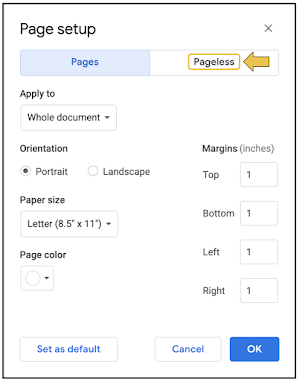
Get started enabling the pageless option by clicking the File tab. At the bottom of the menu that appears, click Page setup.


After clicking Page setup, you'll see a new option for Pageless. If you don't see it yet, this update is rolling out to accounts as we speak. It should arrive soon. If available, click Pageless.


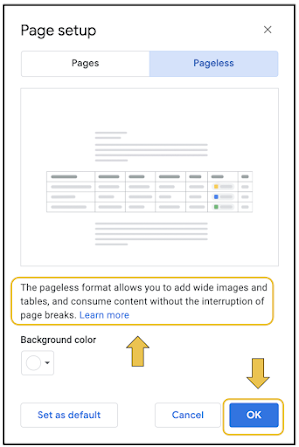
When you select Pageless, you'll see a short description of what this will do to your document. Click here to read more about it. You will also see an option to change the background color in addition to setting Pageless as a default.


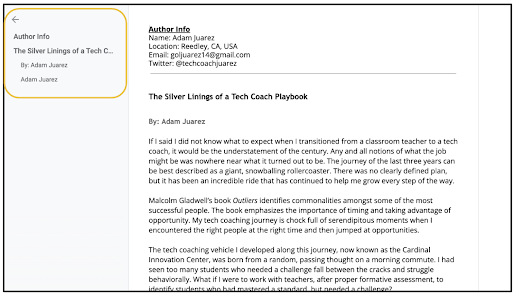
After clicking OK, your document will lose the page breaks and be shown over a wider portion of the viewable screen. On the left side, you'll see an outline automatically if you have already typed out the document.


Pageless documents add a different feel to your Google Docs. It gives it more of a vertical scrolling website feel. This could be great for newsletter and Hyperdocs. How might you use the Pageless option in Google Docs? If you have any questions and would like a follow up, contact me via Gmail or Chat at ajuarez@techcoachjuarez.com.

My book, The Complete EdTech Coach: An Organic Approach to Digital Learning, co-authored with my wife Katherine Goyette is now available on Amazon. Click here to purchase. It is published by Dave Burgess Publishing. Be sure to follow the hashtag #OrganicEdTech and #CVTechTalk for updates.


Tuesday, January 25, 2022

Support English Learners and Quickly Translate PDF Files with Google Docs

Using PDF files and trying to support English learners can be tricky. Because PDFs are meant to limit editing, translating the text to the home language of English learners is difficult. There are paid services for this or you could recruit a translator, but who wants to spend money or wait for translation? For a long time, you have been able to open PDF files as Google Docs and the text became editable. But, in the past, the converted text was often jumbled and many stylistic mistakes were made. 

Recently, this function has greatly improved to where very little of the converted text is altered. With this, you can quickly translate the document from the Google Docs Tool tab. From there, you can download a version of your document in PDF format. Follow the steps below to learn how.

Step 1: Open a PDF in Google Drive.


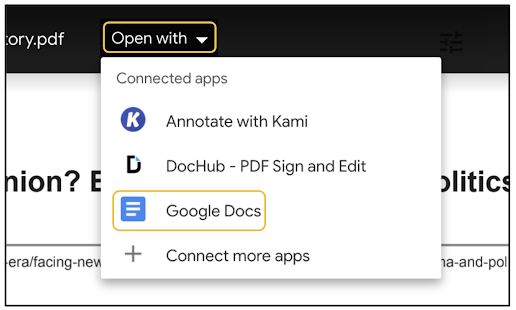
Step 2: Hover your cursor over the document. When the Open with option appears at the top middle, click it and select Google Docs.

Step 3: After the document opens in Docs, scroll through, check for any grammar or formatting errors that may have occurred during conversion and fix them. From there, click the Tools tab at the top. In the dropdown that appears, click Translate document.

Step 5: In the pop up that appears, title the new file and choose your language.


Step 6: After choosing your language, click Translate. A new file will be generated and saved in your Google Drive.


Step 7: The new file will automatically open in a new tab. It will be in the language you selected. Click the Tools tab and hover your cursor over Spelling and grammar. Click Spelling and grammar check. This will show all the mistakes lost in translation.


Step 8: In the pop up that appears, you'll see each mistake. You can ignore or accept each. Since I am not well versed in any language other than English, I generally trust Google's suggestions for spelling and grammar. Google Translate is much better than it used to be and it's a safe bet your translated version will be understandable by those who need to read it. I will say it isn't 100 percent accurate all the time, but good enough to get by until you can get someone to verify it. At the very least, you're providing access to content to those who need it.


Here is what the translated version of my original looks like.


Step 9: To get the translated version in a PDF format, click the File tab, hover your cursor over Download and select PDF. From there, a PDF file will be downloaded to your computer. From there you can upload to Drive if you want.


If you have any questions and would like a follow up, contact me via Gmail or Chat at ajuarez@techcoachjuarez.com.

My book, The Complete EdTech Coach: An Organic Approach to Digital Learning, co-authored with my wife Katherine Goyette is now available on Amazon. Click here to purchase. It is published by Dave Burgess Publishing. Be sure to follow the hashtag #OrganicEdTech and #CVTechTalk for updates.