Thursday, March 25, 2021

Hidden in Plain Sight: Subtasks in Google Tasks


Not too long ago, I wrote a blog about creating new, secondary lists in Google Tasks. That is a great organizational tool, but you have to switch over to those lists to see them. More importantly, you need to remember to switch over. As my colleague Kathleen Giannandrea says, "Out of sight, out of mind". If you fall into that category, the subtasks function in Google Tasks will be helpful. 

For example, if you have a separate list in Google Tasks to remind you to make or check on IEP accommodations, you could, instead, create a Task just for IEP Accommodations with accompanying subtasks. This will keep these tasks at a glance in your primary list without having to switch lists to view. One downfall to adding subtasks to a task is the inability to set it to repeat. You can set a one time reminder for the "parent" task.

Get started by creating a new task in Google Tasks found in the right side panel in Gmail, Google Calendar, Google Docs, Google Slides, Google Chat, Google Drive or Google Sheets.


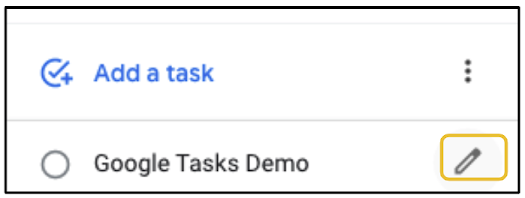
After typing the task, click the "pencil" button to edit.


While in edit mode, click the button to Add subtasks.


You will add the subtasks in the same manner you would a regular task. The difference is the subtasks won't have an edit button. If you need to add multiple subtasks, either click Add subtasks again or push enter/return on your keyboard after entering a subtask.


What you see below is an example of a task with multiple subtasks. 


Here is what it looks like on the right side toolbar. You can click the circle button next to each task to cross off individual subtasks, but if you cross off the "parent" task, all the subtasks will disappear.


For many of us, the subtasks function of Google Tasks is a simple, but great productivity tool hiding in plain sight. How will you use the subtasks function of Google Tasks? If you have any questions and would like a follow up, contact me via Gmail or Chat at ajuarez@techcoachjuarez.com. 

My book, The Complete EdTech Coach: An Organic Approach to Digital Learning, co-authored with my wife Katherine Goyette is now available on Amazon. Click here to purchase. It is published by Dave Burgess Publishing. Be sure to follow the hashtag #OrganicEdTech and #CVTechTalk for updates.


Wednesday, March 24, 2021

Mote is Now Available in Gmail


Just this morning, Mote released a cool new update that allows you to easily embed Mote voice notes into Gmail! The next time you click the Mote Chrome Extension, what you see below will appear. Click Yes to enable Mote in Gmail.


After enabling it in Gmail, do a quick refresh of your browser and start a new message in Gmail. You'll notice on the bottom toolbar a Mote button. 


When you click the button, it will immediately start recording so be ready to talk. Click the Mote logo in the pop up to stop recording. 


When you're done recording, what you see below is what it will look like in your message. If you're not satisfied with the recording, click the three dots in the top right corner of the recording and click Delete.


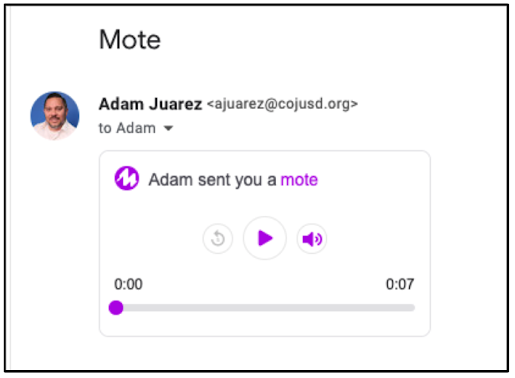
Below is what it looks like on the recipient's end. On a computer, the recipient will simply click the play button and hear the message. On a mobile device, when they click the Mote message, it will open in a mobile browser window where they can click play and listen.


Sometimes students and colleagues can get a better understanding of what you're trying to say via the spoken word rather than just text. How will you use Mote in Gmail? If you have any questions and would like a follow up, contact me via Gmail or Chat at ajuarez@techcoachjuarez.com. 

My book, The Complete EdTech Coach: An Organic Approach to Digital Learning, co-authored with my wife Katherine Goyette is now available on Amazon. Click here to purchase. It is published by Dave Burgess Publishing. Be sure to follow the hashtag #OrganicEdTech and #CVTechTalk for updates.


Chrome Accessibility Update: Live Captions Now Built In


There have been quite a few exciting new updates to Google Chrome recently. One of my favorites is the ability to enable live captions. According to the folks at Chrome Unboxed, the live captions are the product of machine learning and are done on the fly, in real time. At this time, English is the only language supported. This has not been fully released yet, but full release is on the horizon. If you are updated to the most recent version of Chrome, you can get a head start by enabling it via chrome://flags.

Start by typing chrome://flags in the Omnibox and hit enter/return. 

In the search bar that appears at the top, search for Captions. In the results, click the button that says Default and switch to Enable. You'll be prompted to relaunch Chrome and when it restarts, you'll have the ability to turn on the captions in the settings with a variety of other customizable options.


Once enabled, go to your Chrome settings. On a PC or Mac, access this by clicking three dots in the top right corner of Chrome. On a Chromebook, click the bottom right corner of the screen. With the settings open, click Advanced.


After clicking Advanced, scroll down and click Accessibility.

Scroll down to the section called Captions and click it.


You will see a toggle to turn on Live Caption. Below, you'll see customizable options for the appearance of the captions.


Take a look at the video below to see what this looks like.


If you have any questions and would like a follow up, contact me via Gmail or Chat at ajuarez@techcoachjuarez.com. My book, The Complete EdTech Coach: An Organic Approach to Digital Learning, co-authored with my wife Katherine Goyette is now available on Amazon. Click here to purchase. It is published by Dave Burgess Publishing. Be sure to follow the hashtag #OrganicEdTech and #CVTechTalk for updates.


Friday, March 19, 2021

Google Slides Presentation Mode Update


Recently, Google updated the Google Slides presentation mode toolbar. In the past, this toolbar could be very intrusive. It popped up when you didn't want it to and it blocked the view of parts of your slides. These issues were definitely annoying when giving a live presentation or when recording.


If you were just as annoyed as I was, this new update is a breath of fresh air. The updated version of the presentation mode toolbar is much less intrusive. It takes up less screen real estate and it expands only when you want it to. Take a look below to see the updated toolbar in action. Credit to the folks at Google Workspace for creating this GIF.


What did you dislike most about the old toolbar? How excited are you for this update? If you have any questions and would like a follow up, contact me via Gmail or Chat at ajuarez@techcoachjuarez.com. 

My book, The Complete EdTech Coach: An Organic Approach to Digital Learning, co-authored with my wife Katherine Goyette is now available on Amazon. Click here to purchase. It is published by Dave Burgess Publishing. Be sure to follow the hashtag #OrganicEdTech and #CVTechTalk for updates.


Thursday, March 18, 2021

Chromebook Update: Built in Screencasting


For educators, screencasting has been an essential part of distance learning. Most of us have a favorite screencasting app. For students, screencasting is a great strategy for demonstrating learning and creativity. If your students are on Chromebooks, they likely have had to use Chrome extensions such as Screencastify or Nimbus to record their screens. The can also record their screens with Flipgrid. 

With the most recent Chromebook update, version 89, screencasting or the ability to record the screen is now built in. This is done by using the same keyboard command as you would use to start a screenshot. The screenshot menu will appear on the screen, and as seen below, now has the option to record video in next to the screenshot button.


The keyboard command is to simultaneously hold down Control (CTRL), Shift and the Switcher Key. The switcher key is the button just above the number 6. 


There are so many engaging ways you can have students screencast. Have them create slides and explain. Have record a read aloud of text so you can check their comprehension and fluency. How might you have students screencast?

If you have any questions and would like a follow up, contact me via Gmail or Chat at ajuarez@techcoachjuarez.com.  My book, The Complete EdTech Coach: An Organic Approach to Digital Learning, co-authored with my wife Katherine Goyette is now available on Amazon. Click here to purchase. It is published by Dave Burgess Publishing. Be sure to follow the hashtag #OrganicEdTech and #CVTechTalk for updates.


Wednesday, March 17, 2021

Merge PDF Files with iLovePDF.com


Distance learning and hybrid learning have changed the way we do some of the less loved parts of teaching such as submitting weekly attendance and intervention reports and much more. On the teaching side of it, pandemic teaching has compelled us to use PDF materials more than ever before. There are many occasions where we have two separate PDF files that we wish were together. To merge them, go to ilovepdf.com and accomplish this for free. Take a look at how to get started.

Start by going to ilovepdf.com. Click Merge PDF.


On the next page, you have two options. If you click Select PDF files, it will open your computer's files and you can upload. The other option is to click the Google Drive button and add PDF files from you Drive.


Once you've uploaded your PDF files from either your computer or Drive, they will appear as thumbnails. These thumbnails can be arranged in any order by dragging and dropping. Each week, when I submit my weekly attendance reports along with intervention reports, I have to include a cover sheet. I always arrange it to where my cover sheet is first.


If you need to add more PDF files, on the right side, click the red plus button to add more files. A dropdown menu will appear giving you the option to add from your computer or Drive. If you have all the PDF files you want in the correct order, on the bottom right, click Merge PDF.


When they have merged, click the Download merged PDF button to download to your computer or click the Google Drive button to save it in Drive.


This free online tool is great when you find PDF versions of various resources, text or primary sources that you want to combine for easy student access. In addition to merging PDFs, ilovepdf.com offers many other tools. I encourage you to check them out. How will you use ilovepdf.com? 

If you have any questions and would like a follow up, contact me via Gmail or Chat at ajuarez@techcoachjuarez.com. 

My book, The Complete EdTech Coach: An Organic Approach to Digital Learning, co-authored with my wife Katherine Goyette is now available on Amazon. Click here to purchase. It is published by Dave Burgess Publishing. Be sure to follow the hashtag #OrganicEdTech and #CVTechTalk for updates.


Collaborate Better with Google Chat Rooms


A pain point I hear about often is having to dig through emails and Google Drive to find shared files. Recently, Google added Google Chat Rooms to the Google Workspace arsenal of apps. At first glance, it seems like a group chat on steroids, but in actuality, it's a tool that can enhance collaboration and help avoid having to fish through convoluted email threads and Google Drive to find files.

What makes Google Chat Rooms such a great tool for streamlining collaboration is how you only have to invite collaborators one time. Once they're in the Room, any files shared within are shared with all members. No more having to open the file, clicking Share and adding members names. In addition, you can start files right within the Room. Instead of having to search through Drive and email threads, Rooms are housed right within Gmail. Simply open the Room, scroll through the threads and click on the files you need.

Create your first room by going to Gmail and clicking the plus button next to Rooms on the left side of the screen. In the menu that pops up, click Create room.


In the pop up that appears, click in the first box to title your Room. I like to create rooms each quarter for my PLC to share agendas, presentations and planning documents. In the second box, add the names of collaborators. The two options below allow you to Use threaded replies and Allow people outside your organization to join. I recommend using threaded rep


Using threaded conversations is highly recommended. I like to create threads for different topics. In the PLC example below, the thread was titled Unit 5 Lesson Planning. As of now, you cannot officially name or title threads. In light of that, I always make the first post within a thread the title.


One of my favorite aspects of Rooms is how when I share documents, they're automatically shared with all members of the Room. No having to enter people's names or email addresses each time and hoping they open their emails to access the document. 

To share documents, there are a couple of options. If the feature is available in your domain, when you start a reply within a thread, you'll see a button (circled below) to create a Google Doc, Google Sheet or Google Slides Presentation. 


The other option is to click the Drive button seen when replying within a thread. This will initiate a pop up menu allowing you to add any file saved in your Google Drive.


When you post the file from Drive, you'll see a small pop up where you determine the file permissions for all Room members. 


With files shared in a Room thread, collaborators no longer have to go fishing through their inboxes for shared with me emails or the Shared with me folder in Drive. They simply open the room, scroll to the thread and click the file. Google Docs files can be opened within the Chat Room without having to open a new tab. Other files will open in their own separate tab.


The pandemic has forced us to find more effective ways of collaborating. More than ever, educators are using tools like Google Chat Rooms in addition to Google Classroom to collaborate in PLC's and across school sites. How might you use Google Chat Rooms?

If you have any questions and would like a follow up, contact me via Gmail or Chat at ajuarez@techcoachjuarez.com.  My book, The Complete EdTech Coach: An Organic Approach to Digital Learning, co-authored with my wife Katherine Goyette is now available on Amazon. Click here to purchase. It is published by Dave Burgess Publishing. Be sure to follow the hashtag #OrganicEdTech and #CVTechTalk for updates.


Thursday, March 11, 2021

Wanna Copy and Paste from a PDF? Kami to the Rescue!


To quote Peter Griffin, "You know what really grinds my gears?", not being able to copy and paste from a PDF. Many times, we teachers are given resources in PDF form. When we go to adapt it for how we plan to teach, trying to copy and paste content from PDFs can be problematic. The same is true for students. 

This school year, in teaching history, I placed a greater emphasis on having students cite quotes and textual evidence from primary sources. More often than not, the primary sources were sent to students as a PDF file. Students complained how problematic it was to tab switch or try to memorize text when quoting a source. 

One way to alleviate this annoying pain point, for both teachers and students, is to use OCR technology? OCR stands for optical character recognition. This gives you the ability to pull text from an image and make it editable. Most PDF files are scanned images of text. OCR can make the text of a scanned PDF editable. For teachers and students who want to copy and paste snippets of text from a PDF, they can use the OCR function built in to Kami. This function is available in the free version of Kami as well as paid.

Start by opening a PDF either in Google Drive or Google Classroom. Click the Open with button. In the drop down menu that appears, click Annotate with Kami.


When the PDF opens up in Kami, in the top right corner, click the "hamburger" or three lines menu. In the drop down that appears, click OCR For Scanned PDFs. 


Give it a minute to process. At the bottom of the page, you'll see a small pop up saying Running OCR. The page will reload when it's finished running.


When the page reloads, using the Kami Select tool (found on the top of the left side toolbar), select a snippet of text just as you would on a web page or Google Doc. Right click in the selected area and click Copy. You can then paste the snippet of text anywhere you need to use it. 


Teachers! The next time you get some great PDF resources from a PD or workshop and want to use that information in planning a lesson, be sure to rock the OCR function in Kami. Show your students this skill to help them identify textual evidence as part of a lesson and or writing process. How will you use the Kami OCR function?

If you have any questions and would like a follow up, contact me via Gmail or Chat at ajuarez@techcoachjuarez.com. My book, The Complete EdTech Coach: An Organic Approach to Digital Learning, co-authored with my wife Katherine Goyette is now available on Amazon. Click here to purchase. It is published by Dave Burgess Publishing. Be sure to follow the hashtag #OrganicEdTech and #CVTechTalk for updates.