Showing posts with label Chromebook. Show all posts

Monday, January 9, 2023

A Full Day of Professional Learning: Organic EdTech Integration with Google Workspace for Education

Are you looking for an action-packed full day of professional learning? If so, look no further. Bring in AdaKat EdTech Consulting to lead a day of affordable professional learning that will build teachers' capacity to organically integrate technology with Google Workspace for Education and more.

What does it mean to organically integrate technology? In our book, The Complete EdTech Coach: An Organic Approach to Supporting Digital Learning, we state "If you plan with the 4C's in mind, the tech will take care of itself". This means we lead with learning, never with tech. Using our 4C's lesson design process, teachers identify a learning goal and brainstorm how students will engage in communication, creativity, collaboration and critical thinking. As the coach in this process, we rely heavily on the teacher, drawing upon their content expertise and years of experience. They know their content and students best and we will recommend technology we know resides in their teacher toolbox and only if it fits naturally. If no tech is required to enhance the learning process, we will not force it.


This day of professional learning begins by building teacher capacity and adding to their teacher toolbox. Using Google Workspace for Education tools primarily, we will show how use simple tools and strategies in innovative ways.

Executive Processing and Simple Tools for English Learners

Teachers will learn executive processing skills to expedite their workflow and how they can impart these same skills to their students. From there, we dive into simple tools that will give English learners access to content and curriculum. Supporting English learners is something all teachers must do, and we will demonstrate ideas, tips and tricks that hide in plain sight, and can be used effectively by anyone.


Engagement with Chromebooks

Too often Chromebooks are used only as tools for word processing or algorithm-based learning programs. Using Chromebooks in this manner does not engage all learners in the 4C's and makes students passive consumers of content. During this portion of the day, we will investigate ways to use Chromebooks to guide your students to be active creators of content. We'll take a look out maximizing the Chromebook's camera, built-in screen recording app and ways to strike a healthy balance of paper/pencil with technology.

Google Classroom Shells

With all of these ideas, skills, tips, tricks and strategies at the forefront, we will next take a deep dive into the development of Google Classroom Shells. Google Classroom Shells are a simple way to power up PLCs and departments increasing ability to collaborate. Attendees will learn to develop Shells for go-to lessons, common activities, common assessments, Eduprotocols, specific curriculum and even PE classes.

Now that attendees' toolboxes have begun to fill, this day of professional learning will culminate by designing lessons using our 4C's lesson design process. Using a simple 4 square, presenters will guide teachers in a brainstorm in how students will work towards a learning goal while engaging in each of the 4C's. The presenter will rely and draw upon the teachers' years of experience, content expertise and tech toolbox empowering them to organically integrate technology into the lesson. They will be given time to work one on one with the presenters, in groups and or with department/PLCs. Attendees will end the day with at least one lesson they can use in class the next day.

Are you interested in an action packed day of professional learning and lesson design like this? If so, please reach out to AdaKat EdTech Consulting. Click here to book an appointment discuss logistics and pricing. Click here to purchase a copy our book The Complete EdTech Coach: An Organic Approach to Supporting Digital Learning.


Wednesday, March 24, 2021

Chrome Accessibility Update: Live Captions Now Built In


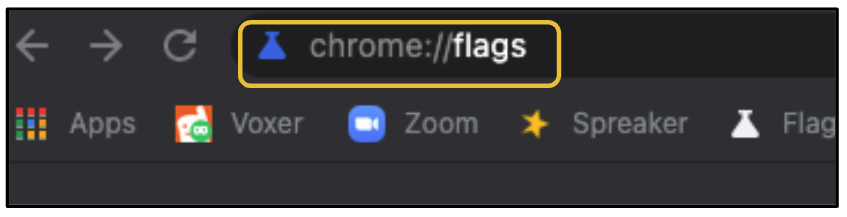
There have been quite a few exciting new updates to Google Chrome recently. One of my favorites is the ability to enable live captions. According to the folks at Chrome Unboxed, the live captions are the product of machine learning and are done on the fly, in real time. At this time, English is the only language supported. This has not been fully released yet, but full release is on the horizon. If you are updated to the most recent version of Chrome, you can get a head start by enabling it via chrome://flags.

Start by typing chrome://flags in the Omnibox and hit enter/return. 

In the search bar that appears at the top, search for Captions. In the results, click the button that says Default and switch to Enable. You'll be prompted to relaunch Chrome and when it restarts, you'll have the ability to turn on the captions in the settings with a variety of other customizable options.


Once enabled, go to your Chrome settings. On a PC or Mac, access this by clicking three dots in the top right corner of Chrome. On a Chromebook, click the bottom right corner of the screen. With the settings open, click Advanced.


After clicking Advanced, scroll down and click Accessibility.

Scroll down to the section called Captions and click it.


You will see a toggle to turn on Live Caption. Below, you'll see customizable options for the appearance of the captions.


Take a look at the video below to see what this looks like.


If you have any questions and would like a follow up, contact me via Gmail or Chat at ajuarez@techcoachjuarez.com. My book, The Complete EdTech Coach: An Organic Approach to Digital Learning, co-authored with my wife Katherine Goyette is now available on Amazon. Click here to purchase. It is published by Dave Burgess Publishing. Be sure to follow the hashtag #OrganicEdTech and #CVTechTalk for updates.


Thursday, March 18, 2021

Chromebook Update: Built in Screencasting


For educators, screencasting has been an essential part of distance learning. Most of us have a favorite screencasting app. For students, screencasting is a great strategy for demonstrating learning and creativity. If your students are on Chromebooks, they likely have had to use Chrome extensions such as Screencastify or Nimbus to record their screens. The can also record their screens with Flipgrid. 

With the most recent Chromebook update, version 89, screencasting or the ability to record the screen is now built in. This is done by using the same keyboard command as you would use to start a screenshot. The screenshot menu will appear on the screen, and as seen below, now has the option to record video in next to the screenshot button.


The keyboard command is to simultaneously hold down Control (CTRL), Shift and the Switcher Key. The switcher key is the button just above the number 6. 


There are so many engaging ways you can have students screencast. Have them create slides and explain. Have record a read aloud of text so you can check their comprehension and fluency. How might you have students screencast?

If you have any questions and would like a follow up, contact me via Gmail or Chat at ajuarez@techcoachjuarez.com.  My book, The Complete EdTech Coach: An Organic Approach to Digital Learning, co-authored with my wife Katherine Goyette is now available on Amazon. Click here to purchase. It is published by Dave Burgess Publishing. Be sure to follow the hashtag #OrganicEdTech and #CVTechTalk for updates.


Friday, February 19, 2021

Google Workspace for Education Updates

In the last 48 hours, Google has announced some amazing new updates to Google Workspace for Education. After reading over their blog post and blog posts of fellow Googley edu-bloggers, here is a summary of some of the updates.

Google Classroom

Have you ever been typing instructions on a Google Classroom assignment and wished you could add bullets or bold/italicize/underline the text? If so, these features are coming very soon. 

This GIF comes from the Google Workspace for Education Blog

We have all probably struggled to see the content on an image of handwritten student work uploaded to Google Classroom. New upgrades to scanning of images will improve the quality of the submissions. Students will be able to use the Google classroom mobile app to scan multiple papers at once and submit as a PDF.

This GIF comes from the Google Workspace for Education Blog

In addition, Google Classroom will be getting tools to better track student engagement, offline support, improvements to grading on the mobile app and better integration with Google Meet, Student Information Systems and third party apps.

Google Meet

Most of the features we love about Zoom will now be available in Google Meet. Breakout Rooms will be scheduled beforehand easily via Google Calendar. You will be able to drag and drop attendees or choose them from a dropdown menu to arrange them into Breakout Rooms. 

This GIF comes from the Google Workspace for Education Blog


You will also be able to mute all students at the click of a button. 

This GIF comes from the Google Workspace for Education Blog


Students will not be allowed to stick around in the main room or breakout rooms when the teacher ends the meeting.

This GIF comes from the Google Workspace for Education Blog

If using Meet via Google Classroom, co-teachers will automatically be co-moderators with all the host controls the teacher has. During Meet video call, host controls will now include abilities to mute all participants at once, lock attendees microphones and remove all attendees. New options for attendees' reactions (raising hand is only option now in free version) have also been added. 


Google Drive

If you have students do a quiz on Google Forms, their progress will be saved automatically. This means they won't lose their progress if they lose connection or need to go to the restroom. They can reopen and continue where they left off. 

One of the coolest parts of Docs, Slides, Sheets, etc. is the ability to view Version History. Soon, this feature will become part of Jamboard. 

Chromebooks

There are some exciting new features for Chromebooks. One of my favorites is the built in screen capture function. In addition to improvements in the ability to take screenshots, you can now record your screen natively. In the past, you needed a screencasting extension to do this. 

This GIF comes from the Google Workspace for Education Blog


Recently, Google Meet added live translated subtitles. This function will now be added to accessibility features for the Chromebook. In addition, a telestrator function will be added to give you the ability to annotate your screen like John Madden during a football game.

It's definitely an exciting time in the world of Google Workspace for Education.. What new features are you most excited about? If you have any questions and would like a follow up, contact me via Gmail or Chat at ajuarez@techcoachjuarez.com. 

My book, The Complete EdTech Coach: An Organic Approach to Digital Learning, co-authored with my wife Katherine Goyette is now available on Amazon. Click here to purchase. It is published by Dave Burgess Publishing. Be sure to follow the hashtag #OrganicEdTech and #CVTechTalk for updates.


Wednesday, October 7, 2020

Screenshots Rock: How to on a PC, Chromebook and Mac


Distance learning has forced teachers to create more digital content than ever before. Designing digital lessons and learning experiences often makes use of your computer's screenshot function. Screenshots are very useful when jazzing up slides, pulling selected text for analysis, sharing error messages with IT and much more. If you're reading this blog post, it's highly likely you already know how to screenshot, but please share this with colleagues who still need to learn. Below, you will see how to screenshot on a Chromebook, Mac and PC.

This is also an important skill for students to learn. Most already know how to screenshot on their mobile phones, but not as much on a computer. As an edtech coach, I get numerous emails daily about error messages and other notifications from students. To best troubleshoot and problem solve, I ask them for a screenshot. When they send me a screenshot, I can better assist or pass on to IT for them to know exactly what the problem is.

Chromebook

On a Chromebook, screenshots are easily done through a simple keyboard command. For a screenshot of the entire screen, simultaneously hold Control+Show Windows Key. To screenshot a selected piece of the screen on a Chromebook, simultaneously hold down Command+Shift+Show Windows Key. Your cursor will appear as a "cross" then click and drag across the area you want to screenshot. The image below shows you the buttons needed for screenshots on a Chromebook.


On a Chromebook, when you have done a screenshot, you'll see a pop up in the bottom right corner of the screen that gives you options to Copy To Clipboard or Annotate Image. If you click Copy to Clipboard, you can paste that screenshot on a Doc, Slide, Drawing, etc. If you click Annotate Image, you'll be taken to a new window where you will be given some basic tools to draw on the image before saving to the Chromebook's files.


If you were to dismiss the pop up (above) or click the "x", the screenshot will automatically be saved in the Chromebook Files app. When you open the Files app, you will find the screenshot in Downloads.


Mac

On a Mac, the process is very similar. The keyboard shortcut is Command+Shift+4 to select a part of the screen and Command+Shift+5 to screenshot the entire screen and or start a screencast. If you use the Command+Shift+4 option, like the Chromebook, a "cross" will appear for you to use to select the area of the screen. The image below shows you how. By default, screenshots are automatically saved on the Desktop.


PC/Windows

If you are working with one of the most recent models of Windows, you can use the keyboard shortcut Win+Shift+S to activate the Snip and Sketch tool. Older versions will have you use the Snipping Tool. On this post, I am demonstrating the most current version of Windows using the Snip and Sketch Tool. This will allow you to screenshot the entire screen or select a specific part. 


Whichever you choose, when you are done making the screenshot, a pop up will appear in the bottom right corner. 


If you click the pop up, the Snip and Sketch Tool will pop up in the center of your screen. You will see a variety of tools you can choose from to mark up the image if you so choose. There is a pen, pencil and highlighter tool in addition to an eraser, ruler, cropping tool and Save button.


When you are ready to save your screenshot, click the Save button. It will be saved in the Pictures folder of your computer. When you click it, what you see below will pop up and you will be given the option to rename and or move the file.


If you prefer not to use the keyboard shortcut, you can always access the Snip and Sketch Tool by clicking the Windows button in the bottom right corner of the screen and selecting it from the list of apps and programs. 


It can also be pinned to your Taskbar for quick access in the future. When the Tool is open, you'll see it on the Taskbar. Right click on it and select Pin to taskbar. 


If you have any questions and would like a follow up, contact me via Gmail or Hangouts at ajuarez@techcoachjuarez.com. If you would like to unsubscribe from this blog, go to bit.ly/tcjinbox.

My book, The Complete EdTech Coach: An Organic Approach to Digital Learning, co-authored with my wife Katherine Goyette is due out in October/November of 2020. It will be published by Dave Burgess Publishing. Keep an eye out on this blog and on social media. Be sure to follow the hashtag #OrganicEdTech and #CVTechTalk for updates.