Thursday, August 19, 2021

Google Sheets: Create Easy To Use Logs For Participation, Restroom Use and More!


Participation points are a big part of the way I teach. The problem is keeping track. In the past, I've printed slips of paper with my roster and gave kids tally marks. Being absent minded, I often lost those papers. I tried carrying my iPad around and marking a Google Form to tally points. That was time consuming. I have even done a strategy called feedback tokens where I printed out hundreds of business card size tokens and gave them to students for participation, etc. and had them "cash" in at the end of class. That worked, but was a management nightmare. 

Now that students are back face to face, I've been looking for a way to digitally track participation points. I did a few Google searches and found quite a few apps for chores, etc., paid services, but nothing free, that would meet my needs. I tried using a spreadsheet on my iPad, but trying mark kids in each cell was cumbersome. As I kept searching, I stumbled across a post by Alice Keeler. Duh! Of course Alice would have a spreadsheet hack for this. Why didn't I go there first. She loves to say, "The answer is always a spreadsheet". In this instance, she is absolutely correct!

Alice posted a sample of what I am trying to do with a spreadsheet using checkboxes. Click here to view Alice's post.  It hit me! Create a spreadsheet like Alice did, using checkboxes, access it on my iPad and I can mark points for students quickly and easily using my Apple Pencil. As I went about developing my participation points spreadsheet, I thought this would also be good for tasks such as keeping track of student restroom use as well. Since you can duplicate sheets, my restroom log was two clicks away.

Start by creating a spreadsheet and entering your students' names. Title the column to the right of the student name column Total. Going right, title each column 1-however many points you might give during a given class. In my class, I have it go as far as 20. I probably won't ever give that many, but I like to have more than what I need. In each cell, add a checkbox by going to the Insert tab and selecting checkbox. In that first cell with a checkbox, click and drag to add checkboxes to all cells in which you want checkboxes. Click here to make a force copy of my sample.

If you're not a spreadsheet ninja, like Alice, here is where you're going to get a little fancy. In the cell for the first student in the Total column, type this formula =COUNTIF(C2:V2,TRUE) and push Enter.  This allow show you a tally in the Total column of all the checkboxes checked in a row. The formula =COUNTIF(C2:V2,TRUE) may need a little tweaking depending on your spreadsheet. C2:V2 represent the first and last cells in a row I want to automatically tally. Your first and last cells in a given row may have different letters so you will have to adjust. 


After using the formula in the first student's row in the Total column, like with the checkboxes, click and drag down to the bottom of the column. This will apply that formula to each student's row.


Below is what it looks like when you click a checkbox. You can see the total column shows how many checkboxes in a student's row have been checked.


If you want to quickly recreate this sheet, formulas and all, for other classes or tasks (I did this for my Restroom Log), go to the tab at the bottom of the sheet, click the arrow next to the sheet name click Duplicate. This will add another sheet to your file. 


In this case, with a newly created sheet, I deleted all but three columns. For something like a Restroom Log, I give students three restroom breaks a semester. This will help me have, at a glance, a record of how many times kids use the restroom.


Take a look below at what it looks like in real time.


I access this spreadsheet on my iPad and use my Apple Pencil to check the checkboxes. I recommend using a tablet or touchscreen device for this, phones included. This makes it easy to circulate the room and give points, etc.

Anything you want to track or take a tally of can easily be done with a spreadsheet using checkboxes and the formula =COUNTIF(C2:V2,TRUE). Big thanks for the inspiration to Alice Keeler. If you're looking for a treasure trove of ideas for spreadsheets, Google Classroom, Jamboard and more, check out Alice's website alicekeeler.com. Follow her on Twitter by clicking here.

If you have any questions and would like a follow up, contact me via Gmail or Chat at ajuarez@techcoachjuarez.com. My book, The Complete EdTech Coach: An Organic Approach to Digital Learning, co-authored with my wife Katherine Goyette is now available on Amazon. Click here to purchase. It is published by Dave Burgess Publishing. Be sure to follow the hashtag #OrganicEdTech and #CVTechTalk for updates.


Some Flipgrid Updates: It's Great for English Learners


Flipgrid is an amazing way to engage your English learners. Flipgrid is a great tool for fostering listening and speaking. Over the summer, Flipgrid has updated its layout and features. Some of these features help you, the teacher, create topics more easily. Others are similar to some of the engagement and privacy features we have gotten used to using on platforms such as Zoom, Google Meet and social media. These features include stickers, GIFs, virtual backgrounds and more. For English learners, Microsoft's Immersive Reader is built right to Flipgrid.

When you create a new topic, you'll see some suggested ready-made topics/templates to help you spark a class discussion.


When setting up a new topic, the interface is simpler and more streamlined. Like before, the Title and Description are the first two things you see. For media, in the past, you had to scroll through a bunch of other settings. Now, a series of Topic media buttons are conveniently located right below the Description.


When you're ready to open a topic to view student responses, there's now a button called Member view to give you the ability to interact as a student. Next to it is a button for Immersive Reader as well as another button to share the topic on a variety of platforms. 


If you click the Member view button to view the topic like a student, you'll be able to record like a student. In the top right corner, on the student view, you'll see the Immersive Reader button, just like on the teacher view.


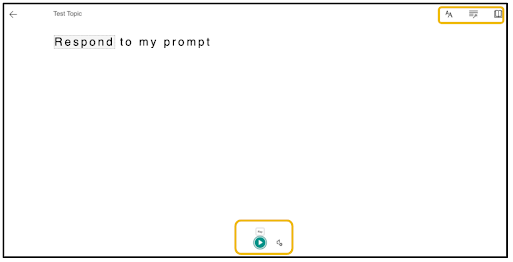
When you click the Immersive Reader button, you'll be taken to a new page where the Topic Description can be read aloud to the student. In the top right corner, there are controls to change the language, highlight parts of speech and more. Click here to learn more about Immersive Reader.  Click the back button at the top left corner to return to Flipgrid. This is very powerful for helping English learners engage with and access content.


When a student records a response, they can click the Options button to be able to upload a clip (pre-recorded video), record audio only with Mic Only, Mirror their Video, Mute, screencast with Record Screen and set Device Settings.


When students click the Effects button, they can add Filters, Text, draw with the Pen, annotate a Whiteboard, add GIFs and Stickers, insert other Media and add Frame to their video. Many of these features students are familiar with on social media platforms such as Snapchat, Instagram and Facebook.


When students click the Backdrop button, they can set a virtual background just like in Zoom or Google Meet. They can choose to use a provided background option or upload their own image. One fun idea would be to have students do an "on scene" news report where they upload the image of a place from which they're reporting. Imagine students "reporting on scene" from the White House or an erupting volcano.


Below is what one of the built in backgrounds looks like. Students still have a button at the top of the video to open a sticky note. Kids can put talking points here and it won't show in their video. It can serve as a teleprompter.


The process for finishing their videos is still much the same.


Flipgrid is a very simple, but powerful tool. If your kids struggle to write, use Flipgrid to have them verbalize their understanding before they write. Have them listen to their peers as a warm up to writing. Utilize Flipgrid to inject authentic opportunities for English learners to practice listening and speaking. How will you use Flipgrid to engage and empower your students?

If you have any questions and would like a follow up, contact me via Gmail or Chat at ajuarez@techcoachjuarez.com. My book, The Complete EdTech Coach: An Organic Approach to Digital Learning, co-authored with my wife Katherine Goyette is now available on Amazon. Click here to purchase. It is published by Dave Burgess Publishing. Be sure to follow the hashtag #OrganicEdTech and #CVTechTalk for updates.


Wednesday, August 18, 2021

Welcome Back to School Tip: Use Chrome Groups to Organize Tabs for Each Class


Welcome back! I hope you're having a wonderful new school year. If you use Google Chrome, you know how easy it is to get stuck in tab overload. Too many tabs open at once can be a multitasking nightmare. You can get caught spending a frustrating amount of time trying to find the right tab. Sometimes you just open another instead of looking for the one you need. 

Hidden within Google Chrome is the ability to create tab groups. This helps you label groups of tabs you have open for better organization. Take a look at the screenshot below. In this Chrome window, I have Chrome tab groups set up for two classes that I teach. I have a group for my 6th period class and one for my 7th period class. If you look closely, each group has a different color. This helps me see easily which tabs I have open for each class. 


Get started by right clicking on a tab. In the menu that appears, hover your cursor over Add Tab to Group. From there, select New Group to create your first group. You can add other tabs to your newly created group by repeating this process, but instead select the group name. You can also drag and drop tabs horizontally into a group. 


The possibilities are endless for the ways you can organize Chrome with tab groups. You can create groups for class periods, subjects, projects, checking for understanding apps, engagement websites and much more. 

If you have any questions and would like a follow up, contact me via Gmail or Chat at ajuarez@techcoachjuarez.com. My book, The Complete EdTech Coach: An Organic Approach to Digital Learning, co-authored with my wife Katherine Goyette is now available on Amazon. Click here to purchase. It is published by Dave Burgess Publishing. Be sure to follow the hashtag #OrganicEdTech and #CVTechTalk for updates.


Monday, August 16, 2021

Welcome Back to School Tip: Get Mobile & Untether Your Laptop with Bluetooth Keyboard/Touchpad


As teachers, we all know the importance of moving around the classroom and not staying in one spot for an entire lesson. Moving around helps with classroom management, checking for understanding and much more. One thing that can tether us to our laptops is when we project our screen to a LCD projector or TV. If hardwired, you may be limited to where your laptop can be in the room. Some of us have apps that allow you to mirror or cast wirelessly, but those wireless connections are not always reliable. Many teachers use clickers, but a good clicker can be expensive and clickers do not have the ability to type. 

A low cost alternative is a bluetooth keyboard with touchpad. One of my favorites is by Logitech and can be purchased on Amazon for $24.99 (at the moment).  This model is pictured below. Stores like Best Buy, Target, Walmart and Big Lots all sell similar products. 


A bluetooth keyboard with touchpad allows you to fully control your computer from anywhere in the classroom. In my classroom, I use this to teach from different spots around the room. If I need to sit next to a student for classroom management purposes, I can teach from the spot next to that student. 

The bluetooth connection is extremely reliable. Some models, such as the Logitech above, run on batteries and others are charged with USB or other cables. The battery life on the Logitech is long lasting even with everyday use. The price is a reasonable investment for any educator and it's low enough that your site admin may be willing to purchase one for you. 

If you have any questions and would like a follow up, contact me via Gmail or Chat at ajuarez@techcoachjuarez.com. My book, The Complete EdTech Coach: An Organic Approach to Digital Learning, co-authored with my wife Katherine Goyette is now available on Amazon. Click here to purchase. It is published by Dave Burgess Publishing. Be sure to follow the hashtag #OrganicEdTech and #CVTechTalk for updates.


Friday, August 13, 2021

Welcome Back to School Tip: Add Yourself As A Student in Your Google Classrooms


Welcome back to school everyone. As we get to know the fresh faces in our classrooms, we will do a bunch of modeling this time of year to get them used to our expectations and routines. One of those expectations or routines kids will need in the beginning of the year is how to navigate your Google Classroom. You'll want to refresh them on where to look for announcements (Stream), how to navigate and turn in certain assignment types (Classwork), and much more. 

From the teacher's end, it looks different than that of the student. When you open an assignment as a teacher, you cannot show how to turn it in or demonstrate what students must do to complete it. My advice is to add yourself, a personal Gmail account or a separate teacher demo account within your district's domain, as a student. This way you can login to Classroom with that account and demonstrate exactly what you want students to do in Classroom. This is especially helpful for students new to the platform, English learners and SPED students. 

If your district doesn't allow accounts outside of the domain to be added, talk to whoever is in charge of the Google Admin Console to create a teacher demo account for you. If it is allowed, add a personal Gmail account as a student. Start by going to the People tab in Classroom. Click the Add students button.


Start typing your personal Gmail address or teacher demo account from within your domain. When it appears in Search Results, click it and then click Invite.


Go to Google Classroom in your personal Gmail account or teacher demo account and you'll see invitations to join the Classrooms.


When you are in as a student, you can do all the same things students can do. You can demonstrate how to do certain assignments and turn them in. 


This is also useful for students who are absent or are working from home because you can screencast and record these demonstrations for them. In addition, anytime you unveil a new assignment or activity in which kids are not familiar, being able to demonstrate the processes and your expectations is very valuable.

If you have any questions and would like a follow up, contact me via Gmail or Chat at ajuarez@techcoachjuarez.com. My book, The Complete EdTech Coach: An Organic Approach to Digital Learning, co-authored with my wife Katherine Goyette is now available on Amazon. Click here to purchase. It is published by Dave Burgess Publishing. Be sure to follow the hashtag #OrganicEdTech and #CVTechTalk for updates.


Tuesday, August 10, 2021

Use Chrome's QR Code Function to Display Lesson Plans for Admin and Coaches


As we return to full-time, face to face instruction, we are inching our way backs to a sense of normalcy. One feature of the job that is returning is administrators and coaches walking into classrooms. As a coach, when doing informal walk thru's, the last thing I want to do is interrupt your class flow by asking or searching for lesson plans. One way to help prevent admin or coach disruption by lesson plan search is to post a QR code near the door that links to lesson plans. 

If you have a preferred weekly lesson plan template saved on Google Docs, fill it out the first week. Each week, copy the previous week and paste it at the top of the document. This way, the most recent week is at the top and it allows you to keep a running record of all your lesson plans on one document. 


After filling the lesson plan template out the first time, click in the Omnibox (address bar). When you do, you'll see a QR code button appear on the right side. Click it.


A dropdown will appear with a QR code to your lesson plan template. Click the download button to save it to your computer. It won't allow you to copy and paste the image from the dropdown. Be sure to set the sharing permissions on the Doc for anyone with a link or specific people to be able to view it.


Create a new Google Doc and insert the downloaded QR code. Drag the corners of the image to make it appear larger within the Doc. Click the print button and print a copy.


I usually laminate the printed Doc and post it right by the door. Doing this let's my admin or coaches access the lesson plan template without interrupting my class or searching my workspace for a printed copy. What ideas do you have for giving stakeholders access to your lesson plans?

If you have any questions and would like a follow up, contact me via Gmail or Chat at ajuarez@techcoachjuarez.com. My book, The Complete EdTech Coach: An Organic Approach to Digital Learning, co-authored with my wife Katherine Goyette is now available on Amazon. Click here to purchase. It is published by Dave Burgess Publishing. Be sure to follow the hashtag #OrganicEdTech and #CVTechTalk for updates.


Welcome Back to School Tip: Keep Google Classroom Stream for Announcements


Welcome back to school! As we return to a semblance of normalcy in our schools, let's take the edtech skills we've learned over the past 18 months and adapt them to face to face teaching. During the pandemic, an edtech tool that became more en vogue than ever was Google Classroom. A common practice for Google Classroom is to keep the Stream for announcements only and Classwork for student work. 

By default, in the Stream, you'll see announcements and anything you post in Classwork. This can be confusing as the Stream is the landing page for students. To make it easier for students, you'll want to configure it so the Stream only shows class announcements and not all things assigned. Below is a step by step guide for going into the settings to configure the Stream to only show announcements only and keep assignments and schoolwork from clogging up the Stream.
What you see below is the default mode of Google Classroom. You can see all things posted in Classwork in the Stream. This includes assignments, questions, quizzes and materials.


To set the Stream to only show announcements and not things posted in Classwork, go to the settings gear button in the top right corner. Scroll down to where it says Classwork on the stream. Click the button that says Show condensed notifications. 


In the dropdown menu, select Hide notifications. Click Save in the top right corner. 


Below is the same Classroom, but with the settings changed. All that will appear in the Stream is class announcements. Use this for reminders, exit tickets and more. 


If you have any questions and would like a follow up, contact me via Gmail or Chat at ajuarez@techcoachjuarez.com. My book, The Complete EdTech Coach: An Organic Approach to Digital Learning, co-authored with my wife Katherine Goyette is now available on Amazon. Click here to purchase. It is published by Dave Burgess Publishing. Be sure to follow the hashtag #OrganicEdTech and #CVTechTalk for updates.