Showing posts with label Google Sheets. Show all posts

Saturday, July 29, 2023

Expediting Your Workflow with Claude.AI: Spreadsheets, CSV Files & Analysis of Student Data


If you're constantly sifting through mounds of data, Claude.AI can help you revolutionize your workflow. This AI tool allows you to upload your data from spreadsheets in the form of CSV files, which can exponentially speed up your student data analysis process.

Traditional data analysis methods can be time-consuming, requiring hours or even days of manual processing. However, Claude.AI's CSV file upload feature helps to eliminate some of the pain points in this task. With just a few clicks, you can input all your data and have it ready for immediate analysis.

Utilizing artificial intelligence, Claude.AI dives into the numbers to identify trends and patterns that might not be immediately apparent to the human eye. This can help you identify recurring problem areas that could benefit from more focused attention. Claude.AI’s in-depth analysis provides crucial insights into these questions, taking some of the guesswork out of your strategy.

Importantly, this doesn't mean that Claude.AI is replacing the human touch. On the contrary, it is augmenting our ability to sift through data more efficiently and effectively. It provides a foundation, an insightful starting point upon which we can then build our strategies. However, it is essential to vet the information that AI provides.

If the initial data analysis and trends provided by Claude.AI are not as focused or in-depth as you like, you can continue the conversation with the chatbot by providing a more detailed follow-up prompt. Remember, Claude.AI will automatically refer back to the spreadsheet you uploaded when providing future analysis and answers within the same conversation thread.

Despite the complex algorithms and machine learning behind Claude.AI, the software is not infallible. As such, it is paramount to remember that anything produced by AI tools should be reviewed by a human. This is a collaboration of sorts, with AI doing the heavy lifting of sorting through mountains of data at lightning speed, and humans applying their expertise and intuition to verify and interpret the insights.

Ultimately, Claude.AI serves as a powerful ally in data analysis, expediting your workflow while enhancing your ability to analyze student data. It is a fine example of how technology can work hand in hand with humans to increase productivity, provide deeper insights, and drive more informed decision-making in the world of education.

For further inquiries or any questions you may have, feel free to reach out to me via Gmail or Chat at ajuarez@techcoachjuarez.com. If you're interested in bringing my expertise to your school for professional development (PD), workshops, keynote speeches, training, or follow-ups on this or prior blog posts, please schedule an appointment here.

I'm delighted to share that my book, 'The Complete EdTech Coach: An Organic Approach to Digital Learning', co-authored with my wife Katherine Goyette, is now available for purchase on Amazon. You can secure a copy by clicking here. Stay tuned for further updates and insights by following the hashtags #OrganicEdTech #WeAreCUE and #CVTechTalk on social media. 

This blog post was written with the help of ChatGPT, Claude.AI, Adobe Firefly and Google Bard.

Tuesday, January 25, 2022

Prep for Google Certified Educator Level 2 Exam: Google Sheets

The Google Certified Educator Level 2 Exam has gone through some changes recently. In the past, it was 20 questions multiple choice and 11 performance tasks. The current iteration is 35 multiple choice questions based off of scenarios. Questions will ask you to choose between 1-5 correct answers. These questions require you to be familiar with the features and functionality of each Google Workspace for Education App. 

For Sheets, you need to be familiar with the following features and functionality.
- How to use Sheets to create a print friendly calendar
- How to filter or hide unwanted data
- How to create charts
- Rules for conditional formatting
- How to enter a dropdown list

Click here to go through some Sheets Practice Scenarios on Quizizz Lessons. These scenarios are NOT the same as the test, but similar. If you understand the skills demonstrated in the videos and can answer my checking for understanding questions, you will be prepared for the Sheets portions of the Level 2 Exam.

If you have any questions and would like a follow up, contact me via Gmail or Chat at ajuarez@techcoachjuarez.com.  

Wednesday, December 8, 2021

Prep for Google Certification Level 1 Exam: Google Sheets


The Google Certified Educator Level 1 Exam has gone through some changes recently. In the past, it was 20 questions multiple choice and 11 performance tasks. The current iteration is 35 multiple choice questions based off of scenarios. Questions will ask you to choose between 1-5 correct answers. These questions require you to be familiar with the features and functionality of each Google Workspace for Education App. 

For Google Sheets, you need to be familiar with the following features and functionality.

- Ways Sheets can help you analyze data
- Ways Sheets can help you manipulate and protect data
- Sheets' relationship with Google Forms

Click here to go through some Google Sheets Practice Scenarios on Quizizz Lessons. These scenarios are NOT the same as the test, but similar. If you understand the skills demonstrated in the videos and can answer my checking for understanding questions, you will be prepared for the Google Sheets portions of the Level 1 Exam.

If you have any questions and would like a follow up, contact me via Gmail or Chat at ajuarez@techcoachjuarez.com. 

My book, The Complete EdTech Coach: An Organic Approach to Digital Learning, co-authored with my wife Katherine Goyette is now available on Amazon. Click here to purchase. It is published by Dave Burgess Publishing. Be sure to follow the hashtag #OrganicEdTech and #CVTechTalk for updates.

Friday, November 19, 2021

Easy Google Sheets Tricks for Tracking Student Progress and Participation Points

Progress monitoring and feedback are essential components of the learning process. Managing these things can be time consuming and cumbersome. Below, take a look at two, easy ways to use Google Sheets to monitor student progress and track participation points as part of a robust feedback loop.

Participation Points and Feedback

Feedback can come in many forms. Traditionally, it comes in the form of grades and red marks on an assignment. This type of feedback is not often acted upon by students. This type of feedback is more like an autopsy. A robust feedback loop during the learning process, not afterwards, makes the teacher and student partners. 

Part of building this loop is creating a culture where students elicit feedback from the teacher, and not just the other way around. Students don't typically like to ask for feedback during the learning process.  To help create this culture of feedback, I like to offer students participation points for asking for feedback and acting upon it. For example, on a block schedule day, I have students work on collaboratively on a project or assignment. For the period, I set a goal of 8-10 participation points. To reach their goal, they need to ask for feedback and have me check their work. Each time they ask and act upon the feedback, I award points. Developing this system has made it a habit for students to elicit feedback. The end products they turn in are much higher quality as they've received feedback and caught mistakes during the process and not afterwards.

Awarding participation points can be done with paper and putting tally marks next to kids' names, but printing a roster each day is a tedious act I wanted to avoid. With Google Sheets, I developed a system where I can click on a student and click a button to add points to their total. I can also take points away if needed. Click here to make a copy of my template. Embedded within the template is a Google Apps Script that allows you to click the plus and minus buttons to award or takeaway points. The first time you use it, you will be prompted to sign in and allow permission for the script to run. 

This Sheet will work on a Chromebook (better if touchscreen), PC and Mac. On mobile devices, it will not work using the Google Sheets app. The app will not allow the script to run. If on a mobile device, it will work if run on iPad or iPhone through Safari. It will not work through the mobile version of Chrome. 

Take a look at the video below to see a short demonstration.


Track Student Progress Towards a Goal

As an educator, monitoring student progress is something we do daily. Doing so can be tedious. One way I track progress towards a learning goal is to use checkboxes in Google Sheets. I create a sheet for each class and put a row of checkboxes next to each kid's name. You can use this for monitoring steps towards finishing a project, books read, participation points and much more. Built in is a formula that tallies the total number of checkboxes checked for each student. Click here to make a copy of my template. Take a look at the video below to see a short demonstration.


Google Sheets is such a versatile tool for tracking and analyzing student data. You can actually be extremely creative with it. How might you use Google Sheets in your role? If you have any questions and would like a follow up, contact me via Gmail or Chat at ajuarez@techcoachjuarez.com. 

My book, The Complete EdTech Coach: An Organic Approach to Digital Learning, co-authored with my wife Katherine Goyette is now available on Amazon. Click here to purchase. It is published by Dave Burgess Publishing. Be sure to follow the hashtag #OrganicEdTech and #CVTechTalk for updates.


Wednesday, November 17, 2021

Keep Track of Google Forms with Notification Rules


The popularity of Google Forms has exploded over the years. It's so versatile. You can create surveys to collect a wide range of data and information. You can create self paced lessons, Create Your Own Adventure Stories, assessments and more. 

Keeping track of who fills out a form and when they complete it can be a tedious task. This requires you to go searching through your Drive to find the Google Sheet that stores the Form's data. Hiding in plain sight, built into Google Sheets, is a Notification rules function. This allows you to be emailed when someone fills out your Form. 

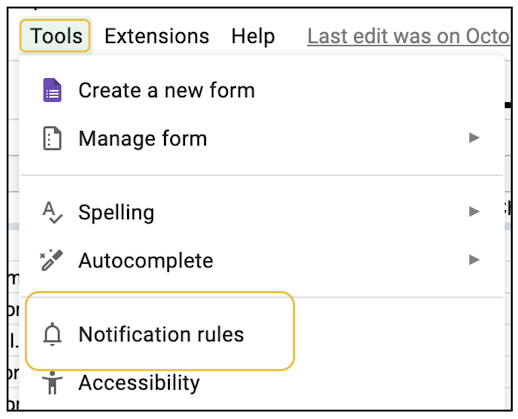
Get started by opening the Sheet that accompanies your Google Form. Click Tools on the top menu and select Notification rules.


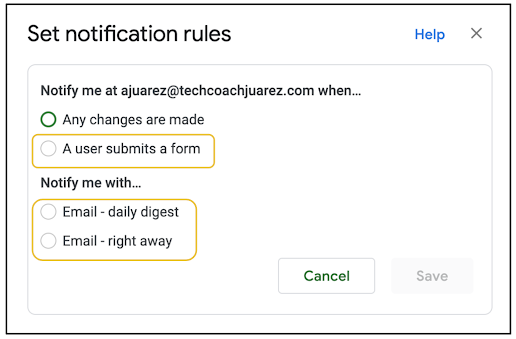
In the menu that appears, you have some options for setting your rules. The first option is when you'll receive the notification email. If you are tracking student responses, I recommend selecting the choice titled "A user submits a form". This will email you within minutes of a someone submitting the Form. The other option is how you'll receive the notification. You can choose from a daily digest, which is one email showing all the submissions that day. You can also choose right away which means every submission will generate an email.


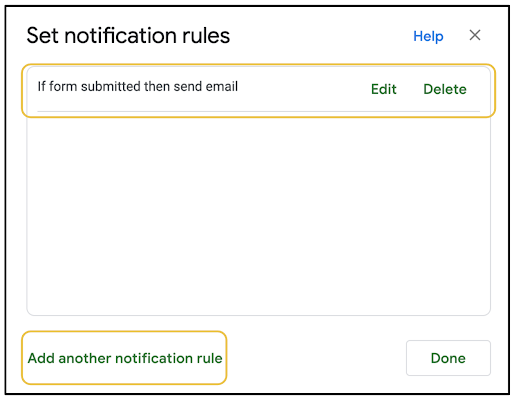
You can set multiple rules by clicking Add another notification rule.


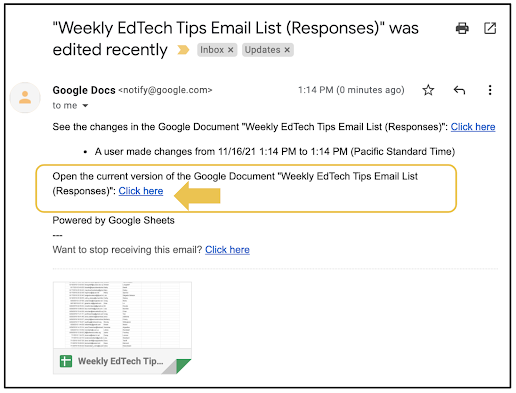
The email you receive will look like what you see below. Embedded is link that takes you directly to the responses Sheet.


There are many applications for notification rules. I've used it to track blog subscribers and unsubscribes. As a classroom teacher, I've used it to get notifications when intervention students complete lessons outside of class. The notification reminds me to check their work and update their grades. Working with parents, you can get notifications to track which parents have yet to respond to a survey. Administrators can do something similar to track which staff members have yet to respond to input surveys. The possibilities are endless. How might you use Notification rules?

If you have any questions and would like a follow up, contact me via Gmail or Chat at ajuarez@techcoachjuarez.com. My book, The Complete EdTech Coach: An Organic Approach to Digital Learning, co-authored with my wife Katherine Goyette is now available on Amazon. Click here to purchase. It is published by Dave Burgess Publishing. Be sure to follow the hashtag #OrganicEdTech and #CVTechTalk for updates.


Thursday, August 19, 2021

Google Sheets: Create Easy To Use Logs For Participation, Restroom Use and More!


Participation points are a big part of the way I teach. The problem is keeping track. In the past, I've printed slips of paper with my roster and gave kids tally marks. Being absent minded, I often lost those papers. I tried carrying my iPad around and marking a Google Form to tally points. That was time consuming. I have even done a strategy called feedback tokens where I printed out hundreds of business card size tokens and gave them to students for participation, etc. and had them "cash" in at the end of class. That worked, but was a management nightmare. 

Now that students are back face to face, I've been looking for a way to digitally track participation points. I did a few Google searches and found quite a few apps for chores, etc., paid services, but nothing free, that would meet my needs. I tried using a spreadsheet on my iPad, but trying mark kids in each cell was cumbersome. As I kept searching, I stumbled across a post by Alice Keeler. Duh! Of course Alice would have a spreadsheet hack for this. Why didn't I go there first. She loves to say, "The answer is always a spreadsheet". In this instance, she is absolutely correct!

Alice posted a sample of what I am trying to do with a spreadsheet using checkboxes. Click here to view Alice's post.  It hit me! Create a spreadsheet like Alice did, using checkboxes, access it on my iPad and I can mark points for students quickly and easily using my Apple Pencil. As I went about developing my participation points spreadsheet, I thought this would also be good for tasks such as keeping track of student restroom use as well. Since you can duplicate sheets, my restroom log was two clicks away.

Start by creating a spreadsheet and entering your students' names. Title the column to the right of the student name column Total. Going right, title each column 1-however many points you might give during a given class. In my class, I have it go as far as 20. I probably won't ever give that many, but I like to have more than what I need. In each cell, add a checkbox by going to the Insert tab and selecting checkbox. In that first cell with a checkbox, click and drag to add checkboxes to all cells in which you want checkboxes. Click here to make a force copy of my sample.

If you're not a spreadsheet ninja, like Alice, here is where you're going to get a little fancy. In the cell for the first student in the Total column, type this formula =COUNTIF(C2:V2,TRUE) and push Enter.  This allow show you a tally in the Total column of all the checkboxes checked in a row. The formula =COUNTIF(C2:V2,TRUE) may need a little tweaking depending on your spreadsheet. C2:V2 represent the first and last cells in a row I want to automatically tally. Your first and last cells in a given row may have different letters so you will have to adjust. 


After using the formula in the first student's row in the Total column, like with the checkboxes, click and drag down to the bottom of the column. This will apply that formula to each student's row.


Below is what it looks like when you click a checkbox. You can see the total column shows how many checkboxes in a student's row have been checked.


If you want to quickly recreate this sheet, formulas and all, for other classes or tasks (I did this for my Restroom Log), go to the tab at the bottom of the sheet, click the arrow next to the sheet name click Duplicate. This will add another sheet to your file. 


In this case, with a newly created sheet, I deleted all but three columns. For something like a Restroom Log, I give students three restroom breaks a semester. This will help me have, at a glance, a record of how many times kids use the restroom.


Take a look below at what it looks like in real time.


I access this spreadsheet on my iPad and use my Apple Pencil to check the checkboxes. I recommend using a tablet or touchscreen device for this, phones included. This makes it easy to circulate the room and give points, etc.

Anything you want to track or take a tally of can easily be done with a spreadsheet using checkboxes and the formula =COUNTIF(C2:V2,TRUE). Big thanks for the inspiration to Alice Keeler. If you're looking for a treasure trove of ideas for spreadsheets, Google Classroom, Jamboard and more, check out Alice's website alicekeeler.com. Follow her on Twitter by clicking here.

If you have any questions and would like a follow up, contact me via Gmail or Chat at ajuarez@techcoachjuarez.com. My book, The Complete EdTech Coach: An Organic Approach to Digital Learning, co-authored with my wife Katherine Goyette is now available on Amazon. Click here to purchase. It is published by Dave Burgess Publishing. Be sure to follow the hashtag #OrganicEdTech and #CVTechTalk for updates.


Tuesday, November 17, 2020

Use Google Forms and Sheets to Track Intervention Students and More


A common pain point among educators is having to transpose grades, data, etc. from paper or a program to another program. One thing we have started doing is electronically submitting records of student intervention. We have the autonomy to track and record student intervention interactions with our own preferred methods. For the most part, I have seen teachers write down their intervention on a paper chart. When we were turning in hard copies, this method is fine, but now we're submitting electronically. 

One solution would be to scan intervention forms, but that can be tedious and time consuming. Using Google Forms in concert with CONCATENATE in Google Sheets or Microsoft Excel, you can track intervention data, and much more, digitally and efficiently. I am by no means an expert with spreadsheets. My skill level is rather rudimentary, but this trick has made my workflow much better and saved me hours of tedious work.

In the GIF below, you see a sample of a form similar to what I use to track intervention with students. Setting the form is not difficult. The tedious, difficult part is getting all the student names into the form.

Using your school's student data system (We currently use Illuminate), you can download spreadsheets with your class rosters. Below is a sample of what these spreadsheets can look like. Using CONCATENATE in Google Sheets or Microsoft Excel, you can combine student last names, first names, and a comma in between, into a list that is EASILY copied and pasted into a Google Form.


According to edu.gcfglobal.org, the CONCATENATE function allows you to combine text from different cells into one cell. In our example, we can use it to combine the text in one column and another column  to create a combined name in a new column. 

Get started using CONCATENATE to combine last name and first name with a comma and space in between. In the screenshot below, I used an empty cell in the first row of data. Start by typing the "equal" sign. From there, enter the first cell you want to combine. In this case, it was "B2" for the last name Banner. After typing B2, with no spaces, type an ampersand. 

To add a comma after the last name (Banner), put a quotation mark, comma and another quotation mark. Remember, no spaces. To add a space after the comma, type an ampersand, quotation mark, hit the spacebar and put another quotation mark. To add the first name (Bruce), type an ampersand and the cell for Bruce (C2). Push the enter button when done. Typing the cells is not case sensitive. The formula used to combine the cells creating Banner, Bruce was =B2&","&" "&C2.


The beauty of this is that you only have to type the formula once. Once the last and first name is combined, click in that cell and you'll see a blue box around it. In the bottom left corner of the cell, you will see a blue square. Click and drag the square down to "fill down" and apply the formula to all of the rows below. This will combine last and first names for all students in the spreadsheet.


The GIF below shows CONCATENATE in action.


Select and copy all of the combined last and first names. 


With all of the students' names copied, create a Google Form. Set up a question for student names. Paste the names as the options for either Multiple Choice or Checkboxes. If you teach multiple classes, you will want to create a question for each class. Paste the student list into "Option 1" and it will add all student names to the question.


With my student rosters easily put into Google Form, without typing one by one, there are many ways to use them. I use them for tracking intervention, phone calls to absent students, rubrics and more. Click here to view a sample of Form I use when teaching multiple classes. How might you use a Form like this?

If you have any questions and would like a follow up, contact me via Gmail or Hangouts at ajuarez@techcoachjuarez.com. 

My book, The Complete EdTech Coach: An Organic Approach to Digital Learning, co-authored with my wife Katherine Goyette is now available on Amazon. Click here to purchase. It is published by Dave Burgess Publishing. Be sure to follow the hashtag #OrganicEdTech and #CVTechTalk for updates.


Thursday, November 12, 2020

Monitor Asynchronous Work with Sheets Notification Rules


Since the dawn of distance learning, the term Asynchronous has become a huge part of the EDU lexicon. I think I say this word at least a dozen times daily and type it more than double that. Keeping students engaged in asynchronous work can be a struggle. Some students have thrived, others struggled while many have been rather hit and miss. 

A common asynchronous learning activity is to embed lesson videos with questions on Google Forms. Teachers insert a recorded lesson video to the Form, students watch the video in the Form then answer a variety of checking for understanding questions. 

Keeping track of when students submit work are valuable data points not only for tracking asynchronous work, but also for gaining insight on when students are completing work. This type of information can be useful when trying to better understand student study habits and routines. In addition, this data can be useful when setting up intervention groups. Using notification rules in the Google Sheet generated by a Google Form, you can access this data. You can receive an email immediately after a student submits a Form or get a daily digest of Form submissions.

Below is a series of screenshots showing you how to get started using notification rules with Google Forms and Google Sheets.

Step 1: After creating a Form, click Responses.


Step 2: Click the Spreadsheet button. A small window will then appear.


Step 3: In the small window, click Create a new spreadsheet and click Create.


Step 4: In a new tab, the Sheet will open. Click Tools and select Notification rules.


Step 5: A small window will appear called Set notification rules. Select the option to be notified when "A user submits a form." For "Notify me with" you can choose to be emailed a daily digest or to be emailed right away, as soon as a student submits the form.


This is a sample of what the email looks like when you have set notification rules. If you click the circled "Click here" it will open the Sheet so you can see the most recent submissions of the form.


Notification rules can be used to keep up with a variety of information. It can be useful when using a Form for a sign-up sheet, fundraiser, feedback form, suggestion form and more. For what might you use notification rules? If you have some ideas, please share. 

If you have any questions and would like a follow up, contact me via Gmail or Hangouts at ajuarez@techcoachjuarez.com. 

My book, The Complete EdTech Coach: An Organic Approach to Digital Learning, co-authored with my wife Katherine Goyette is now available on Amazon. Click here to purchase. It is published by Dave Burgess Publishing. Be sure to follow the hashtag #OrganicEdTech and #CVTechTalk for updates.


Thursday, September 24, 2020

Make a Force Copy of a Digital File in GSuite


As educators, we create resources all the time. When we collaborate with colleagues, we share these resources, but issues arise with editing and viewing permissions as well having to make copies of digital files. If you are using GSuite, there is a simple trick for creating a "Force Copy" link. A "Force Copy" link forces anyone who clicks on it to make a copy of your file without having open a View Only version and make the copy on their own. It removes a few steps from that process. With many colleagues, removing those extra steps can be very helpful. 

This isn't a brand new idea, and you could Google it and find many articles on how to do this, but take a look at the steps and screenshots below to learn how to make a "Force Copy" of a file in GSuite.

Step 1: Open your file and click Share. Set permissions for Anyone with the link is a Viewer.


Step 2: After setting the permissions, look at the Omnibox (address bar)

Step 3: In the Omnibox (address bar), find where is says edit near the end of the address. Delete the word edit and replace it with copy.


Step 4: After changing edit to copy, push Return (on a Mac) or Enter (on a PC or Chromebook) and you'll be taken to this page. Copy the new URL, the entire address, and send it anyone you like or post it somewhere for people to make a "Force Copy" of your file. When they click Make a copy, their copy will automatically be saved in My Drive of their Google Drive. This trick can be done with Slides, Docs, Sheets, Forms, Jamboard, and Drawings.


If you have any questions and would like a follow up, contact me via Gmail or Hangouts at ajuarez@techcoachjuarez.com. If you would like to unsubscribe from this blog, go to bit.ly/tcjinbox.

My book, The Complete EdTech Coach: An Organic Approach to Digital Learning, co-authored with my wife Katherine Goyette is due out in October/November of 2020. It will be published by Dave Burgess Publishing. Keep an eye out on this blog and on
social media. Be sure to follow the hashtag #OrganicEdTech and #CVTechTalk for updates.


Friday, April 24, 2020

The Right Side Panel in GSuite


Efficiency and convenience are two important things when trying to improve and maximize your workflow. Tab hopping, though not difficult, isn't the most efficient method of multitasking. The seconds wasted hopping through multiple tabs in Chrome add up to minutes. With more and more tabs open, the brain power used to remember which tab is which app/site wears on you. Anything to make this process easier is welcomed.

Not too long ago, Google added a right side panel to apps such as Gmail, Google Drive, Google Calendar, Google Docs, Google Slides and Google Sheets. This panel is viewable by clicking the little arrow icon in the bottom right corner of the aforementioned apps. This side panel gives you at a glance access to Calendar, Keep and Google Tasks. 

In Gmail, Google Drive and Google Calendar, there is another button, below the default "at a glance links", for Add-ons. For example, in Gmail, you can install an Add-on for Zoom or DocUsign on the side panel. 

Using this side panel within GSuite is a great way to improve your efficiency and workflow. As an educator, my favorite way to use the side panel is the ability to add important emails as a task in Google Tasks. This helps me set reminders and due dates for action items I receive on a daily basis. 

There is also a great feeling I get every time I complete a task and it disappears from my list. When you complete all tasks, it says good job.


Something as simple as having my Google Calendar in the side panel, at a glance, while working in Gmail is another workflow improvement. This helps tremendously when scheduling emails, video calls and other tasks. 


With students, the side panel is a great way to have kids easily access notes and sources when writing. If kids take notes from different sources in Google Keep, they can open Keep in the side panel while in Google Docs. Any notes can be added directly into the Doc to jumpstart their writing.


If you have any questions and would like a follow up, contact me via Gmail or Hangouts at ajuarez@techcoachjuarez.com. If you would like to unsubscribe from this blog, go to bit.ly/tcjinbox.