Showing posts with label Google Slides. Show all posts

Thursday, February 24, 2022

The Power of the Stop Sign


According to the IBM Training and Skills Blog, "Learning is a lifelong process, it is a self-directed and self-paced journey of discovery…not a forced march and 'race' to a learning standard or data point. The purpose of learning is not to 'arrive' at a particular level of proficiency “on time”. As long as we are alive, most people are continually learning, and the 'journey' never ends. " I really love this quote. I believe this sentiment should guide our work as educators.

I am not quoting this to knock on standards or data. That's a whole other blog post. I am quoting this because I aim to teach students and train teachers with the idea that learning is a process, a process that never ends. As educators, we want to model for students how to be lifelong learners. 

Too often in my career, I have encountered students who will submit work for the sake of submitting work. They are playing the game of school. They say, "Here mister, I turned it in. I should have an A". After evaluating their work and providing comments and feedback for which they can use to improve, I often get refusal to resubmit work, because in their minds, they were finished. The learning was over. The learning was a destination, not a journey or process. 

One way I have been trying to change this mindset with my students is by focusing on providing targeted feedback while the kids are working. I provide feedback on their note taking and while they producing a learning artifact. If I wait until they've turned something in to provide feedback, it becomes an autopsy. Very few will want to go back and fix something "dripping with red ink".

This is easier said than done, but once you develop this culture, you will begin to see students start to elicit feedback from you and not just the other way around. When this happens, you are "grading" them as they work and when you see the final product, the quality is much higher. It's much easier to grade because you've been part of their learning journey. 

Ok, I will get off of my soapbox now. Let's take a look at a simple way to build a feedback loop and help build a culture of learning being a journey and not a destination. One way I try to do this is by awarding participation points for students who ask for feedback during class. Click here to access a spreadsheet I use to keep track of weekly participation points. 
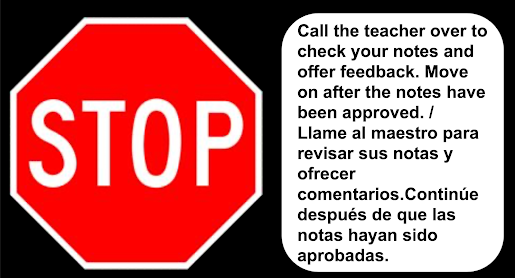
A simple, yet powerful way build a culture of feedback is to use a "stop sign" slide at strategic points in a lesson. When I teach a lesson, I like to pre-record my lessons. Each lesson is chunked into 2-3 minute videos. In between each chunk, I insert my stop sign slide. I like to use Quizizz Lessons for this, but it also works with systems such as Pear Deck, Nearpod, Google Slides and more. This slide asks students to stop, reflect on their notes and ask the teacher for feedback. They raise their hand and I come take a look at their notes and see if they missed any important information. 

In these one on one encounters, organic conversations arise and individualized teaching moments take place. Feedback becomes personalized to the needs and questions of that student. If they act on the feedback, I add participation points and they continue with the lesson at their own pace. This style of teaching means you will not be tethered to your computer or desk. The step counter on your smartwatch will be working overtime so wear comfortable shoes. 

This can be done when delivering live, whole class instruction too. Insert some stop signs where kids can reflect, write summaries, pair-share, revise notes, receive feedback, etc. before moving on. It provides a nice little brain break.

If you've read this far, you may be thinking, what about student talk and the 4 C's? The examples discussed above are just ideas on way you could deliver instruction. That instruction forms the foundation for activities that will require students to use the learning to engage in the 4 C's and interact with their peers.

Stop signs are great ways to break up a lesson. If you are doing a Hyperdoc, insert some stop signs to remind students to reflect and ask for feedback. Using tools like Kami, you can insert stop signs in articles when students are marking the text. The possibilities are endless.

How might you use stop signs to build a culture of feedback, reflection and learning as a process? If you have any questions and would like a follow up, contact me via Gmail or Chat at ajuarez@techcoachjuarez.com. My book, The Complete EdTech Coach: An Organic Approach to Digital Learning, co-authored with my wife Katherine Goyette is now available on Amazon. Click here to purchase. It is published by Dave Burgess Publishing. Be sure to follow the hashtag #OrganicEdTech and #CVTechTalk for updates.




Thursday, February 17, 2022

Fullscreen Interactive Google Slides: The Chrome Extension You've Been Waiting For!


Google Slides is such a versatile tool. The possibilities are virtually endless. One thing I know I've wanted to be able to do with Slides is to quickly and easily annotate over my slides fullscreen. In the past, we had to be in edit mode which makes the slides smaller. If you're trying to do a demonstration or guided practice with students, this can be difficult for them to see. 

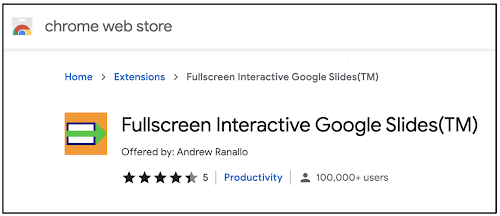
But what if you could annotate fullscreen? If you've been wondering the same thing, the answer is here in the form of the Fullscreen Interactive Google Slides Chrome extension. Click here to add to your Chrome browser. 


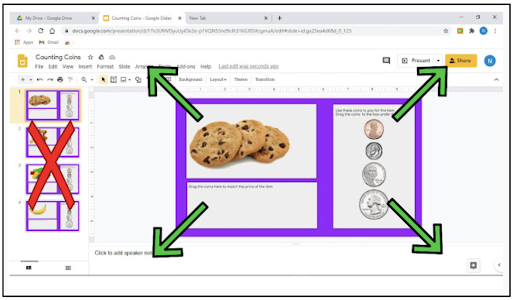
This extension, once installed, allows you to, with the click of a button, make the edit mode of your slide to go full screen. This will enlarge the viewable area all the while continuing to give you access to the toolbar to annotate and manipulate the slide. No need to click Slideshow or Present.


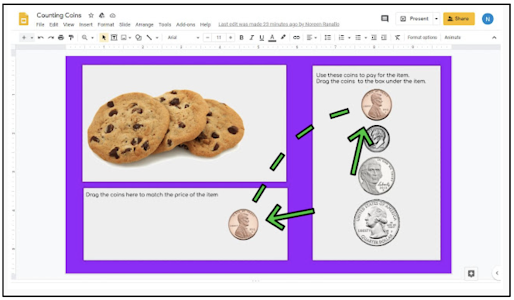
Below is what it looks like when using the extension. You can see the slide in a much larger, fullscreen area. All tools are at your disposal. This can be great for guided practice and helping students see the lesson better.


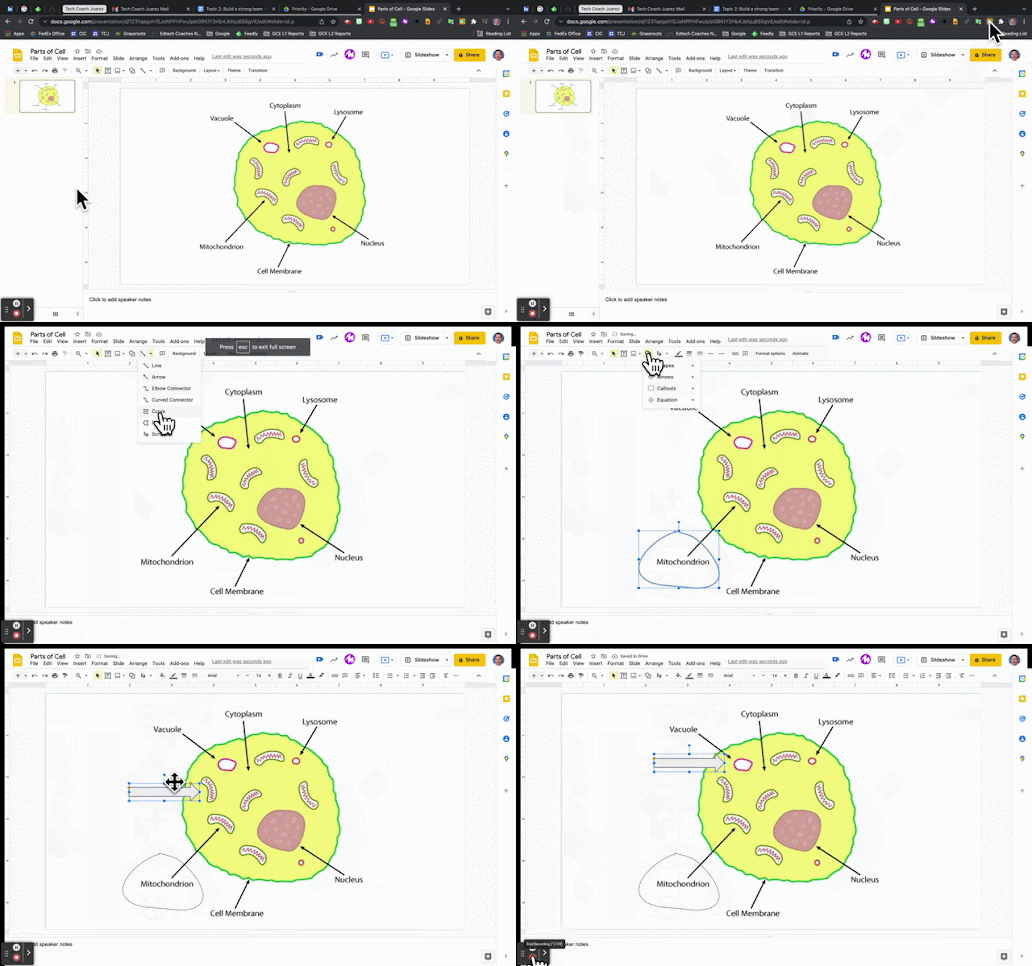
The GIF below shows the extension in action.


How might you use the Fullscreen Interactive Slides extension? If you have any questions and would like a follow up, contact me via Gmail or Chat at ajuarez@techcoachjuarez.com. 

My book, The Complete EdTech Coach: An Organic Approach to Digital Learning, co-authored with my wife Katherine Goyette is now available on Amazon. Click here to purchase. It is published by Dave Burgess Publishing. Be sure to follow the hashtag #OrganicEdTech and #CVTechTalk for updates.

Wednesday, January 26, 2022

Prep for Google Certified Educator Level 2 Exam: Google Slides


The Google Certified Educator Level 2 Exam has gone through some changes recently. In the past, it was 20 questions multiple choice and 11 performance tasks. The current iteration is 35 multiple choice questions based off of scenarios. Questions will ask you to choose between 1-5 correct answers. These questions require you to be familiar with the features and functionality of each Google Workspace for Education App. 

For Slides, you need to be familiar with the following features and functionality.
- Know how to use Slides to build a Create your own adventure story
- Know how to publish Slides to the web
- Know how add drop shadow to shapes and pictures
- Know how to change and edit theme

Click here to go through some Slides Practice Scenarios on Quizizz Lessons. These scenarios are NOT the same as the test, but similar. If you understand the skills demonstrated in the videos and can answer my checking for understanding questions, you will be prepared for the Slides portions of the Level 2 Exam.

If you have any questions and would like a follow up, contact me via Gmail or Chat at ajuarez@techcoachjuarez.com.  

Sunday, December 5, 2021

Prep for Google Certified Educator Level 1 Exam: Google Slides


The Google Certified Educator Level 1 Exam has gone through some changes recently. In the past, it was 20 questions multiple choice and 11 performance tasks. The current iteration is 35 multiple choice questions based off of scenarios. Questions will ask you to choose between 1-5 correct answers. These questions require you to be familiar with the features and functionality of each Google Workspace for Education App. 

For Google Slides, you need to be familiar with the following features and functionality.

- How Slides can help facilitate collaborative projects
- Insertion of YouTube videos and options for playback
- Features that make presentations more visually appealing

Click here to go through some Google Slides Practice Scenarios on Quizizz Lessons. These scenarios are NOT the same as the test, but similar. If you understand the skills demonstrated in the videos and can answer my checking for understanding questions, you will be prepared for the Google Slides portions of the Level 1 Exam.

If you have any questions and would like a follow up, contact me via Gmail or Chat at ajuarez@techcoachjuarez.com. 

My book, The Complete EdTech Coach: An Organic Approach to Digital Learning, co-authored with my wife Katherine Goyette is now available on Amazon. Click here to purchase. It is published by Dave Burgess Publishing. Be sure to follow the hashtag #OrganicEdTech and #CVTechTalk for updates.


Tuesday, October 19, 2021

Simple Tools for Curating Resources


Curation is not just for those who manage museums. Curation is a great strategy for engaging students with content and empowering them to take charge of their learning. Traditionally, teachers have been a sage on the stage where students sit quietly and listen. When you curate resources, students can be empowered to dive into the content at their pace. Students become explorers of content, not just passive consumers. Curation allows you to do this all within in one stop shop.

Instead of having students struggle to keep up with your lecture on To Kill a Mockingbird, try curating excerpts of text, scholarly commentaries, movie video clips and more. Let students have the freedom to explore those resources at their pace and this will likely lead to more engagement and empowerment. Curating resources like this also lends itself towards increased engagement with the 4 C's, communication, creativity, critical thinking and collaboration.

To get started with curation, take a look at some simple tools shared below.

Google Classroom

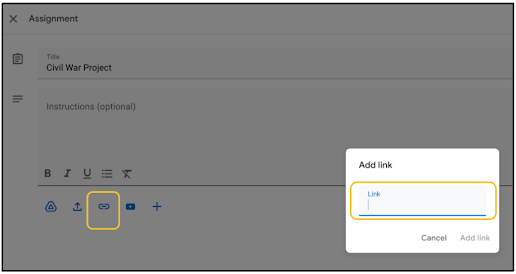
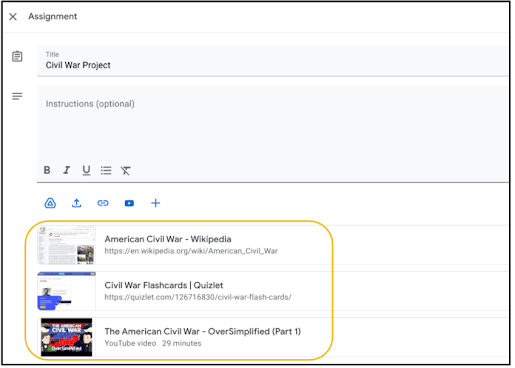
With curation, there is no need to find some fancy tool. If you're reading this blog, it's very likely you are already using Google Classroom. The link button on a Google Classroom assignment, material and or question allows you to quickly and easily curate resources.


When the student opens the assignment, they will see buttons that lead them to the resources you've created. Be sure to put detailed instructions.


Google Docs

If you haven't heard of Hyperdocs, click here to take a look. You won't be sorry. Hyperdocs are a lesson design strategy using Google Docs and embedded links. The links are curated resources and learning experiences. Students have a whole learning experience set up in a one stop shop. 

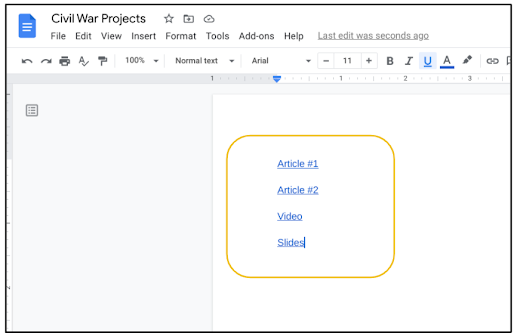
Getting started with curation with Google Docs is as simple as turning text into a hyperlink.


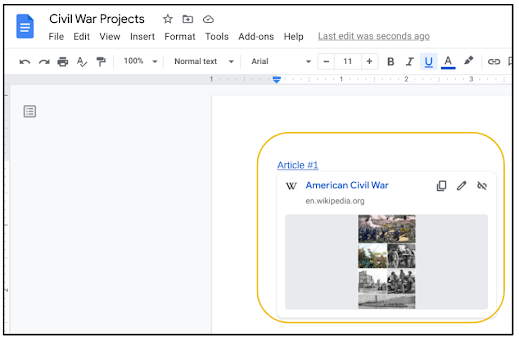
When students put their cursor over a hyperlink, a preview to the link appears.


Google Slides

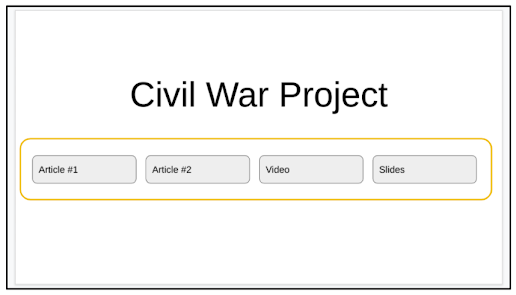
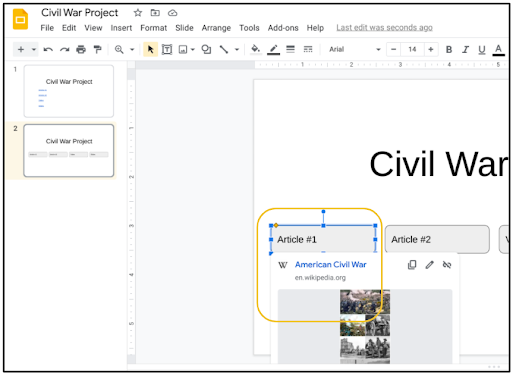
In a very similar manner as Google Docs, you can curate with Google Slides. Any text, shape or image you add to a slide can be hyperlinked.


Like Google Docs, when you hover over an object on the slide that's been hyperlinked, a preview to the resource appears. 


Google Sites

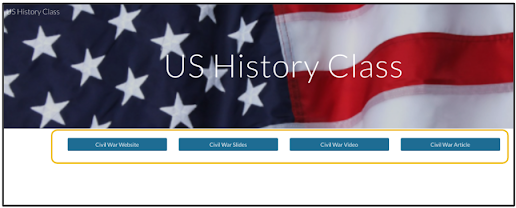
Sites is a visually appealing way to curate student resources. You have more options as far as how the resources are presented. Resources such as Slides, Docs and YouTube videos are visible and viewable within the Site without having to follow a link. Clickable buttons are another option for inserting links. If you are looking for a dynamic user experience, Google Sites is the ticket.


Wakelet

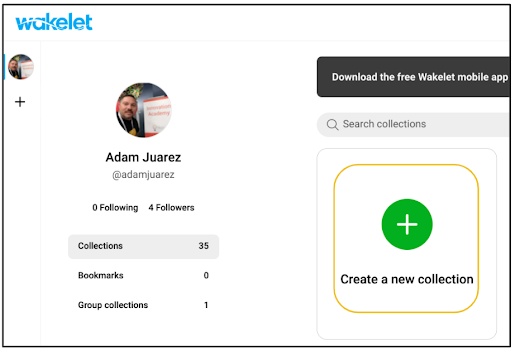
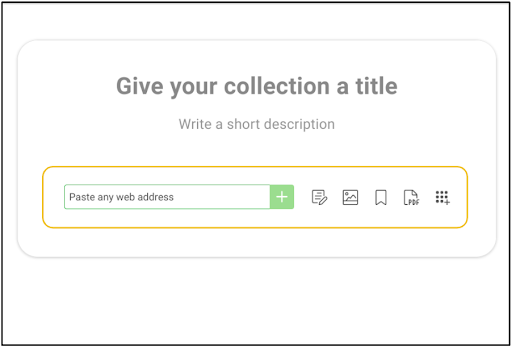
Beyond the realm of Google Workspace, Wakelet has become a popular tool for curating resources. After signing up for Wakelet, you can create Collections. Collections allow you to curate almost any digital file type and they are easily shareable. 


Below you can see the different ways to add digital files to a Wakelet collection. You can paste a URL to a file, search your computers and much more.


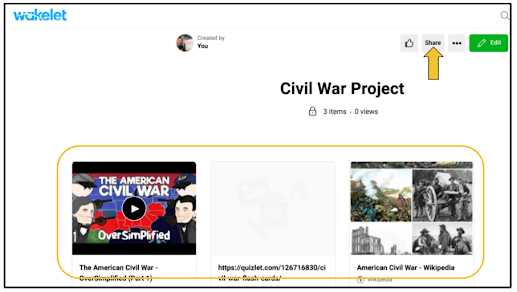
Once a Collection is created, Wakelet allows you to customize the way the resources are presented. The Share button allows to quickly share the Collection on almost any platform. If you are using Google Classroom, the Share button allows you to copy a link that can be pasted into an Assignment or Material. 


If you are interested in learning more about Wakelet, click here to try their newly minted Wakelet Certification Course. It's self paced and will allow you to learn all the ways Wakelet can be used.

Curation is a great way to put control of learning into the hands of students. What will you curate? If you have any questions and would like a follow up, contact me via Gmail or Chat at ajuarez@techcoachjuarez.com. My book, The Complete EdTech Coach: An Organic Approach to Digital Learning, co-authored with my wife Katherine Goyette is now available on Amazon. Click here to purchase. It is published by Dave Burgess Publishing. Be sure to follow the hashtag #OrganicEdTech and #CVTechTalk for updates.


Tuesday, September 7, 2021

Get Started with "Choose Your Own Adventure" Stories Using Google Slides


A "Choose Your Own Adventure" Story is a fun, simple way to empower students to explore a variety of possibilities when reading a story. Instead of everyone reading the story in the same timeline, students can choose where to go at "forks in the road" of the story. The magic of linking text boxes to other slides makes this relatively easy to create with Google Slides.

Start by putting all the pieces of your story and the various versions onto their respective slides. Once your slides are created, at "forks in the story", create text boxes for kids to choose the direction they want to go. In the example below, there are two options. 


For each option, select the text with your cursor and right click. In the menu that appears, click Link. 


After clicking Link, select Slides in this presentation. This will allow you to choose which version of the story the student will navigate to.


Choose the slide that corresponds to the respective version of the story. Repeat this process for each version.


Below is a simple example of what it would look like if a student chose Option 1. 


Below is a simple example of what it would look like if a student chose Option 2. 


How will you use "Choose Your Own Adventure" Stories in your class? If you have some cool examples, please share on Twitter with the hashtag #OrganicEdTech or send me a link to ajuarez@techcoachjuarez.com. 

If you have any questions and would like a follow up, contact me via Gmail or Chat at ajuarez@techcoachjuarez.com. My book, The Complete EdTech Coach: An Organic Approach to Digital Learning, co-authored with my wife Katherine Goyette is now available on Amazon. Click here to purchase. It is published by Dave Burgess Publishing. Be sure to follow the hashtag #OrganicEdTech and #CVTechTalk for updates.


Thursday, September 2, 2021

Quickly Translate the Text on Your Google Slides

Back to School Night season is upon us and Google Slides are a valuable tool in presenting your classroom's rules, expectations and more to parents. For parents who speak a language other than English, it can be difficult to translate an English language presentation. For English learner students, not being able to see Slides presentations in their home language is a learning barrier. 

To help remedy these issues, take a look at the Translate My Slide Add On in Google Slides. Below is a sample slide typed completely in English. The Translate My Slide Add On will translate the text typed on the slide to a myriad of languages.


Start by clicking the Add-ons tab on the toolbar. From there, click Get add-ons.


The Google Workspace Marketplace will appear. In the search bar, type translator. Among the results, you'll see Translate My Slide. Click it to open and then click Install.


After installation, the next time you click the Add-ons tab, Translate My Slide will appear as an option. Click it and then click Start a new translation.


On the right side of your presentation, the a menu will appear. In this menu, choose your source language and target language. At the bottom, toggle the switch to Translate all slides with 1 click. Click Translate to start the process.

Depending on the amount of slides in your presentation, it only takes 10-20 seconds to translate. The larger the presentation, the longer it will take. When finished, you'll see a Job done alert.


After closing the Job done alert, you'll see the text boxes in your slides translated into the language of your choice. 


If you want to keep your original English language version unscathed, make a copy of it and run the Translate My Slide Add-on on the copy. This will give two versions, in different languages. For what will you use the Translate My Slide Add-on? If you have any questions and would like a follow up, contact me via Gmail or Chat at ajuarez@techcoachjuarez.com. 

My book, The Complete EdTech Coach: An Organic Approach to Digital Learning, co-authored with my wife Katherine Goyette is now available on Amazon. Click here to purchase. It is published by Dave Burgess Publishing. Be sure to follow the hashtag #OrganicEdTech and #CVTechTalk for updates.


Friday, March 19, 2021

Google Slides Presentation Mode Update


Recently, Google updated the Google Slides presentation mode toolbar. In the past, this toolbar could be very intrusive. It popped up when you didn't want it to and it blocked the view of parts of your slides. These issues were definitely annoying when giving a live presentation or when recording.


If you were just as annoyed as I was, this new update is a breath of fresh air. The updated version of the presentation mode toolbar is much less intrusive. It takes up less screen real estate and it expands only when you want it to. Take a look below to see the updated toolbar in action. Credit to the folks at Google Workspace for creating this GIF.


What did you dislike most about the old toolbar? How excited are you for this update? If you have any questions and would like a follow up, contact me via Gmail or Chat at ajuarez@techcoachjuarez.com. 

My book, The Complete EdTech Coach: An Organic Approach to Digital Learning, co-authored with my wife Katherine Goyette is now available on Amazon. Click here to purchase. It is published by Dave Burgess Publishing. Be sure to follow the hashtag #OrganicEdTech and #CVTechTalk for updates.


Tuesday, March 2, 2021

Memes in the Classroom? Check out this example!

Back on February 12, 2021, I wrote a blog post about how have students create memes for concepts learned in class using Google Slides and Google Classroom. Memes can be a great activity for identifying or connecting underlying themes as well as making content to pop culture connections.

In a lesson I recently taught about Manifest Destiny, my students, most of which are English learners, came up with some brilliant memes. I curated their memes on my Cardinal Innovation Center website. As more memes get added to the website, I am able to use them for spiral review and preview in future classes.  Click the bold titles below to see more examples of student generated memes.

Manifest Destiny

In this lesson, students learned how the United States believed it was their destiny to rule land from the Atlantic to the Pacific Oceans and how they made this dream come true.


In this lesson, students learned the basic causes of the Mexican American War and the role the War played in achieving Manifest Destiny.


In this lesson, students learned the purpose of the Spanish American War, its role in American Imperialism, and the spoils the US gained as a result.


In this lesson, students learned about Mark Twain's criticism of American Imperialism.


If you curate memes on a Google Site, students can use the memes as method of review, writing prompt, fodder for academic conversations, peer feedback, metacognition and more. How will you use memes in your grade level and or content area? If you have any questions and would like a follow up, contact me via Gmail or Chat at ajuarez@techcoachjuarez.com. 

My book, The Complete EdTech Coach: An Organic Approach to Digital Learning, co-authored with my wife Katherine Goyette is now available on Amazon. Click here to purchase. It is published by Dave Burgess Publishing. Be sure to follow the hashtag #OrganicEdTech and #CVTechTalk for updates.


Friday, February 12, 2021

Have Kids Easily Create Memes in Google Classroom

Memes are a huge part of popular culture. We all have laughed at a meme we've seen on social media. Students talk about the memes they saw online with their friends. A few years back, I started having students create memes for topics they learned in my history classes. They served as a method for students to connect popular culture to the historical topics they were learning. 

They are great for history, but can be done in any subject. Finished memes could be jumping off points for academic conversations and critical thinking exercises. They can be a great starting point for building a robust feedback loop as well.

Below are some student examples from this school year. These come from a lesson I taught on the American Revolution. Each meme was created with Google Slides via Google Classroom.

Get started by creating a Memes Template assignment in Google Classroom. The template allows you to reuse the post over and over without having to reinvent the wheel. Add simple instructions that can be altered if needed each time you reuse the assignment. Click Create and choose Slides. When you reuse it in the future, a new copy of this Slides template will be made each time. With each reuse, if you need to augment it, you can, but the basic structure will always be the same.


Below is an example of the template I use. I like to use the grey space on the outside of the slide to insert a box with instructions. Students will have to find a background image and paste it on the slide. Teach them how to layer it where the image is in the "back" of the slide with the captions on top of it. This can be done by right clicking on the image after it's been pasted onto the slide. 

From there, I use Word Art to insert a space for the captions. Be sure to use a white font and make it bold. My instructions tell them to double click on the Word Art to edit it with their captions. When this template is reused in the future, I can duplicate this slide for as many slides necessary for the topic I am teaching. 


After setting up the template Slides presentation, be sure to set it to Make a copy for each student.


Below is an example from earlier this school year. Reviewing student work is a breeze. Click on the thumbnail of a student's submission and marvel at their memes. Use this as an opportunity to leave text feedback in the Private comments section or voice comments if you have the Mote Chrome extension. Click here to learn more about Mote.


Moving forward, click Reuse post in Google Classroom to reuse your Memes template. I recommend creating a Google Classroom Shell with no students invited to house all of your template assignments. This has been a huge time saver for me. Click here to learn more about creating a Google Classroom Shell.


Each time you reuse the Memes template, simply change out the topic. No need to create new slides because a new copy of the original will be made. The new copies can be augmented as needed and the original will not be changed.


How will you use Memes in your subject area or grade level? If you have some cool student examples, please share them so I can feature them in the Cardinal Innovation Center Memes Gallery. If you have any questions and would like a follow up, contact me via Gmail or Chat at ajuarez@techcoachjuarez.com. 

My book, The Complete EdTech Coach: An Organic Approach to Digital Learning, co-authored with my wife Katherine Goyette is now available on Amazon. Click here to purchase. It is published by Dave Burgess Publishing. Be sure to follow the hashtag #OrganicEdTech and #CVTechTalk for updates.