Tuesday, August 30, 2022

Google Classroom as a PE Fitness Tracker


Over the years, finding ways to organically integrate edtech into PE classes has been a struggle. There are apps kids can use with their phones, but accessibility is still an issue as we cannot require all students to enable location services and other settings. This past year, I collaborated with my friend and colleague Sara Vega (legendary PE Teacher and Soccer Coach) on a way to use Google Classroom to help track fitness. We came up with the idea of building a "Class Shell" full of template posts that she would reuse each time she wanted students to check in and record some fitness data.

A "Class Shell" does not have students enrolled. It is a Google Classroom with assignment templates. Each teacher only needs to reuse the template posts in their Google Classrooms that contain students. Below are some screenshots of our PE Fitness Activity Shell. We built three categories: BMI, Cardiovascular Fitness, Flexibility and Muscular Strength.
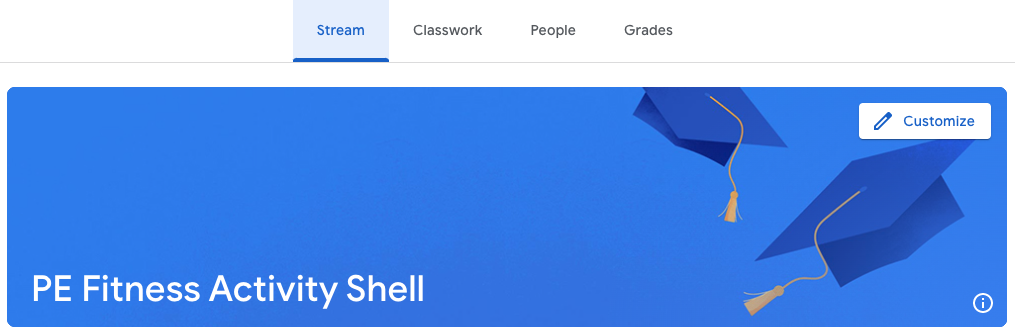


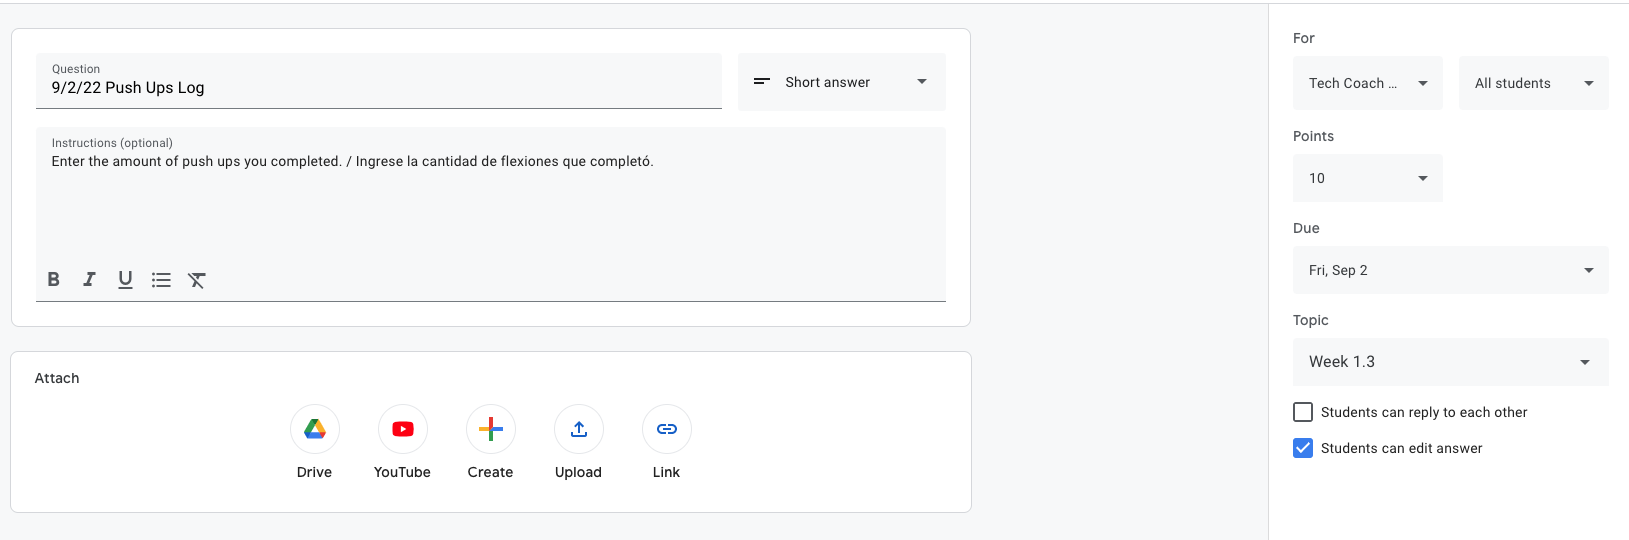
Notice the "X's". Those are place markers for dates. Each post is a Google Classroom Question where students will enter a number of reps or time for the respective fitness activities. 

In this system, after building the templates in the Shell, teachers will open their Google Classrooms that contain students and Reuse post.


Next, choose the template to reuse.


With the reused template post, change out the "X's" for the corresponding date of the post.


Because the instructions are always the same, there is no need to change the instructions. Add your point value, set due date and topic, and click Ask.

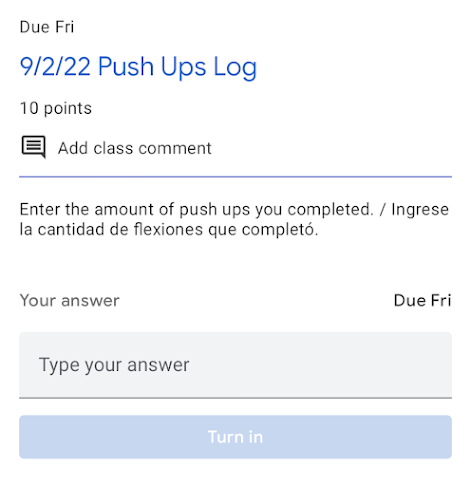
For students, it may be easier for them to log their fitness reps or times using their phones. When in the gym or on the track, a computer, tablet or Chromebook could be problematic, but not impossible. Below is a screenshot of what it looks like on the student side using the Google Classroom mobile app.
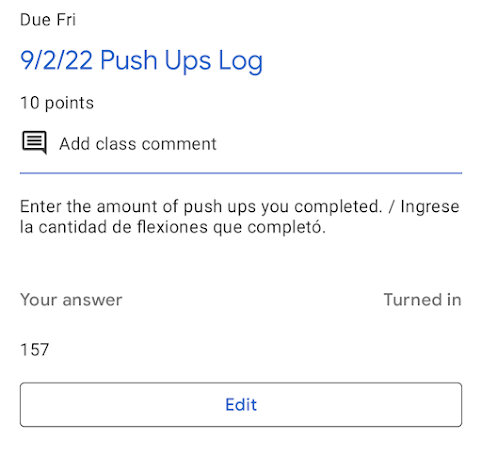
In this example, the student entered an astounding 157 push-ups. 
On the teacher's end, like with any Google Classroom assignment, you can see the students who have turned in and not turned in in real time.


When you open the assignment, you will see at a glance the students who've turned in their reps/times and quickly give them credit or points. 


For students to monitor their progress, they can easily go back into Google Classroom, open previous submissions and see how they've grown from week to week or month to month. This system is obviously not as accurate as a fitness tracker app, but a simple, easy way to help students monitor fitness using a free tool in which they are already familiar. How might you use this hack or with which PE teachers might you share this idea? If you have any feedback or suggestions on how to improve this, please let me know. 

If you have any questions and would like a follow up, contact me via Gmail or Chat at ajuarez@techcoachjuarez.com. My book, The Complete EdTech Coach: An Organic Approach to Digital Learning, co-authored with my wife Katherine Goyette is now available on Amazon. Click here to purchase. It is published by Dave Burgess Publishing. Be sure to follow the hashtag #OrganicEdTech and #CVTechTalk for updates.




Wednesday, August 24, 2022

Help Curb Plagiarism by Disabling Copy in Google Docs


An often heard pain point is how students have become too good at copying and pasting. This leads to blatant plagiarism. As educators, we are looking to get students to analyze and synthesize content in order to generate thoughts, opinions, claims and cite textual evidence. Too often, students will try to cut corners by copying and pasting content and claiming it as their own. 

Google Docs, hiding in plain sight, has a feature that allows you to disable copying on a document you own. For example, if you have an article you want students to read, synthesize and analyze, you could copy and paste the text onto a Google Doc. Be sure to cite the source and or give credit to the author. Once on a Google Doc, click the Share button in the top right corner.


In the pop up that appears, click the Settings gear icon.


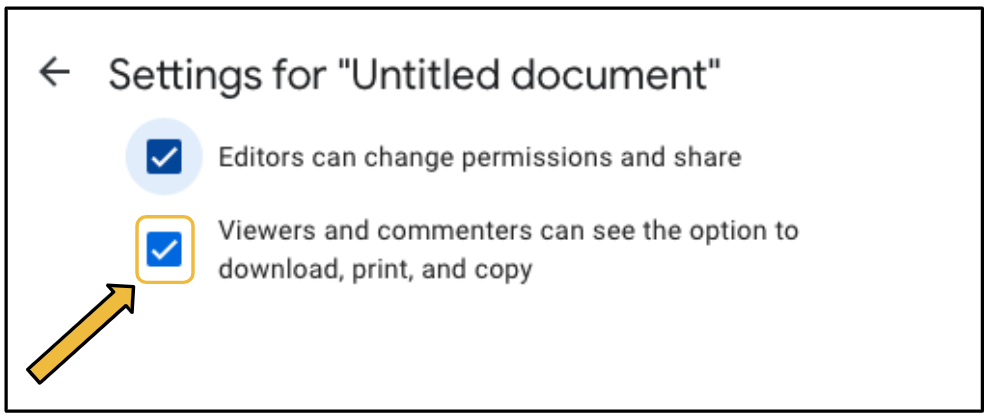
From there, uncheck the box titled "Viewers and commenters can see the option to download, print and copy". Then click the back arrow.


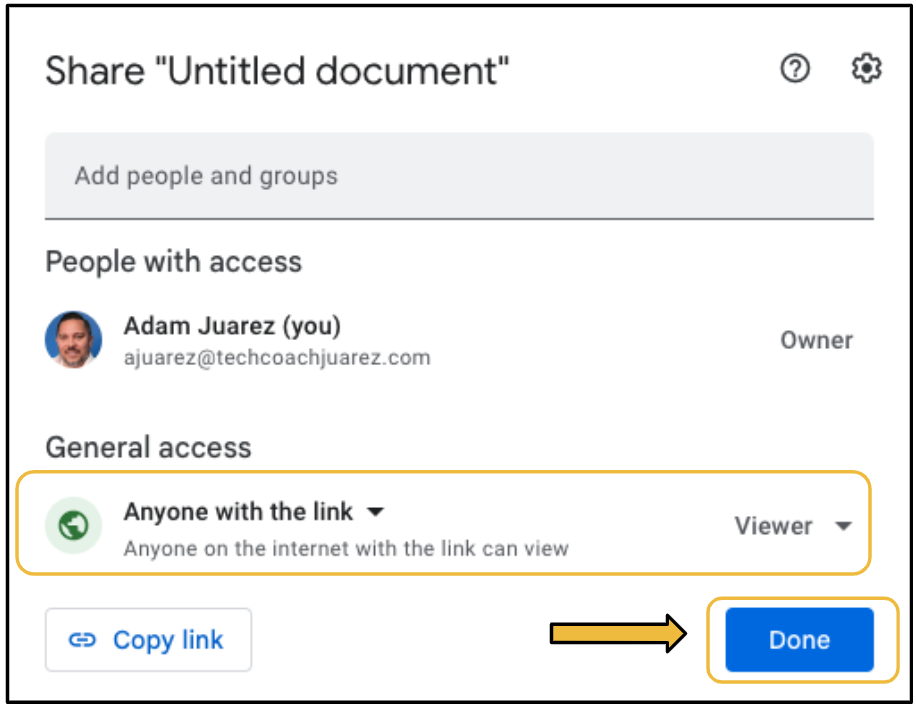
Be sure to set your permissions so students can view the document and click Done.


Below is a screenshot of what it looks like on the student end of this type of document after copying permissions have been disabled. A student could try to highlight text, but they will not be able to copy it from the Edit tab or by right clicking. Keyboard commands for copying are also disabled.


Disabling the ability to copy in Google Docs makes your documents truly View Only. How might you use this feature? If you have any questions and would like a follow up, contact me via Gmail or Chat at ajuarez@techcoachjuarez.com.

My book, The Complete EdTech Coach: An Organic Approach to Digital Learning, co-authored with my wife Katherine Goyette is now available on Amazon. Click here to purchase. It is published by Dave Burgess Publishing. Be sure to follow the hashtag #OrganicEdTech and #CVTechTalk for updates.


Tuesday, July 12, 2022

Power Up Your Hyperdocs with YouTube Preview

The Hyperdoc Handbook by Lisa Highfill, Sarah Landis and Kelly Hilton took the EDU world by storm, and for good reason. Since this book was published, educators have been designing empowering lessons with Google Docs and more. A popular Hyperdoc feature is to include links to YouTube videos. Until recently, these links existed in the Doc as a hyperlink. These hyperlinks opened the video in a new tab for students to watch. 

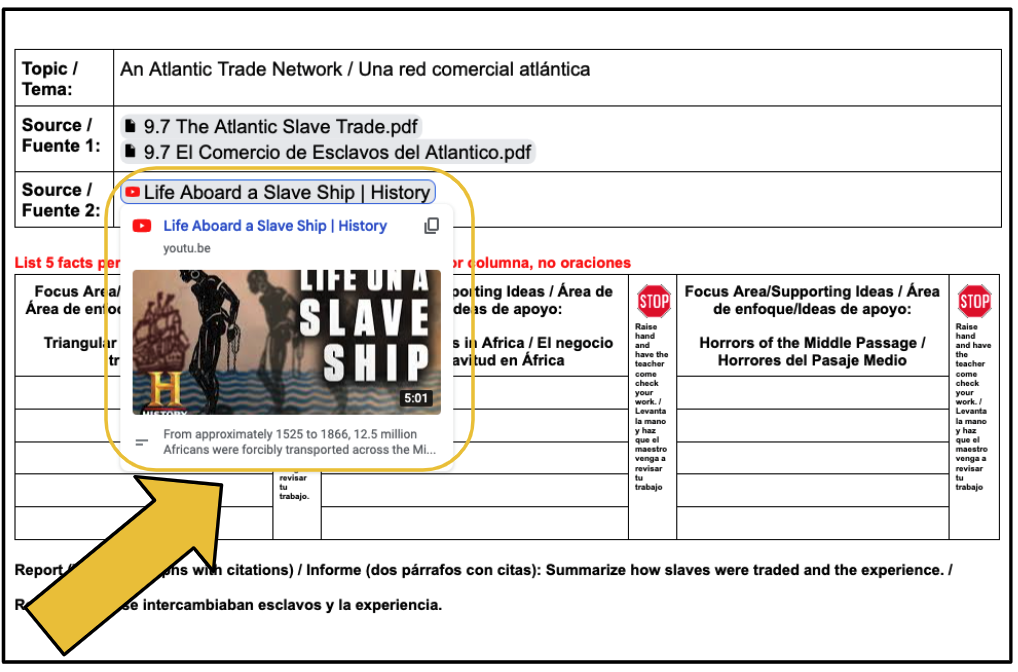
An issue I've seen with students is that when they tab hop, they can often be tempted to veer off task. When working through an activity such as a Hyperdoc, keeping students focused on the task is imperative. Recently, Google Docs has been updated to give you the option to add a YouTube link in the form of a "pretty little Smart Chip-like button." See below.


When a student hovers over the "YouTube Chip", a small preview will appear below. This preview gives them more information, at a glance, about the video.


If student hovers over the actual image of the video in the preview, they will see a button appear that says Open preview. 


When they Open preview, in the bottom right corner of the tab, the video will open up and play. This allows them to type on the Doc, take notes and more while watching the video. They can do this from the convenience of the same tab. No tab hopping necessary.


The screenshots shown above are from a Mini Report Eduprotocol. It was this past school year where I saw students using this feature completely on their own. I learned of this cool trick from students. What cool things will your students teach you this upcoming school year?

If you have any questions and would like a follow up, contact me via Gmail or Chat at ajuarez@techcoachjuarez.com.

My book, The Complete EdTech Coach: An Organic Approach to Digital Learning, co-authored with my wife Katherine Goyette is now available on Amazon. Click here to purchase. It is published by Dave Burgess Publishing. Be sure to follow the hashtag #OrganicEdTech and #CVTechTalk for updates.


Monday, July 11, 2022

Easily Customize Your Google Classroom Banner with Google Drawings

Since the advent of the COVID-19 shift to distance learning, creating a cool looking Google Classroom banner has been all the rage. When creating a custom banner, many people have been aggravated by the height and width requirements for the banner and cropping it to make it fit. Canva has some social media templates for banners that can be used, but in Google Drawings, you can set the area to be the exact size, 800 W x 200 H pixels.

Below is what a default banner looks like when you create a Classroom. To add your own design, click the Customize button in the top right corner. (Hint: This process is something to know for the Google Certified Educator Level 1 Exam).


In the menu that pops up, click Upload photo to add your own custom design. If you click Select photo, you will be able to choose from Google's preset image options and themes.


To create your own design in Google Drawings, first click the File button on the top toolbar. Near the bottom, click Page setup.


In the menu that pops up, it will be defaulted to Standard 4:3. Click that and select Custom.


The default measurement unit is inches. Click Inches and switch it Pixels. The first number on the left is the width. Set it 800. The second number is the height. Switch it to 200. Click Apply.


Immediately you will see the dimensions of the canvas in Google Drawings switch to a wider look. 


Be as creative as you like in setting up your Classroom banner.


When done creating, click File, hover your cursor over Download and click JPEG. This will download the image to your computer for easy upload to Google Classroom.


When you return to Google Classroom, click Customize and then click Upload photo. Your computer's files will pop up. More than likely, your JPEG will be in the Downloads folder. 


When you select the JPEG file, it will be uploaded to the Classroom at the perfect size and ratio.


I want to give a big shout out to my friends at Covina Valley USD in Covina, CA who helped me with the process and ideas for this blogpost. During our Google Certification Bootcamp in June 2022, questions arose about this process and we were able to figure out this hack. 

If you have any questions and would like a follow up, contact me via Gmail or Chat at ajuarez@techcoachjuarez.com.

My book, The Complete EdTech Coach: An Organic Approach to Digital Learning, co-authored with my wife Katherine Goyette is now available on Amazon. Click here to purchase. It is published by Dave Burgess Publishing. Be sure to follow the hashtag #OrganicEdTech and #CVTechTalk for updates.


Friday, May 27, 2022

An Easy Way to Get Started Using Dropdown Menus in Google Docs


Recently, Google Docs added a new Dropdown menu feature. It can be easily accessed by typing the "@" symbol. The first time you try it, it will be at the top of the menu that appears. After the first time, it will be located at the bottom. Scroll down to access the feature. It can also be found via the Insert menu on the top toolbar. 


When you select Dropdown, you will be prompted to create a new dropdown or use a previous one. You will be given the options to use their preset options as well. 


When creating your own Dropdown, by default, you can create 4 options, but you have the ability to color code them and add or subtract options. 


Below is an example of what this feature can look like. In the example, I have written a narrative with Dropdown menus inserted at strategic points. This can be a comprehension exercise for students to show knowledge of the characters in a story. The Dropdown will show one of the options, but if the student thinks the option is incorrect, they can click it to change the name to the correct answer. 


Below you can see the three sample Dropdowns and the available options.


This is just one simple way to begin using the new Google Docs Dropdown feature. How might you use this feature in your role? If you have any questions and would like a follow up, contact me via Gmail or Chat at ajuarez@techcoachjuarez.com.

My book, The Complete EdTech Coach: An Organic Approach to Digital Learning, co-authored with my wife Katherine Goyette is now available on Amazon. Click here to purchase. It is published by Dave Burgess Publishing. Be sure to follow the hashtag #OrganicEdTech and #CVTechTalk for updates.


Friday, April 29, 2022

Power Up Your Collaborative Lesson Design with Wipebook!


Floor to ceiling whiteboard walls are luxury most educators do not have. I am one of the fortunate educators whose learning space has floor to ceiling, magnetic whiteboard walls. They make teaching students and leading professional learning sessions a blast. But what about the times when I am not in my learning space where I don't have this amazing luxury? In those instances, Wipebook the rescue!

The Cardinal Innovation Center in Orosi, CA

When I teach and or present in spaces other than my own, Wipebook allows me to design lessons as if I was still in the friendly confines of the Cardinal Innovation Center. Pinning up Wipebook pages around the room allows me to quickly and easily increase my dry erase, writable space to give students and teachers the ability to get up and make their thinking visible. With their ideas up, on the walls, on Wipebook pages, the ease and opportunities for feedback increase tremendously. In addition, this is conducive to fostering collaboration. 

In my book, The Complete EdTech Coach: An Organic Approach to Supporting Digital Learning, my co-author Katherine Goyette and I promote a 4 C's lesson design style. We begin with a learning target/goal/standard and use a simple 4 square diagram to map out how students will engage with each of the 4 C's as a way of reaching the learning target/goal/standard. As we like to say, "When you plan with the 4 C's in mind, the tech takes care of itself."

Wipebook is great for departments and PLCs to collaboratively design 4 C's-infused lessons and learning experiences. They are lightweight, flexible, easy to transport and fit well on a tabletop. This allows all colleagues to easily gather around, brainstorm and plan. Simply gathering around a Wipebook page to design a lesson is like a family gathering to share a meal. In this instance, colleagues are sharing some edu-fellowship and fostering a culture of collaboration.

Start by writing your learning target/goal/standard at the top and drawing a basic 4 square diagram. Each of the 4 C's (communication, collaboration, creativity, critical thinking) will go in one of the 4 squares. From here, the conversation begins on how students will meet the learning target/goal/standards via each of the C's. If you download, the Wipeboard Scan app, you can easily keep a record of your planning with you and reuse the Wipebook. One of the simple, yet brilliant things about Wipebook is that they are reusable. Try doing that with chart paper! 

Below is a sample from a "Causes of WWI" lesson my colleagues and I designed with Wipebook. 


My wife (co-author) and I use Wipebook when we lead 4 C's lesson design workshops. As mentioned, they are lightweight, flexible and easy to transport. In most instances, the spaces in which we lead workshops and professional development have little to no dry erase whiteboard space. With Wipebook, we are covered.

My wife Katherine and I right before our 4 C's Lesson Design session at 2019 NSTC Conference in Palm Springs. This was the first time we used Wipebook to facilitate this session.

Below are some action shots of our first session using Wipebook. In each image, you can see how the versatility of Wipebook made it easy to facilitate collaboration. 


You can see some teams collaborating on the Wipebook while at the same time using devices to research strategies and standards. This provides a healthy balance of tech and non-tech in the lesson design process. 


As my colleague and good friend Joe Marquez says, "Teaching is a collaborative sport." Wipebook is a simple, yet powerful tool for fostering collaboration amongst educators. Many of us have fond memories of sharing family meals and the great conversations shared. Wipebook can bring a similar feel to the lesson design process. Oftentimes, lesson design can feel like a chore, and it becomes dreaded, but what if it felt more like sharing a family meal? I can't imagine much dread in that. Let Wipebook help you set the table.

My book, The Complete EdTech Coach: An Organic Approach to Digital Learning, co-authored with my wife Katherine Goyette is now available on Amazon. Click here to purchase. It is published by Dave Burgess Publishing. Be sure to follow the hashtag #OrganicEdTech and #CVTechTalk for updates.