Friday, August 21, 2020

Use a Second Screen to See Your Students While Sharing Screen in Zoom


One of the most common questions I get asked is about how to see my students while sharing my screen on Zoom. It's not the easiest thing in the world to do, but it is possible. To pull this off, you will need a second screen. If you're not sure how to set up a second screen, please contact me and we can discuss options as it depends on your computer and the input/output ports. 

The way I do it is with an old monitor I had in my home office. This monitor has an HDMI input. My laptop is a MacBook Pro. At Walmart, for $30, I found a USB-C to HDMI cable to connect my monitor to my MacBook. Once connected, I adjusted the display settings to extend my screen.

When my students are in my Zoom meeting, I select Gallery View.  I share my screen and choose Desktop 2. When I share the screen, I can see my students in a column. This column can be stretched horizontally on my laptop's screen. This allows me to see the kids on the laptop and share my "lesson" screen on the monitor. 


What you see above is a countdown timer I displayed for students during some work time. On the laptop, I can see all my students while they are working. 

If you have any questions and would like a follow up, contact me via Gmail or Hangouts at ajuarez@techcoachjuarez.com. If you would like to unsubscribe from this blog, go to bit.ly/tcjinbox.


Wednesday, August 19, 2020

Facilitate Thin Slides within Google Classroom


Thin Slides is a versatile and simple way to get students engaged by listening, speaking, presenting and more. For teachers, you can use it to activate prior knowledge, check for understanding and break up the monotony of a lesson. 

Normally, this is done by creating a slidedeck in Google Slides, setting the permissions to Can Edit and pushing the link out to students via email, Share or Google Classroom. 

Doing it those ways works just fine, but there are some drawbacks. One common drawback is students not staying on their slide, accidentally or purposefully. Below is my idea to facilitate this activity, but avoiding accidental or purposeful errors on the students' parts.

Step 1: Start an assignment in Google Classroom. Click Create and choose Slides. Be sure to put detailed instructions and expectation.


Step 2: Title your slidedeck. Only put one slide.

Step 3: In the assignment, select Make a copy for each student.

Step 4: Open the assignment to view the student submissions.


Step 5: After students have submitted their slides, open the first student's slidedeck when ready to present. Use the arrows to go to next student's slide as you move through the Thin Slides activity.


The GIF below shows what it would look like presenting each student's slide.


If you have any questions and would like a follow up, contact me via Gmail or Hangouts at ajuarez@techcoachjuarez.com. If you would like to unsubscribe from this blog, go to bit.ly/tcjinbox.


Thursday, August 13, 2020

Chefs Taste Their Food, Teachers Add Themselves as Students in Google Classroom

Great chefs and cooks like to taste their food while they cook. They do this to try to ensure the restaurant patron's culinary experience is the best it possibly can be. Teaching with Google Classroom is no different. To ensure your lesson delivery and student experience is the best it can be, the teacher needs to see the student end of Google Classroom. My advice for doing this is to add yourself as a student in your Google Classrooms. 

You can do this by going to the People Tab and inviting your personal Gmail account as a student. Granted, your school or district's domain must allow for outside the domain accounts to join. If so, your personal Gmail account can allow you to have the student perspective of all of your Google Classrooms.

After doing this, one piece of advice would be to turn off the Google Classroom notifications in your personal account. Every time you assign or post something, from the teacher perspective, your personal Gmail address will be getting a notification. It could get a little annoying. 

Step 1: Go to People Tab and click the Invite button in the Students section

Step 2: Enter your personal Gmail address, select it and click Invite

The personal Gmail address will appear greyed out and it will say "(invited)" until you open the invitation in your personal account and accept the invitation. Upon acceptance, the account will appear the same as any other student enrolled in your Google Classroom.


If you have any questions and would like a follow up, contact me via Gmail or Hangouts at ajuarez@techcoachjuarez.com. If you would like to unsubscribe from this blog, go to bit.ly/tcjinbox.


Google Tasks and Calendar for Students and Teachers


Distance teaching and learning poses a variety of challenges. One of those challenges is staying on top of the seemingly endless stream of emails.  One way to help stay on top of email action items is to use Google Tasks. 

Google Tasks can be found in the side panel of Gmail, Calendar, Drive, Docs, Slides and Sheets. Tasks allows you to create quick, at-a-glance "to-do's" that can have time-based reminders. If you attach a time-based reminder, this task will also appear on your Calendar. 

An email message in Gmail can be turned into a task in Google Tasks. If you have action items or required work in an email, you can simply add that message to your Google Tasks to help you remember to complete the action. The series of screenshots below shows you how. 

The examples below are for a student. These processes will work the same for teachers. Each time a student gets an assignment or announcement in Google Classroom, an email is generated. Students can take that email, from Classroom, and it to Google Tasks to set a reminder to do the work.

Step 1: Open the email message and click the Add to Tasks button.


Step 2: After clicking the Add to Tasks button, the email message will appear in Google Tasks on the side panel. Click Edit (pencil button) to augment the task


Step 3: After clicking the Edit button, you edit the title, add details below, add a date/time reminder and set it to repeat if you want.


This is what it looks like with added details and a time/date reminder.


Step 4: Make sure Tasks is turned on Google Calendar. This will allow any task with a time/date reminder to appear in your Google Calendar.


This is what it will look like when Tasks is turned on Google Calendar.


If you have any questions and would like a follow up, contact me via Gmail or Hangouts at ajuarez@techcoachjuarez.com. If you would like to unsubscribe from this blog, go to bit.ly/tcjinbox.


Monday, August 10, 2020

Parents and Google Classroom Tip: Add as Guardians or Students


Maintaining a strong communication loop with parents is more important than ever with distance learning. Here are three ways to do so with Google Classroom. 

1. Add parents as Guardians

In Google Classroom People Tab, each student (enrolled using a GSuite for Education address) will have a button that says Invite Guardians. When you click it, you will enter that student's parent email address. This will send reports of that student's work and progress to the parent's email address weekly. 

2. Add parents as Students

If you have parents that are very hands-on and want to really get the student experience to better help their child, add the parent email address as a student. The same way, in the People Tab, you invite a student, you can invite the parent as a student to the Classroom. One thing to be aware of when doing this is that your school or district's domain must allow accounts outside the domain to join the Classroom. Talk to your school's tech coach or IT person for info on this. 

This video shows how add parents as Guardians or Students.


3. Give parents the student login

Your school's data system (ie. Illuminate) usually has reports listing your students' email addresses and passwords. You can pass this along to parents to have them login as the student for them to help. 

Adding parents as students and giving parents their child's login info do pose the potential hazard of cheating. I tend to assume the best of intentions, but it would be naive of me not at least consider this possibility. 

If you have any questions and would like a follow up, contact me via Gmail or Hangouts at ajuarez@techcoachjuarez.com. If you would like to unsubscribe from this blog, go to bit.ly/tcjinbox.


Friday, July 31, 2020

Don't Forget About Paper and Pencil in Distance Learning


When you think of distance learning, one of the first terms that comes to mind is digital. Since the schools shut down, teachers have been scrambling to transform their paper and pencil activities and lessons to a digital format. As an edtech coach, I have been helping teachers with this transition. In light of this transition, I recommend not forgetting about paper and pencil. It may sound odd from someone like me, but I am a big proponent paper and pencil activities during distance learning.

If you've been following me on various social media platforms, you aware of my fondness for sketchnotes. My sketchnoting mentor Sylvia Duckworth has many great tools and strategies for sketchnoting digitally. If interested, follow her on Twitter. I have always preferred the paper and pencil method of sketchnoting. For years, I have scanned student-generated paper/pencil sketchnotes and posted them on my Cardinal Innovation Center website. In a distance learning world, there is no opportunity to scan student-generated paper/pencil sketchnotes. But never fear, the Google Classroom mobile app is here.

The Google Classroom mobile apps for iOS (iPhone, iPad) and Android as well as using the camera on Chromebooks/laptops makes sketchnoting and other paper/pencil activities in distance learning possible. The videos below show how students can turn in an image of handwritten work to Google Classroom in iOS, Android and Chromebook. Feel free to share these videos with teachers and students.

iOS

Android

Chromebook

If you have any questions and would like a follow up, contact me via Gmail or Hangouts at ajuarez@techcoachjuarez.com. If you would like to unsubscribe from this blog, go to bit.ly/tcjinbox.

Thursday, July 30, 2020

Back to School Google Classroom Tips: Stream Settings and Classwork Resources Topic


It's almost time to head back to school, but for many of us, it's not the back to school we were used to. More teachers than ever before will be relying on Google Classroom to facilitate distance learning. Anything we can do to streamline Google Classroom will be beneficial for students. Here are two of my favorite tips to better organize the Google Classroom Stream and Classwork tabs.

Announcements Only in the Stream

In the years I've used Google Classroom, I noticed students struggle to find easily find assignments while "fishing" through the Stream. By default, the Stream displays class announcements and class assignments. My recommendation is to separate the two. One quick setting change will keep all class assignments out of the Stream and only in the Classwork tab. This will make it easier for kids to navigate.

To enable this, go to the settings button in Google Classroom. Scroll down to the setting that says "Classwork on the Stream". If it says either "Show Attachments and Details" or "Show Condensed Notifications", switch it to "Hide Notifications". At the top, click Save.  This will prevent assignments posted in Classwork from clogging up the Stream. Kids will know the Stream is for class announcements and Classwork is for assignments.

Resources Topic in Classwork Tab

In a physical classroom, we create bulletin boards for kids to easy, quick access to a variety of learning materials. In distance learning, using Google Classroom, it's a little bit different. My recommendation for this is to create a "Resources" topic in Classwork. What I have done in the past is create Materials under a Resources topic that are links to a variety of websites and resources that students refer to often. I keep this topic "pinned" to the top. Doing this gives students easy, quick access to these resources.

The video below explains each of these tips.


If you have any questions and would like a follow up, contact me via Gmail or Hangouts at ajuarez@techcoachjuarez.com. If you would like to unsubscribe from this blog, go to bit.ly/tcjinbox.

Wednesday, July 22, 2020

Grow Your PLN with Facebook Groups


This blog post comes at a bittersweet time. In the past week, my subscribers have surpassed the 150 mark. Thanks to all who have subscribed. I'm honored that so many people take the time to read my thoughts and ideas. On the other hand, this is only the second blog post of the summer. I am normally more frequent in my blog posts, but a few weeks ago, my dad, Lou Juarez, passed away suddenly at the age of 80. Edtech blogging has been on the back burner since then, but I am getting back in the "blogging saddle" as it is very therapeutic. Click here to read about my dad's amazing life.


A popular hashtag amongst educators is #bettertogether. This hashtag spreads the message of sharing resources and ideas amongst educators. It reinforces the spirit of collaboration. Since the COVID-19 crisis has juxtaposed the way we do school, the spirit of this hashtag has spread like wildfire. Traditionally, teachers have taught in silos. They were given the keys to their room, handed a textbook and taught the best they knew how. This isn't an environment conducive to collaboration. With the crisis, many teachers who were still stuck in this mindset have shed those shackles and reached out like never before. Teachers who dreaded me, the tech coach, entering their room or striking up a conversation, immediately felt the need to reach out and learn to adapt to the changing landscape. Many of these teachers are beginning to branch beyond their instructional coaches into social media to continue to learn. 

If you're reading this blog, you're a connected educator that knows the value of a PLN (Personal Learning Network). You're an educator who's active on Twitter and member of EDU Facebook and Voxer groups. If you're looking to continue to grow your network or would like to help get a colleague starting growing theirs, take a look below at some of my favorite Facebook Groups to join. Becoming a connected educator was a watershed moment in my career. Hopefully you can connect with more people to support you through the turbulent changes currently going through education.


Facebook, recently, has put a huge emphasis on Facebook Groups. Some of the Facebook Groups TV commercials have been pretty clever. Educator Groups have been flourishing. It used to be common for educators to be on Twitter for professional networking and Facebook for personal stuff. That is no longer the case. The beauty of Facebook Groups is that you can connect with other educators without having to "friend" them. Check out some of my recommended Facebook Groups.

#EduMatch: Founded by Sarah Thomas, #EDUMatch is like the match.com for educators connecting educators with other educators that match subject, grade level etc. 


#ToTheEdgeEDU: This group is centered around the stories and philosophy of Nevada educator Kyle Anderson and his book of the same name. It's a great resource to connect with educators who share stories of risk taking and resilience.


Teachers Using Google Suite for Education: This group is a worldwide group for people to find support for anything dealing with Google Suite for Education.


#CVTechTalk: Founded by my wife Katherine Goyette and I, this group is an offshoot of our weekly Twitter edchat where we discuss edtech and pedagogy. The CV stands for the Central Valley of California, but all educators worldwide are invited to join the conversation. 


Site Leaders Connect: This group is the official Facebook Group for my wife, Katherine Goyette's Google Innovator project. Its purpose is to connect educational leaders with each other and spread a culture of innovation amongst administrators, coaches and leaders. If you know an educational leader looking to find inspiration, this group and website has a treasure trove of 15 minute insight interviews.


Facebook for Education Group: This is a worldwide group for educators to ask questions and get support for anything in education. Responses come quickly so if you're looking for a good "first group" to join, this is the one. 


The Suite Talk: Founded by fellow Google Certified Trainer Kim Mattina, this group is another great community for getting cutting edge ideas and support using GSuite tools.

If you have any questions and would like a follow up, contact me via Gmail or Hangouts at ajuarez@techcoachjuarez.com. If you would like to unsubscribe from this blog, go to bit.ly/tcjinbox.


Monday, July 6, 2020

DIY Greenscreen


The 2020 COVID-19 shelter-in-place mandate has made quite the impact on how educators go about our jobs. The mandate fostered a shift to distance learning and brought tools such as Zoom and Google Meet to the forefront. One of the most popular Zoom features is the virtual backgrounds. Virtual backgrounds are fun as well as good tools for maintaining privacy when working from home. 

To maximize the virtual backgrounds feature, you are going to want to have a green screen. Without one, your virtual background image isn't as clear and when you move, your body can disappear on camera. Having a green screen doesn't require professional videography experience. For roughly $50-60, you can transform your home office space with a DIY green screen. Here is how I did it.

1. At local hardware store, purchase a small spool of twine, string or rope. For a few more dollars, grab a package of drywall anchors. The anchors come with screws in the bag. Also grab a pair of eye hooks or  carabiners.


2. Head to Amazon to grab a roughly $40 9x12 green screen. I chose those dimensions because it stretches nearly the entire width of my home office.

3. Drill in the anchor and then insert the screw. Repeat this on the opposite wall. 


4. Thread the string, twine or rope through the slit atop the green screen. Tie your eye hooks or carabiners to each end and hook them up to the screws on each wall. Be sure to make the string as taut as possible. 


5. You now have the ability to stretch the screen across the width of the room and move it to side as needed. If you need to take it down for storage, simply unhook the eye hooks or carabiners and roll it up nicely.

If you have any questions and would like a follow up, contact me via Gmail or Hangouts at ajuarez@techcoachjuarez.com. If you would like to unsubscribe from this blog, go to bit.ly/tcjinbox.


Friday, May 29, 2020

Organize Your Workflow with Google Chrome Tab Groups


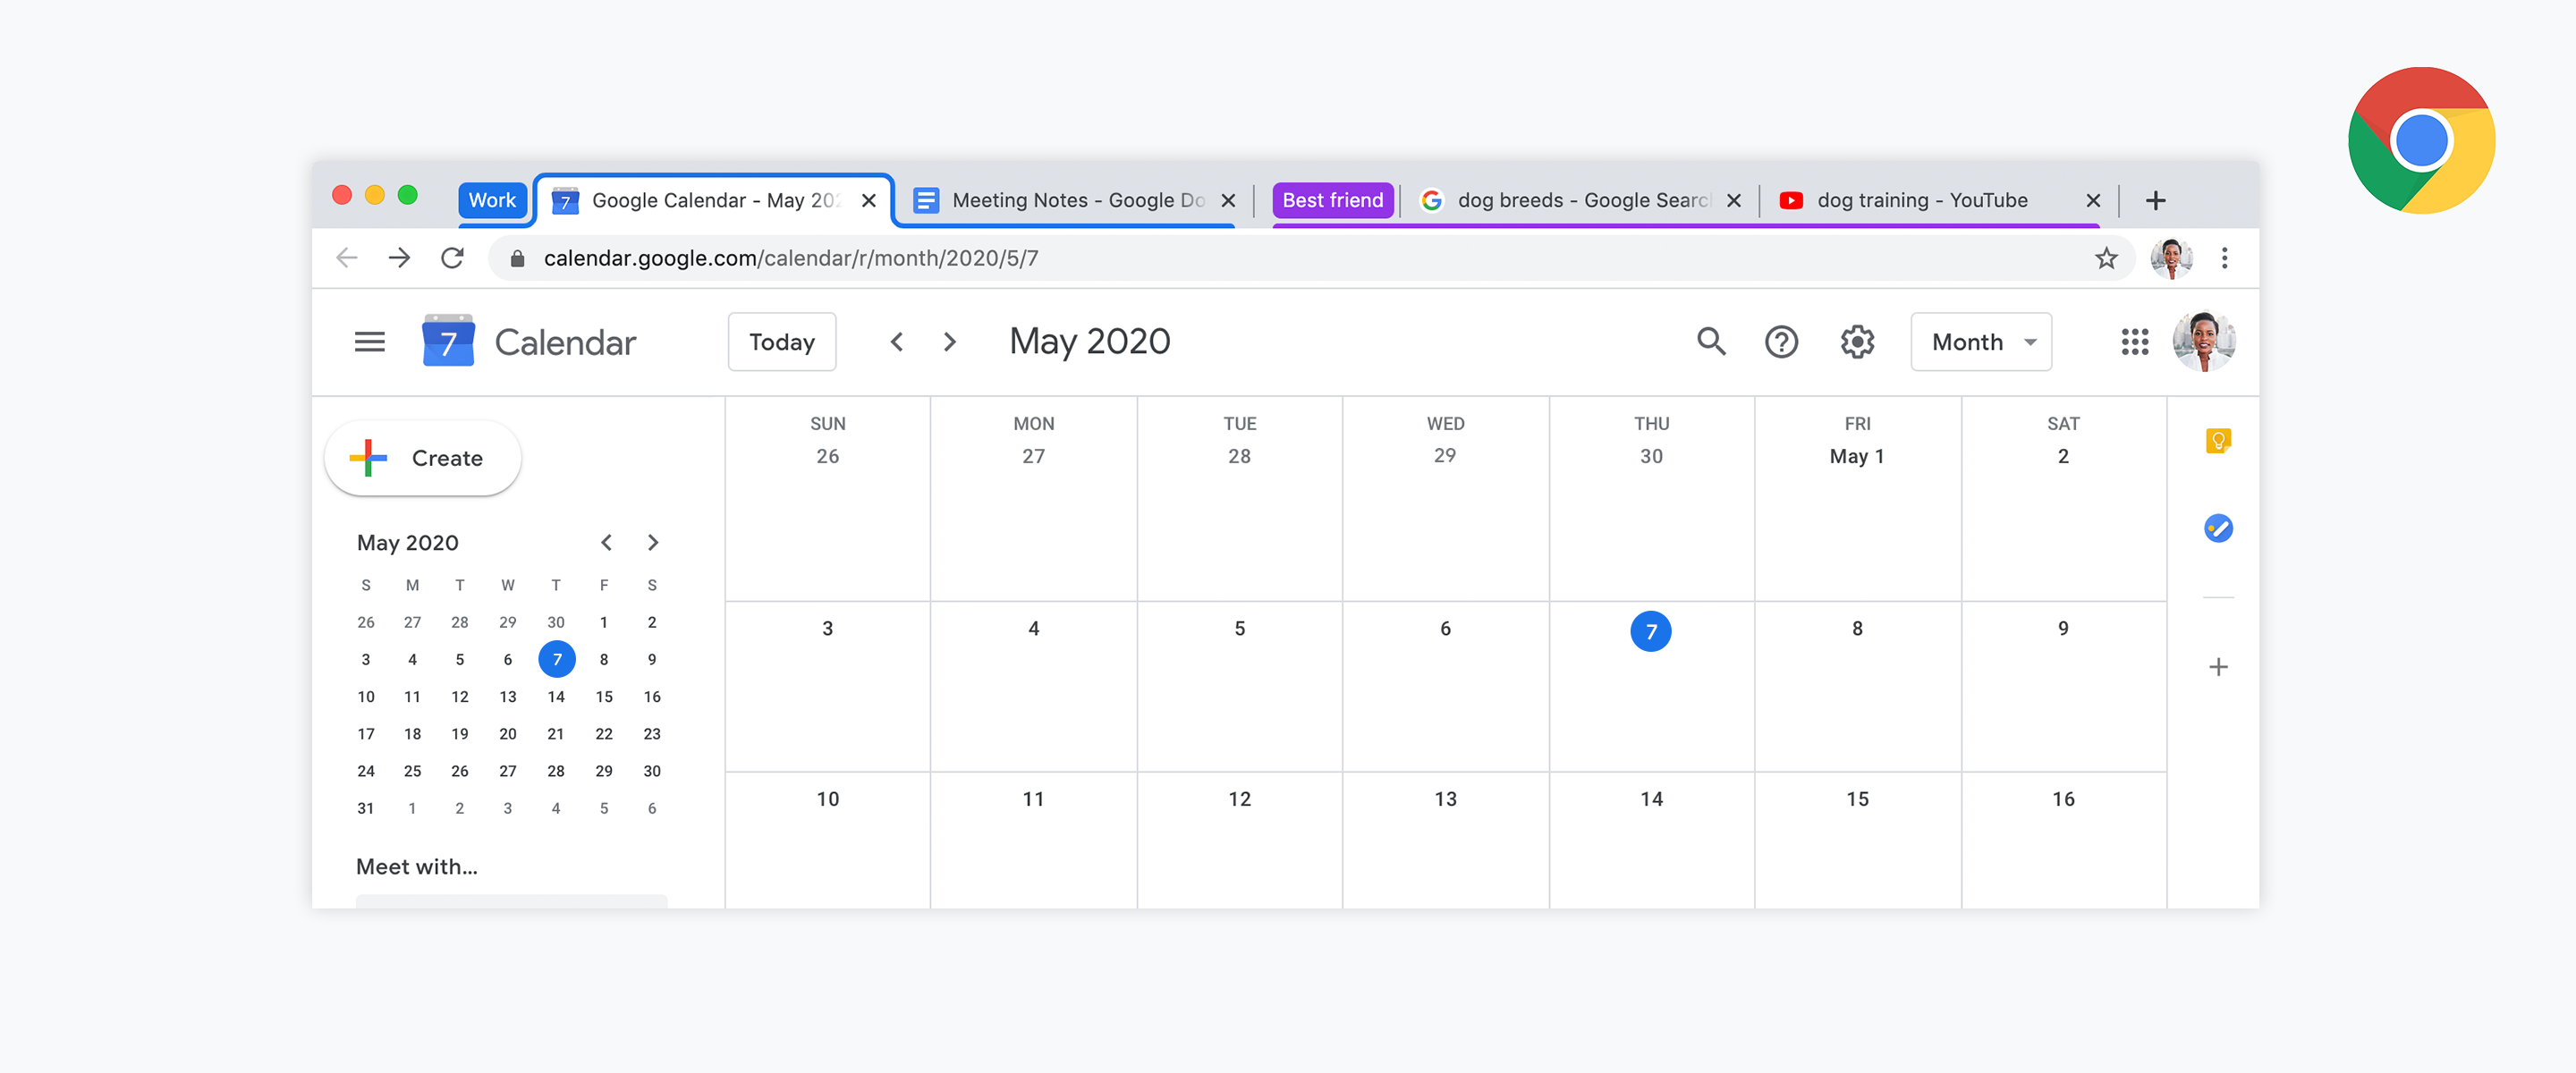
Organize your tabs with tab groups in Google Chrome

Whether you're a Google Chrome tab minimalist or hoarder, this new Chrome update will be useful. In the past week, Google has pushed out Chrome Version 83 and part of this version is the ability to group tabs. The grouping are completely up to you. Group them to fit your workflow and how your brain works. 

For starters, you will need to update your Chrome browser to Version 83. To check, click on the three dots in top right corner of browser, select settings and, in settings, select About Chrome. 


Near the top, you'll see your Chrome Version. If it says up to date, you should be able to use Chrome Tab Groups. If not, you should see an option to update Chrome. Be sure to update to access this feature. (In my screenshot, I've already updated.)


Once updated and the feature is live, you access Chrome Tab Groups by right clicking on a tab.


You can rename the group by clicking on the colored dot just to the left of the first tab in the group.


Below the box where you rename the tab group, you can choose a color to color code your tab groups.


A way this has improved my workflow is how I have groups of tabs for each class period I teach. For each class period tab group, there is a a tab for that class' Google Classroom, Illuminate Online Gradebook, Flipgrid Grid, Quizizz game and Quizlet study set. For me, as a tab hoarder, this is great. This allows me to not have to go into any of those tabs and switch classes or accounts. Many times, during class period transitions, I forget to switch accounts for a new period and valuable time is lost while kids wait for me to get into the correct account. This way, they're all open and at a glance. In addition, I keep a group of tabs titled "Work" for my Gmail, Calendar, Drive, etc.

The silent video below shows you how to place a tab into a new group and move tabs to existing groups.


If you have any questions and would like a follow up, contact me via Gmail or Hangouts at ajuarez@techcoachjuarez.com. If you would like to unsubscribe from this blog, go to bit.ly/tcjinbox.


Wednesday, May 27, 2020

Flipgrid for Families


Flipgrid | Empower Every Voice

Flipgrid is absolutely one of my favorite education apps. They are always adding cool new features. I'm loving the new whiteboard and screencasting features. As a teacher of a large amount of English learners, it is a great app to foster listening and speaking skills. In our current situation of distance learning, Flipgrid is becoming more popular. Teachers are relying on it for student wellness check-ins, checking for understanding, learning demonstrations and more. 

If you're new to Flipgrid, like any tech tool, practicing with it in a non-formal, fun setting is a great way to learn how to use it for educational purposes. For example, I mastered Zoom by hosting video calls for virtual happy hours with friends and family. With Flipgrid, you can do the same. 

During the quarantine, my daughter Ashleigh turned nine. Her birthday, obviously, had to be augmented from the traditional birthday parties we've had for her in the past. Since we couldn't gather to sing her Happy Birthday, I shared a Flipgrid topic with friends and family on social media, via text and email. Using this topic, they were able to record a Happy Birthday greeting and or song.

20 people recorded a greeting. What really hit me about those who recorded the greeting is that the vast majority of them were not educators. Even amongst educators, Flipgrid is still growing, but to those outside the realm of K-12 education, it is virtually unknown. Many figured out relatively easily how to use the Flipgrid platform. Others messaged me for help before figuring it out. 

As I reflect on this experience, using Flipgrid for this manner was a very organic way learning the tool as an educator and for reaching parents. It gave parents an opportunity to learn a new app with their kids. As students use it more and more for academic purposes, finding ways to help parents help their kids with Flipgrid, and other apps, is important. Many of my non-educator friends and family thought Flipgrid was pretty cool and were excited to see their kids use it for school purposes in the future. 


Moral of the story is this. A great way to learn the ins and outs with Flipgrid, other "new to you" apps, is to experiment with friends and family. Set up a happy birthday Flipgrid topic for a loved one. At family game night, play Quizizz, Kahoot or Quizlet Live for a fun topic. Doing this can familiarize non-educator parents with these apps and help them better support their students when they use them for school purposes. 

Click here to see Grandma Jan, who has no Flipgrid experience, sing a great rendition of Happy Birthday.
Click here to see Ashleigh's friend Ella sing Happy Birthday. Ella is being assisted by her parents.

If you'd like to learn how to get started with Flipgrid for the first time, click the links below to access a slide deck and view a how-to video.


Thursday, May 14, 2020

Setting Up External Speakers in Zoom and Google Meet


Since this whole distance learning adventure began, I have had the privilege of supporting hundreds of teachers who are learning to use Zoom and Google Meet. As teachers have gotten more comfortable with these tools, they have been taking more and more relative "tech risks".  Since they've been forced to work from home, many have invested their own money in new tech tools. A common purchase has been external, bluetooth speakers. Often times, the built-in computer speakers don't provide the sound quality to effectively participate in a video call with students and or colleagues. As more and more teachers have been making speaker purchases, I have received a number of requests for help enabling the speakers in Zoom and Google Meet. 

The images below shows you where to go to choose your external speaker instead of your default, built-in computer speakers when participating in Zoom and Google Meet. If using a bluetooth speaker, it must be paired and connected at that time with your computer to show as an option.


Change your speaker in Zoom (desktop client)


Change your speaker in Google Meet

If your external speaker is connected via bluetooth, it will appear in the circled list.


If you have any questions and would like a follow up, contact me via Gmail or Hangouts at ajuarez@techcoachjuarez.com. If you would like to unsubscribe from this blog, go to bit.ly/tcjinbox.